Lesson 5 - The GENERATE and TERMINATE Blocks: Transaction Entities
A GPSS Transaction is an object with a set of attributes. Each Transaction is distinct in that it can be identified by a unique Transaction Number. Transactions created in a simulation are numbered consecutively starting with 1. In addition, you can change the attributes associated with each Transaction. Attributes are in the form of priority, scheduled time, Assembly Set, and "Transaction Parameters", which are given user ASSIGNed names or numbers. Transaction Parameters are like the letters in the mail carrierís bag that are addressed to one person. The Parameters carry information about the Transaction that is unique to that Transaction only. You can use Snapshot Windows to look at information that is carried in these Parameters. Transactions pass from Block to Block in a simulation, acting on, and being acted upon by other GPSS Entities.
Unlike general purpose programming languages, each Transaction in GPSS maintains a place marker. Whereas there is only one place in a computer program to be remembered, in a GPSS simulation there may be thousands, with thousands of Transactions located in many different Blocks. Transactions do not necessarily start at the top of the program. A GPSS simulation may have many GENERATE statements, each of which creates many Transactions, each of which has a place marker.
Transactions can be created in a batch, or at spaced out time intervals by a GENERATE Block. All simulations must have at least one GENERATE Block. Letís consider the case where a new Transaction is created every 60 time units. The specific unit of time does not matter as long as we are consistent throughout. Letís say that one time unit represents a second. Then, the appropriate form of the GENERATE statement for a Block which creates a new Transaction every minute is:
GENERATE 60 ;Create a new Transaction
Since GPSS World has a floating-point clock, we could also represent generation of Transactions at one minute intervals by
GENERATE 1 ;Create a new Transaction
Then if we needed to represent a one second interval it could be represented by 1/60 of a minute or 0.01666667. You should choose the representation that is most meaningful in your model. If you use an expression here, it must be parenthesized.
Start a GPSS World Session as we have done before.
CHOOSE
File / Newand since the model is already selected
SELECT
OKand type the GENERATE statement from the previous page in the Model Window that appears. Then, translate your one line model. Start by pressing the Tab Key.
PRESS
[Tab]TYPE
GENERATEPRESS [Tab]
TYPE
60PRESS [Tab]
TYPE
;Create a new TransactionWe have only used tabs so the model will line up. It is not necessary for the parts of your GPSS model line to be in certain columns, but it does make it easier to read. You can change the tabstops by editing the Settings of the Model Object. We will show you how, later.
Now,
CHOOSE
File / Save Asand in the dialog box in the highlighted area
TYPE
MyModeland
SELECT
SAVEThen,
CHOOSE
Command /Create Simulationand
CHOOSE
Window / Simulation Window / Blocks WindowYou should see your GENERATE Block in the Blocks Window. Blocks are always numbered starting with 1. This is the "Details View" of the Blocks Window where the most important information about each Block is listed in columns.
Let's turn off the "Details View".
CHOOSE
View / Entity DetailsThis "toggles" the window into and out of "Details View". In this non-details view, succeeding Blocks are generally placed beneath their predecessors. When the next Block wonít fit beneath its predecessor, it is moved up to the top of the next column to the right. The arrangement of the Blocks is also due to the size of the window and will change if you resize the window.
Let's move back to off the "Details View".
CHOOSE
View / Entity DetailsTERMINATE Blocks remove Transactions from the simulation. When a Transaction enters a TERMINATE Block, the Transaction is destroyed. Also, there is an optional operand that will decrement a special number called the "Termination Count". When you type START 123, you are setting the Termination Count to 123. This controls how long the simulation should run by itself. If you place a 1 in operand A of a TERMINATE Block, every time a Transaction is destroyed by that Block, the Termination Count is reduced by 1. When the Termination Count becomes 0 or less, the simulation ends and, unless suppressed by Operand B of START, a Standard Report is written automatically. The Termination Count can be less than zero when the simulation ends if Operand A of the TERMINATE Block is greater than 1.
Letís add a TERMINATE Block to our model. Click on the Title Bar of the MyModel.gps Model Window. In the Model Window start a new line after the GENERATE Block line. With the cursor at the end of the GENERATE Block line
PRESS
[Enter]then
PRESS [Tab]
TYPE
TERMINATEPRESS [Tab]
TYPE
1PRESS [Tab]
TYPE
;Destroy a TransactionCHOOSE
Command / RetranslateNow, click on the Title Bar of the Blocks Window. Another way to get to the Blocks Window is to could click on the appropriate item in the window list under the Windows menu of the Main Window.
Figure 5ó1. The Blocks Window with a two Block Model
These two Blocks represent a tiny simulation. They could represent a situation where a customer arrives at a store every minute, precisely on the minute. Not very likely, but later you will see how to change the model to match your specific situation. For now, letís use this model to study what happens in a simulation.
The clipboard operations of Cut, Copy and Paste are available as you build your model. Large segments of blocks can be selected and then replicated, moved, or deleted this way. Feel free to experiment with this powerful feature. Multiple Block selection and the clipboard operations are discussed in the GPSS World Reference Manual.
Before we begin the simulation, you must know about two lists of Transactions called the Current Events Chain, and the Future Events Chain. To understand these chains, you must keep in mind the "system clock", which tells what the current simulated time is. Each Transaction has an attribute that indicates when it must attempt its next Block entry. If the current simulated clock time has not yet reached that time, the Transaction must be put aside until the simulation is ready for it. Thatís what the Future Events Chain is for. The Future Events Chain is a holding area for Transactions that are scheduled to do something in the future.
Every time a Transaction enters a GENERATE Block, a second Transaction is created. This new Transaction does not enter the GENERATE Block right away. Instead, it is placed on the Future Events Chain according to the arrival time interval you specified in the GENERATE Block.
The Current Events Chain is the set of Transactions that still have Blocks to be entered at the current system clock time. Transactions are taken from the front of the Current Events Chain, one at a time, to enter as many Blocks as possible. When there are no more Transactions on the Current Events Chain, GPSS World will advance the system clock.
Letís take a look at the Current Events Chain and the Future Events Chain in our Current Model. First set up a Stop Condition that will cause the simulation to stop on each attempted Block entry.
Make sure the Blocks Window has the focus. You should now see two blocks
CLICK ON
The Generate Block IconIn the debugging icons in the Debug Toolbar at the top of the Blocks Window, you will see a place icon in the form of a stop light.
CLICK ON The Place Icon in the Debug Toolbar at the Top of the Window
This will place a STOP on the Generate Block. The Simulation will stop on an attempted entry into the GENERATE Block. The STOP command is discussed in Chapter 6 of the GPSS World Reference Manual. Before we even start, letís see whatís on the Current Events Chain and the Future Events Chain.
CHOOSE
Window / Simulation Snapshot / FEC SnapshotCHOOSE
Window / Simulation Snapshot / CEC SnapshotNothing on the CEC, but there is one Transaction on the FEC! Thatís because the GENERATE Block was "primed", thereby creating its first Transaction when we issued the STOP Command. Once we issue a START Command, Transaction 1 will be moved to the Current Events Chain and the time will be set to 60.
Close each of the Snapshot Windows.
CLICK ON
The X-Upper Right of Each WindowThese windows are not like the windows that you select under Window / Simulation Window. Snapshots are static views of the current condition and will not change as the simulation runs. They can be refreshed by halting the simulation and opening the window when you are ready for current information. Although you don't really have to halt the simulation, doing so keeps the information in the Snapshot Window consistent with the current state of the simulation.
Make sure you can see the entire Journal Window. Click on its Title Bar if you need to.
CHOOSE
Command / STARTand in the dialog box, replace the 1
TYPE
100SELECT
OKThis sets the Termination Count to 100, moves Transaction 1 to the Current Events Chain, and begins the simulation. But remember that we have set up a Stop Condition. That is why the simulation stops before the first Block entry, and writes a 2 line message in the Journal Window. We could also put a Stop Condition on any Block using the Stops menu in the Blocks Window. As we shall see shortly, current Stop Conditions can be viewed in a special Simulation Snapshot window.
Letís make Transaction 1 enter the GENERATE Block. Weíll use the STEP 1 Command, which has been preloaded into function key p. It will be available until you change it.
PRESS
[F5]Now, look at the Current Events Chain and the Future Events Chain using the same mouse clicks that we did a minute ago in the Window / Simulation Snapshot Menu.
Your windows should look like this.
Figure 5ó2. CEC Snapshot-Unexpanded View.
Figure 5ó3. FEC Snapshot
.
Now, look at the FEC Snapshot so you can see all the information about the Transaction waiting to enter the simulation. On the FEC the Time is the "Block Departure Time" (BDT) which is the system clock time when Transactions on the FEC are scheduled to come back into the simulation. The Next Block column shows the number of the Block to be entered next by each Transaction. Block number 1 is the GENERATE Block and Block number 2 is the TERMINATE Block. Transaction 2 is waiting to enter the GENERATE Block.
Now letís look at the Expanded View of the CEC. With the focus on the CEC Snapshot Window
CLICK ON
The + in the CEC Window
Figure 5ó4. CEC Snapshot. Expanded View.
Transaction 1 has entered the GENERATE Block, thereby creating Transaction 2, which goes onto the Future Events Chain. Transaction 1 is on the Current Events Chain, with M1, its time of entry into the simulation at 60 seconds, and Transaction 2 is on the Future Events Chain, ready to enter the GENERATE Block when the simulated clock time becomes 120 seconds. The GENERATE Blockís job is to bring in a new Transaction every 60 simulated seconds. You will see this information in the various views of these windows. Later we will see that Transaction Parameters can be easily accessed in these windows.
Close the Snapshot Windows as we did a few minutes ago.
Letís see what time it is right now. Activate the Journal Window as we did above
CHOOSE
Command / SHOWIn the dialog box:
TYPE
AC1CHOOSE
OKAC1 is the SNA that returns the value of the absolute system clock. Transaction number 1 will move as far as it can in the Current Model at time 60. When it can move no further, it is taken off the Current Events Chain.
Letís load the SHOW command into [F8].
CHOOSE
Edit / SettingsThen, page forward in the Model Settings Notebook to the Function Keys Page.
In the F8 box
TYPE
SHOW AC1SELECT
OKTransaction 1 is about to be destroyed by entering the TERMINATE Block. Letís let it do so.
PRESS [F5]
The Transaction will move one Block in response to a STEP 1 command that has been caused by a single keystroke. Transaction 1 has been destroyed. The next Transaction to move in the simulation is Transaction 2, which has just been taken off the FEC.
Transaction 1 is gone. Since that depleted the Current Events Chain, there was nothing more to be done at time 60. GPSS World then advanced the clock to the next scheduled time of 120. Transaction 2 was then taken off the Future Events Chain and placed on the Current Events Chain. The Future Events Chain is now empty. However, Transaction 2 is about to enter the GENERATE Block. This will create Transaction 3 and schedule it for 60 time units into the future. Then Transaction 2 will go on its way. Letís allow Transaction 2 to enter the GENERATE Block.
PRESS [F5]
Now, look at the chains.
CHOOSE
Window / Simulation Snapshot / CEC Snapshotand with the CEC Snapshot Window having the focus
CLICK ON
The + Signthen in the Main Window
CHOOSE
Window / Simulation Snapshot / FEC SnapshotSize the windows and move them one above the other. Then elongate them so you can see all the information. See? Transaction 3 is now on the Future Events Chain at time 180, and Transaction 2 is ready to enter the TERMINATE Block. When it does, it will be destroyed, and the simulation will have nothing more to do at time 120.
Oh yes! Remember that Transaction 1 already entered the TERMINATE Block. That means that the Termination Count was decremented by 1. Letís check TG1, the SNA that returns the remaining Termination Count. In the Model Window menu
CHOOSE
Command / SHOWthen
TYPE
TG1in the dialog box.
SELECT
OKThe value is written to the Journal Window and also to the Status Line at the bottom of the Main Window.
Of course! We set up the TERMINATE Block to subtract 1 from the Termination Count every time it is entered by a Transaction. Since it has been entered once, the Termination Count is now 99. If we would remove the Stop Condition, and let the simulation run, it would stop automatically when the Termination Count reached 0.
Now youíre on your own for a minute. Your assignment is to load other commands into the function keys and to become totally familiar with the creation and movement of Transactions to the Current Events Chain. Please take some time now to study these things. Use the Snapshot Windows to study these changes. When youíre done, please close up any Snapshot Windows that are open.
Welcome back. I hope you feel good about the Current Events Chain and the Future Events Chain.
Now, letís open an Expression Window on the Clock, the Termination Count, and the Active Transaction number.
CHOOSE
Window / Simulation Window / Expression Windowin the dialog box, for the Label
TYPE
Clockand for the Expression
TYPE
AC1CLICK ON
ViewCLICK ON
MemorizeView allows you to see the expression in the current Expression Window, and Memorize will allow you to save the information with the simulation so you will not have to enter the information the next time you want to display it in a Plot or Expression Window. You can also enter expressions that you wish to save with a model by using Edit / Settings and Clicking on the Expressions tab. You must save the model in order for expressions that are entered here to be saved These expressions will be memorized and will be available to be viewed the next time you create a simulation from this model.
Now, add the next expression. Type in the next Label and Expression in the dialog box deleting the previous entries.
TYPE
Act. Xactand
TYPE
XN1CLICK ON
ViewCLICK ON
Memorizeand repeat the procedure for the third expression. In the dialog box for the Label and Expression,
TYPE
Term Ct.and
TYPE
TG1CLICK ON
ViewCLICK ON
MemorizeClose the Edit Expression Window Dialog
SELECT
OKYou should now see the new Expression Window.
Now letís speed things up a bit. Let's remove all Stop Conditions.
CHOOSE
Window / Simulation Snapshot / User StopsCLICK ON Remove All
SELECT
OKLetís look at the Blocks Window again.
CLICK ON Anyplace on the Blocks Window
Now,
PRESS [F5]
several times to observe the effects of the movement of Transactions on the system clock and the Termination Count. Notice, in the Blocks Window, that each Block flashes after it has been entered by a Transaction, not before.
When you are ready, use either the Continue icon in the Debug Toolbar at the top of the Blocks Window or the loaded Function Key to continue the run.
CLICK ON
The Continue Icon in the Debug Toolbar at the Top of the Windowor
PRESS [F
2]The simulation will end soon and write a report. You can examine the report later, if you like.
We have covered a lot of ground. Letís review. To schedule a Transaction to come into the simulation at some future time, GPSS World places the Transaction on a chain of Transactions called the Future Events Chain, or FEC. The FEC is ordered by increasing values of scheduled time. In other words, a Transaction scheduled at time 200 will precede a Transaction scheduled at time 300. When there is nothing more to do at any given simulated clock time, GPSS World takes Transaction(s) off the Future Events Chain that have the lowest scheduled time value. It is precisely this action that causes the system clock to advance. Since the system clock jumps over time durations where no events occur, it is often possible for a discrete event simulation to run much faster than the real process being simulated.
The Current Events Chain, or CEC, is used as a holding area for Transactions that still have things to do at the current simulated clock time. When there are no more Transactions on the CEC, it means that there is nothing more to do at the current simulated time instant. GPSS World then moves all Transactions scheduled at the lowest time on the FEC to the CEC, and advances the system clock to the new value.
Please note that when Transactions scheduled to reenter the simulation at the same time are moved from the FEC to the CEC, their order is randomized. This prevents certain unintended synchronization sequences from developing. You can prevent this randomization by setting time tie randomization to zero in the Random Page of the Model Settings Notebook. If you wish to view this setting
CHOOSE
Edit / Settingsto move to the Random Page.
An important rule to remember is that the simulated clock time advances every time a Transaction or Transactions must be taken from the Future Events Chain. As you can see, time in a digital computer simulation does not flow smoothly. A simulation usually consists of many Block entries at a given clock time, followed by a sudden jump to the next clock time. As far as the interpretation of the simulation goes, all GPSS Block entries occurring at a given clock time are occurring instantaneously! The quick jumps to each new time instant often allow simulations to run much faster than the real time process being modeled. A simulated time duration is always associated with new Transactions being taken from the FEC.
When you use the INTEGRATE Command to automatically maintain a continuous variable, a mathematical integration algorithm is employed between discrete time instants to update the continuous variables. Such mixed simulations proceed in alternating discrete and continuous phases. But more on this later, in the lesson on continuous modeling.
Thatís all for now. Go ahead and end the GPSS World Session.
CLICK ON
The X-Upper Right of the Main Windowand answer the questions asked in the dialog boxes. We have added a TERMINATE Block since we saved the model. If you want to use the model in the next lesson, answer "No" no to the "Do you want to save changes ..." question for the Simulation Object (.sim) and the Report Object (.gpr), and "Yes" to the save question for the Model Object (.gps).
In the simple simulation we studied in this lesson, the Transactions that represented the customers did not do anything! They entered the store and disappeared in the same instant. To be realistic, we must have the customers spend time before departing. We obviously must have a way to cause a time delay in the simulation. This is discussed in the next lesson. See you then.
Lesson 6 - The ADVANCE Block
Before starting this lesson, letís review how a simulation works. Remember that the Future Events Chain, the FEC, is a chain of Transactions in increasing order of scheduled times. When all the Transactions scheduled for the current time have done all they can do, the most imminent Transaction(s) are taken from the FEC, and the system clock is advanced. Such Transactions are kept in a first come first served (within priority) holding area called the Current Events Chain, or CEC.
The highest priority Transaction on the CEC is the Active Transaction. A simulation consists of the Active Transaction entering first one GPSS Block, then the next, until it can enter no more. When the Active Transaction can no longer move, it is removed from the CEC. Then another Transaction becomes the Active Transaction. If the CEC is empty, the next Active Transaction must come from the FEC, by moving one or more Transactions from the FEC, to the CEC. Remember, it is precisely the act of taking the most imminent Transaction(s) from the FEC that makes the system clock advance.
In the last lesson we learned how GPSS World simulates time durations by placing Transactions on the FEC, and moving them to the CEC at the end of the simulated duration. This was controlled by a GENERATE Block. In this lesson, you will learn how to use the ADVANCE Block to cause existing Transactions to experience simulated delays.
Letís take another look at the simulation we used in the last lesson. It simulated the arrival of customers at a store. Recall that in the simulation, we represent the situation where customers arrive precisely 60 seconds apart.
Letís begin. Start a GPSS World Session. See Lesson 1 if you are unsure of how to do this.
If you have not deleted MYMODEL.GPS from Lesson 5, open it now otherwise,
CHOOSE
File/ Newand since the model type is already selected
SELECT
OKTYPE
GENERATE 60 ;Create a new Transactionand on the next line
TYPE
TERMINATE 1 ;Destroy a TransactionSave the model using
Save As like we did in Lesson 5.Create the simulation.
CHOOSE
Command / Create SimulationNow, open the Blocks Window.
CHOOSE
Window / Simulation Window / Blocks WindowNow, set up a Stop Condition that will cause the simulation to stop on each attempted entry into the TERMINATE Block.
CLICK ON The TERMINATE Block Icon
in the Blocks Window, then
CLICK ON
The Place Icon in the Debug Toolbar at the Top of the Windowto place a Stop condition on the TERMINATE Block and then return to the Journal / Simulation Window
CLICK ON Anyplace on the Journal / Simulation Window.
then
CHOOSE
Command / STARTand in the dialog box replace the 1,
TYPE
1000SELECT
OKThis sets the Termination Count to 1000, and begins the simulation. But remember that we have set up a Stop Condition. That is why the simulation stops on the first attempt to enter the TERMINATE Block. Now, look at the Current Events Chain and the Future Events Chain.
CHOOSE
Window / Simulation Snapshot / FEC Snapshotand
CHOOSE
Window / Simulation Snapshot / CEC SnapshotCLICK ON The Plus Sign in the CEC Snapshot Window
Transaction 1 is on the Current Events Chain, and Transaction 2 is on the Future Events Chain, ready to enter the GENERATE Block when the simulated clock time becomes 120 seconds. Transaction number 1 does all its Block entries at time 60, and then the clock is advanced. Transaction 1 is about to be destroyed by entering the TERMINATE Block. Before we continue, close the FEC and CEC Snapshots.
CLICK ON The X-Upper Right of the Main Window
Now, letís continue. Make sure that the focus is on the Blocks Window.
PRESS
[F5]to step one Block entry.
Letís look at the simulated clock time.
CHOOSE
Command / SHOWand in the dialog box
TYPE
AC1The current time is 120.000, as we can see in the Status Line of the Main Window. This is the simulation entry time for Transaction 2. Letís load the SHOW command into [F8].
CHOOSE
Edit / SettingsIn the notebook go to the Function Keys page and to the right of F8
TYPE
SHOW AC1SELECT
OKTransaction 1 is gone. Since that depleted the Current Events Chain, the simulation jumped to the next scheduled time at 120 seconds. Transaction 2 was taken off the Future Events Chain and placed on the Current Events Chain, thereby advancing the system clock to 120.
Transaction 1 did not spend any time in the simulation. All its Block entries occurred at a single simulated instant, namely when the system clock was at 60 seconds. In the case of a simulation of customer arrivals, we would have to interpret this as a succession of customers arriving, but spending no time in the store. We must get each Transaction back onto the Future Events Chain to simulate the passage of time while the Transaction is still in the simulation. Then the Transaction would be taken off the Future Events Chain after the system clock had advanced further. The GPSS ADVANCE Block is what we need! Operand A of the ADVANCE Block is the time increment at which the Transaction should be scheduled to come off the Future Events Chain. Letís set this up for Transaction 2 in our simulation. First, insert the ADVANCE Block after the GENERATE Block. In the Model Window, position the cursor at the end of the GENERATE Block line and
PRESS
[Enter]or
CHOOSE
Edit / Insert Linethen
TYPE
ADVANCE 61 ;Cust browses 61 sec.Now that you have added a new Block, you will have to retranslate the model. Make sure that the focus is on the Journal Window to keep track of messages as we Step through the simulation.
CLICK ON Anyplace on the Journal / Simulation Window
and
CHOOSE
Command / RetranslateIn the simulation in the last lesson, Transaction 2 left the simulation at time 120, before Transaction 3 arrived (at 180). Now, however, Transaction 2 will stay in the simulation 61 time units. The ADVANCE Block will cause this to happen. This means that Transaction 3 will arrive before Transaction 2 leaves. Let's see if this is true. First let Transaction 2 enter the GENERATE Block. This will create, and schedule Transaction 3 to come in at time 180.
In the Blocks Window we had put a Stop Condition on the TERMINATE Block before we Retranslated. Stops work by block number and survive a Retranslation. The TERMINATE was Block number 2. Now, the ADVANCE Block is block 2 and the Stop will be on it. Start the simulation.
CHOOSE
Command / STARTIn the dialog box replace the 1,
TYPE
1000SELECT
OKThe simulation will stop when Transaction 1 tries to enter the Advance Block.
PRESS
[F5]to make the Transaction enter the ADVANCE Block.
Look at the CEC and the FEC as we did before by opening the appropriate Snapshot Windows. If you donít remember how to do this, look back to the beginning of this chapter.
Do you see Transaction 1 on the FEC at time 121 as well as Transaction 2 on the CEC scheduled to move at time 120? Your windows should look like this.
Figure 6ó1 FEC Snapshot.
Figure 6ó2. CEC Snapshot-Expanded View.
PRESS
[F8]and you will see (in the Status line of the Main Window) that the clock has been updated to time 120. Step twice more.
PRESS
[F5]two times. Now, check the time again by pressing:
PRESS
[F8]Notice that since Transaction 2 was the last Transaction on the Current Events Chain, the system clock was advanced immediately when Transaction 1 was taken from the FEC at time 121. The time is now 121. Once again, you should look at the FEC and CEC to understand which Transaction is on which chain. Notice that Transaction 2 is on the FEC, and will not be active until time 181. Letís continue. Step two more times.
PRESS [F5]
two times and then look at the location of the Transactions on the chains. When you stepped, you should have caused Transaction 1 to leave the ADVANCE Block and be TERMINATEd. Then, Transaction 3, which has been scheduled to enter the simulation at time 180, will enter the GENERATE Block. Show the current time.
PRESS [F
8]Transaction 3 has entered the GENERATE Block creating Transaction 4. Transaction 3 will take its turn entering the ADVANCE Block next.
Please take time now to understand what is happening. Transaction 3 is about to be placed on the FEC behind Transaction 2 and 4, at time 241 (180+61). The current time is 180, and Transaction 2 will become active at time 181. For the simulated second between time 180 and 181 both Transactions will be on the FEC using up part of their 61 second browsing intervals. This is the first second of Transaction 3ís interval and the last second of Transaction 2ís interval. For this one simulated second, both customers are browsing in the store.
PRESS [F5]
and
PRESS [F5]
Now, notice that Transaction 2 has become active, and that the time is now 181. Transaction 2 is about to leave the simulation at this time since it will enter the TERMINATE Block next. It has just left the ADVANCE Block. Look at snapshots of the CEC and FEC as we did before to establish which Transactions are on which chain. When you have studied the SNAPSHOTS and feel comfortable with the location of the Transactions and their movement times,
PRESS [F5]
PRESS [F
8]Transaction 2 has left the simulation. It arrived at time 120, and left at time 181. That means we have simulated its browsing time to be 61 seconds. Thatís exactly what we wanted the ADVANCE Block to do for us.
If we interpret Transaction 2 to represent "customer number 2", we conclude that the customer browsed in the store for 61 seconds, leaving 1 second after the arrival of customer number 3.
GPSS is much more than a programming language. Unlike programming languages, GPSS has many points of control. When you interrupt a program written in C or BASIC you need only know which statement is next. GPSS is different. Thereís usually more than one Transaction in the simulation at any instant, and each one can be ready to enter a different GPSS Block! So, we see that unlike a programming language, which always knows which one statement is to be executed next, GPSS has a place marker for each Transaction. This allows you to have each customer in a simulation doing or waiting for a different thing. The use of multiple place markers is one of the reasons that GPSS is a more powerful simulation language than are programming languages like BASIC or FORTRAN or C. Each Transaction in GPSS knows which Block it is to enter next, and there may be thousands of Transactions.
Once again, we now leave you on your own. Your assignment is to continue to use the STEP, and SHOW commands and the Chain Snapshot Windows until you are quite comfortable with the action of the ADVANCE Block to represent a simulated time delay. Use pencil and paper to calculate when future events should be scheduled. Feel free to experiment. Try modifying the ADVANCE Block, but donít forget you must retranslate after you make changes. You can make the simulation more realistic by using operand B of ADVANCE to randomize the delay times. If you want to venture this far, you should read about the ADVANCE, GENERATE, and TERMINATE Blocks in Chapter 7 of the GPSS World Reference Manual. Return to the tutorial when you are ready.
Welcome back. Did you see that the ADVANCE Block simply places a Transaction back on the FEC to simulate a time delay? It causes the delayed Transaction to be processed at precisely the right simulated time.
Remember that the simulated clock time advances every time a Transaction must be taken from the Future Events Chain. A simulation usually consists of many Block entries at a given clock time, followed by a sudden jump to the next clock time. As far as the interpretation of the simulation goes, all GPSS Block entries occurring at a given clock time are occurring instantaneously!
If you want to experiment some more with the ADVANCE Block, please do so.
For now,
CLICK ON
The X-Upper Right of the Main WindowYou decide if you want to save the Simulation or the Model with the ADVANCE block for further experimentation. This will end the GPSS World Session.
Well, now we can simulate customers browsing in the store. But what about when customers want to engage a salesman? A salesman will certainly only talk to one customer at a time. If we do nothing other than add an ADVANCE Block, we will simulate the case where more than one customer has engaged the salesman at the same time. Remember how both Transaction 2 and Transaction 3 were using up their 61 second delays during the same simulated second (180-181) ?
If a customer needs a full 61 seconds of the salesmanís time, we must not start counting until the customer begins talking to the salesman. In other words, we cannot allow a Transaction to enter the ADVANCE Block until it has engaged the salesman. And we must stop any Transaction that tries to engage a busy salesman.
As you might expect, GPSS provides Blocks (SEIZE and RELEASE) to do this. Weíll discuss them in the next lesson. See you then.
Lesson 7 - The SEIZE and RELEASE Blocks: Facility Entities
Before starting this lesson, letís review how a simulation works. Remember that the Future Events Chain, the FEC, is a chain of Transactions in increasing order of scheduled times. When all the Transactions scheduled for the current time have done all they can do, the most imminent Transaction is taken from the FEC, and the system clock is advanced. All transactions scheduled for the new time are removed. Such Transactions are kept in a first come first served (within priority) holding area called the Current Events Chain, or CEC. The top Transaction on the CEC is called the "Active Transaction". A simulation consists of a series of Active Transactions, each entering as many GPSS Blocks as possible. When one Active Transaction has nothing more to do, another Transaction is chosen to be the Active Transaction. Block entries at a single clock time occur instantaneously, with no simulated time duration.
Good. Now that thatís out of the way, letís recall what happened in the last lesson. We simulated customers browsing in the store, but we did not cause them each to fully engage a salesman, one at a time. Let us assume that each customer must spend 61 seconds talking to a single salesman. To simulate this, we cannot let a Transaction enter an ADVANCE Block immediately, because that would start counting off the 61 second interval, even if the salesman were talking to another customer. If the salesman is already talking to a customer, we want any succeeding Transactions to be prevented from entering the ADVANCE Block. To do this, we can use a GPSS Entity called a Facility, and the associated Blocks, SEIZE and RELEASE. The Facilities Window is available for viewing Facility Entities.
A GPSS Facility Entity has several attributes, the most important of which is ownership. When a Facility is owned by a Transaction, it is said to be busy. Otherwise, it is said to be idle. Only one Transaction can own a Facility, and ownership is acquired by entering a SEIZE Block which names that Facility in its A operand. Transactions attempting to acquire ownership of a Facility by entering a SEIZE Block are denied entry into the SEIZE Block until the Facility is idle. This prevents the movement of Transactions that are waiting to gain ownership of the Facility. The would-be SEIZEing Transaction stops moving in the simulation until its turn for ownership comes up. Such Transactions are removed from the CEC, and placed on the Facilityís "Delay Chain" until they can assume ownership of the Facility.
An owning Transaction continues to move in the simulation, and owns the Facility until it enters a RELEASE Block naming that Facility in its A operand. As you can see, the SEIZE and RELEASE Blocks are exactly what we need to keep our "customer" Transactions from entering the ADVANCE Block before they have engaged the salesman. Only when a Transaction comes off the FEC and enters a RELEASE Block, does the next simulated customer get to talk to the salesman.
Letís try out these new Blocks.
Start a GPSS World Session as we have before. See Lesson 1 if you are unsure of how to do this,
CHOOSE
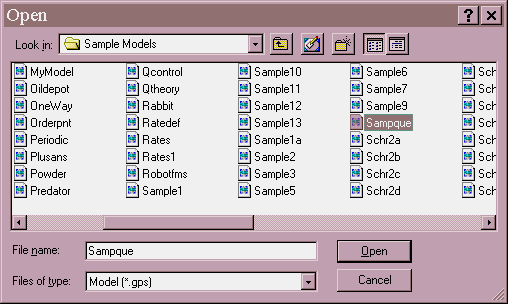
File / OpenSince you know how to enter statements in building a model, we have provided this one for you. All you have to do is select Seizemod from the model list. You will see that the model has the following Blocks.
GENERATE 20 ;Customer arrives
and
SEIZE SALESMAN ;Customer engages salesman
and
ADVANCE 41 ;Customer talks to salesman
and
RELEASE SALESMAN ;Customer gives up salesman
and
TERMINATE 1 ;Customer leaves
Create a simulation.
CHOOSE
Command / Create SimulationNow, let's put a STOP on the GENERATE Block
CHOOSE
Window / Simulation Window / Blocks WindowNext,
CLICK ON The GENERATE Block Icon
CLICK ON The Place Icon in the Debug Toolbar at the Top of the Window
This will set up a Stop Condition that will cause the simulation to stop on each attempted entry into the GENERATE Block.
CHOOSE
Command / STARTin the dialog box, replace the 1
TYPE
1000and
SELECT
OKor
PRESS
[Enter]The Function key [F5] is also set to cause you to be able to step through the simulation with a single keystroke. Function key [F8] has been set to show us the clock time. Remember, you can set any of the function keys to SHOW expressions or System Numerical Attributes (SNAs).
Letís move the first Transaction one step into the GENERATE Block.
PRESS
[F5]Look at the Journal Window. The message will tell you that Transaction 1 is about to enter the SEIZE Block. It will be able to do so because the salesman is idle. Letís also view the Current and Future Events Chains.
CHOOSE
Window / Simulation Snapshot / CEC Snapshotand in the CEC Snapshot Window,
CLICK ON
The + Signfor a closer look at the individual Transaction on the chain.
CHOOSE
Window / Simulation Snapshot / FEC SnapshotAfter you have viewed the Events Chains, close them. If you want to print them first, select
File / Print.Transaction 1 is on the CEC ready to enter the SEIZE Block. Transaction 2 is on the FEC scheduled to enter the simulation at time 40.
Give the Blocks Window the focus.
CLICK ON
Any place on the Blocks WindowNow, letís allow Transaction 1 to gain ownership of a Facility Entity used to represent the salesman.
PRESS
[F5]Transaction 1 is still the Active Transaction, i.e., first on the CEC. It is now the owner of the Facility that represents the salesman. Letís check by opening the Facilities Window.
CHOOSE
Window / Simulation Window / Facilities WindowThis is a representation of the Facility Entity that represents the salesman. Donít worry about the details of this window, as we will study it later. For now, find the "Owner XN" heading and notice that Transaction 1 is the owner. Transaction 1 is ready to begin the 41 second interval during which the customer will be talking to the salesman, by entering the ADVANCE Block.
PRESS
[F8]and
CHOOSE
Window / Simulation Snapshot / FEC SnapshotPRESS
[F8]The ADVANCE Block has placed Transaction 1 on the FEC. The customer it represents will disengage the salesman at time 61. Notice that the current time is 40. Actually, we can read it off the Title Bar of the Snapshot window as well as in the Status Line.
Before we go any further, letís look at the Blocks Window.
CLICK ON
Any place on the Blocks Windowto make it the Active Window.
Now, letís move the current Transaction, number 2 one more Block.
PRESS
[F5]Transaction 2 is about to attempt to SEIZE the salesman at time 40. It will not be able to do so. Transaction 1 owns the salesman.
PRESS
[F5]and
PRESS
[F8]and
CHOOSE
Window / Simulation Snapshot / FEC Snapshotand
CHOOSE
Window / Simulation Snapshot / CEC SnapshotWhat happened to Transaction 2? Where is it? Transaction 2 attempted to enter the SEIZE Block but was denied entry and placed on the Delay Chain of the salesman Facility. By refusing to let Transaction 2 enter the ADVANCE Block, we have not yet started on the 41 seconds that Transaction 2 must pass while owning the salesman Facility. Letís look at the Facilities Window.
CLICK ON
Any place on the Facilities Window
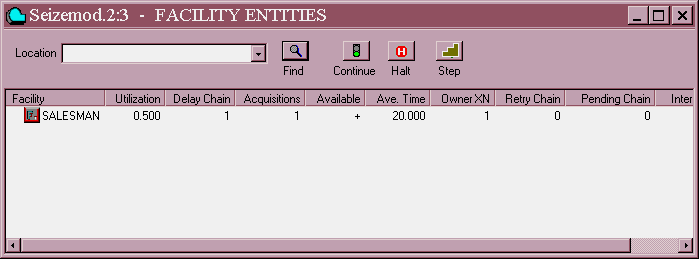
Figure 7ó1. Facilities Window. Detailed View.
You will see that there is one Transaction on the Delay Chain for the Facility.
CHOOSE
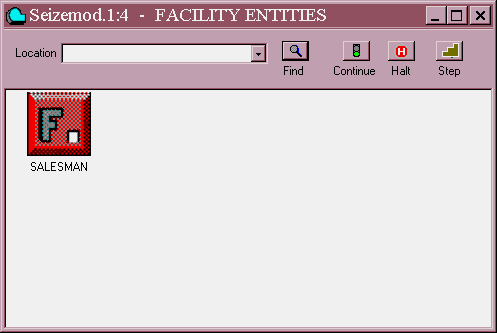
View / Entity DetailsWe are now looking at the non-detailed view of the salesman Facility. See the small column representing a queue containing one Transaction? Transaction 2 is on the Delay Chain of the Facility Entity that represents the salesman.
Figure 7ó2. Facilities Window. Non-detailed View.
Letís continue.
PRESS
[F5]PRESS
[F8]The removal of Transaction 2 from the CEC depleted it. Since Transaction 3 was next on the FEC, the system clock has been advanced to 60. Transaction 1 will be finished talking to the salesman at time 61, and will be ready to disengage by entering the RELEASE Block. Make the Blocks Window the active window
CLICK ON
Any place on the Blocks WindowPRESS
[F5]What happened? Where did Transaction 2 come from? Transaction 1 gave up ownership of the salesman Facility when it entered the RELEASE Block. This made the Facility idle. Since Transaction 2 was next on the Delay Chain of the salesman Facility, it was automatically given ownership and allowed to enter the SEIZE Block. Transaction 3 is now on the Delay Chain waiting its turn with the salesman. Now make the Facility Window active
CLICK ON
Any place on the Facilities Windowand return to the detailed view.
CHOOSE
View / Entity Details
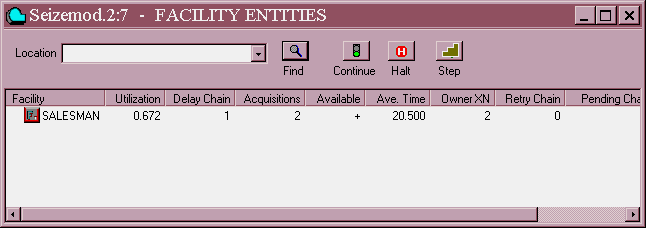
Figure 7ó3. Facilities Window. Detailed View.
See? Transaction 2 owns the Facility, and there is 1 Transaction waiting to own it.
Just a quick note here: You can minimize any of these windows when you donít want them by clicking on the minimize button in the upper right corner of the window. Then you can quickly reopen the window by clicking on the window's icon in the lower left of the Main Window. However, always be aware that when on-line windows are minimized or open, they will slow the running of your simulation. An alternative is to use the Windows / Tile menu command to organize all your windows.
Transaction 1 has entered the RELEASE Block, thereby allowing Transaction 2 to enter the SEIZE Block. Transaction 2 will enter the ADVANCE Block when it gets its turn as the Active Transaction. Transaction 2 immediately takes possession of the Facility even though it is not the active Transaction. It does so by entering the SEIZE Block. This prevents a Transaction that might be transferred from elsewhere in the simulation to the SEIZE Block from jumping ahead of the next rightful owner, Transaction 2.
Transaction 2 is ready to enter the ADVANCE Block, now that it has engaged the salesman. But first, Transaction 1 will leave the simulation by entering the TERMINATE Block.
PRESS
[F5]and
CHOOSE
Window / Simulation Snapshot / FEC Snapshot
Figure 7ó4. FEC Snapshot.
and
CHOOSE


