Chapter 1. Using GPSS World
How This Manual Describes Actions
This tutorial is designed to lead you gradually through the powerful simulation features of GPSS World. Most choices will be made from drop down menus or dialog boxes.
Actions you are asked to make immediately are represented by verbs in uppercase. For example, when you see PRESS, CHOOSE, CLICK, DOUBLE CLICK, SELECT, or TYPE, you are to perform the action, yourself. When actions are referred to, but you are not asked to do them immediately, the verbs are shown in lower case.
Words representing objects or denoting concepts specific to GPSS World are often shown in Italics for emphasis, when first encountered, or capitalized when used frequently. GPSS verbs are generally shown in all capitals. For example, SHOW is an Immediate Command.
Keystrokes you are required to make are indicated the name of the key enclosed in an outline. For example, "PRESS
[Enter]" means that you are to press the key labeled "Enter" on your keyboard.When more than one key must be used, the key symbols are separated by a plus sign(s). For example,
[Ctrl] + [Alt] + [H] means that you are to press and hold the first two keys, while you press and release the right one. With two keys, press and hold the left one then press and release the right.Mouse actions are required when the capitalized phrases CLICK or DOUBLE CLICK appears. This means that you are to use mouse button 1 to perform the action. When mouse button 2 is needed, it will be called for explicitly. By default, mouse button 1 is the left mouse button, and 2 the right. You can use the system control panel to switch these assignments.
Menu items are indicated in a bold
Times New Roman font. When more than one level of selection is necessary, they are shown in the order: menu bar item / pull down menu item / cascade menu item. For example,CHOOSE
File / Openmeans that you should use either the mouse or the keyboard to choose the "Model" item in the menu bar. Then you should choose the "Open" item in the pull down menu. In this example, there is no cascade menu item. For purposes of nomenclature in this manual, "CHOOSE" is used for menu items, "SELECT" is used for other choices.
Dialog window controls are also shown in a bold
Times New Roman font. For example,SELECT
OKmeans that you should use the mouse to select the OK button or in some cases the Proceed button in the dialog window to process your selection. In either of these cases you can also use the keyboard to process your selection. To do this,
PRESS
[Enter]Characters you are to type into a Model Window are indicated in a bold
Courier New font. For example,TYPE
GENERATE 100means that you are to type the characters "GENERATE 100", making sure the Model Window has the focus, and that the text cursor has been positioned to the right place in the window.
Finally, programs in the Windows directories or on the Desktop are described with underlining For example,
DOUBLE CLICK ON
The GPSS World Session Iconmeans that you are to view the desktop or a Windows folder containing the icon that represents the GPSS World Session Object, and you are to position the mouse pointer over it and double click mouse button 1. Parts of the windows, other than menu items, such as debugging icons are also indicated with underlining.
Menu Operation
You can use either the mouse or the keyboard to choose menu items. In multistep selections, a selection cursor appears to show you which item is about to be chosen. A selection cursor is a dotted line or a "pressed" appearance around a menu item. The [Alt] key, when pressed, will select the first item in the main menu giving it a "pressed" appearance. The
arrow keys can then be used to move back and forth over the menu items. The [Enter] makes the final selection.Using the Mouse
There are two ways to use a mouse to choose a menu item. You can position the mouse pointer over the item to be chosen, and then press and release mouse button 1. You can do this in the menu bar, a pull down menu, or a cascade menu.
Alternately, you can press mouse button 1 and not let up immediately. Instead, you can drag over the item in the pull down menu and over the item in a cascade menu to be chosen, and then release the button. You may find this combined action quicker, although there are keyboard shortcuts, as well.
Using the Keyboard
The keyboard alone can be used to make menu choices. If any menu actions are highlighted, press [Esc]
.If the cursor is presently in a window, press [Alt] to position the menu selection cursor on the first item of the menu bar. Now you can move the selection cursor by using the arrow keys
. Press [Enter] to make the final menu item choice.Alternately, you may be able to simply press a mnemonic key. These keys are denoted by the underlined letters occurring in the menu items. After entering keyboard selection mode by pressing [Alt], you can press mnemonic keys to choose succeeding menu items. For example [Alt] then [C] will cause the Command Menu to drop down.
Some items have shortcut key combinations listed in the menu, to the right of the item. You can immediately choose a menu item, simply by pressing this key combination. Of course, for you to be able to do this, that window has to have the focus.
Finally, when you see
SELECT
OKyou may instead choose to use the keyboard and
PRESS
[Enter]This works in all dialog boxes except the Custom Command Dialog that is that is reached via the Command Menu. The Custom Dialog allows for multiple commands to be entered. The [Enter] key starts a new line in this dialog box.
Model Windows
When a GPSS World Text Window has the focus, keystrokes usually cause the replacement or insertion of characters into the window. The [Ins]
key can be used to change between insert mode and replace mode. The mode is indicated by the shape of the blinking text cursor, which also indicates the insertion point in the window.Either the keyboard or the mouse can move the text cursor. Clinking mouse button 1 moves the text cursor to the position under the mouse pointer. The arrow keys,
[Home], [End], [PgUp], and [PgDn] all move the text cursor, as does normal text insertion and deletion.A new line of text can be started by pressing
[Enter].Selected text is shown in inverse, and can take part in special operations. You can select text by dragging mouse button 1 over the target text, by pressing [Shift]
, and clicking mouse button 1 on the end of selected text, or by double clicking on the word to be selected.You can delete characters, one at a time, by pressing
[Del] or backspace. Pressing [Del] deletes the character to the right of the cursor; pressing backspace deletes the character to the left of the cursor. Selected text can be deleted by choosing Edit / Cut , or by pressing [Del] . A single level undo is available by choosing Edit / Undo .Dialog Boxes
Although the GPSS World dialog boxes are all different, they do have some things in common.
Mouse selection is normally used to set the focus in entry fields, and make selections in each dialog. Usually, the
[Enter] key will select OK, the [Esc] key will select Cancel, and the [F1] key will select Help.Getting Help
On-line Help is available when you
CHOOSE
Helpin a dialog window, or when you
PRESS
[F1]Once the On-line Help Facility is activated, you can use a variety of search techniques for information. If you highlight a keyword in a Text Window and press the Help Window will open on detailed information for that keyword. This is useful for getting information on things like GPSS Blocks, Commands, PLUS library procedures, and probability distributions.
Universal Keys
Several keys, and key combinations are effective no matter which GPSS World
TM window has the focus. They are generally used to control a simulation in progress by quickly activating frequently used commands.The Accelerator Keys
Accelerator keys are key combinations that immediately enter a menu command into GPSS World. Usually, they are listed just to the right of the menu item they effect. They are enabled only when their associated menu item is. To activate an accelerator key, hold down all keys in the combination except the last, then press the last key, then release all keys.
GPSS World Hot Keys
Hot keys are quick ways to send GPSS World Commands to a Simulation Object. They are:
[Ctrl]+[Alt]+[S] - Create Simulation
Text View Navigation Keys
Navigation Keys let you jump to specific locations in a Text View. They are:
- Previous Error[Ctrl]+[Alt]+[B] - Next Bookmark
[Ctrl]+[Alt]+[G] - Go To Line
[Ctrl]+[Alt]+[N] - Next Error
[Ctrl]+[Alt]+[P]
Editing Accelerators
Editing is faster using Text Edit Accelerators instead of menu selection. These keys are:
[Ctrl]+[Z]
- Insert Line
[Ctrl]+[D]
- Delete Line
[Ctrl]+[I]
- Undo
[Ctrl]+[C]
- Copy to Clipboard
[Ctrl]+[X]
- Cut to Clipboard
[Ctrl]+[V]
- Paste from Clipboard
also,
[Ctrl]+[Ins]
-
Copy to Clipboard
[Shift]+[Del]
-
Cut to Clipboard
[Shift]+[Ins]
-
Paste from Clipboard
General Accelerators
There are several other general purpose keys. They are:
[Ctrl]+[O] - File Open
[Ctrl]+[S] - File Save
[Ctrl]+[P] - File Print
[Altl]+[F6] - Next Pane
[Shift]+[F6] - Previous Pane
Function Keys
Function keys can be given ad hoc assignments. You can do this in the Model Settings Notebook by choosing
Edit / Settings and selecting the Function Keys page in the notebook. Then, type in the new assignment beside the appropriate function key label. Thereafter, when you press the associated function key, the assigned Command is executed. If you use INCLUDE, you can even assign a complex Command List and/or PLUS Procedure redefinition to the function key.Some of the function keys have been preloaded for your convenience. You can change these assignments to best fit your work style. We have used some of these preassigned keys in this tutorial.
F1] = Help[
Blocks and Transactions
GPSS simulations consist of a network of "Blocks", which represent actions or delays to be encountered by a set of "Transactions", which "enter" one Block, then the next. The whole simulation is simply a sequence of one Transaction entering one or more Blocks, then another Transaction, and so on.
Your job in modeling a real system is to piece together a set of Blocks that cause Transactions to behave in a manner resembling the real (or proposed) system. For example, GENERATE Blocks introduce Transactions into the simulation at simulated time intervals of your choosing. Such Transactions could represent customers, parts, telephone calls, electronic signals, or something else.
Blocks and Transactions are only two of several GPSS Entity types. Generally, when a Transaction enters a Block, some operation is performed on a third Entity. For example, the entry of a Transaction into a SEIZE Block causes a Transaction to "own" a GPSS Entity called a facility. Facility entities are generally used to represent single owner resources.
The first few lessons in this tutorial are not concerned with the action of specific Blocks. You will start to study a small subset of them in Lesson 5. After you begin to feel comfortable with the basic methods of simulation, you should make yourself aware of what the remaining Blocks can do for you. These are listed and discussed in Chapter 7 of the GPSS World Reference Manual. However, you only need to understand a few GPSS Blocks to begin to build models.
Donít worry about the action of specific Blocks, just yet. We will begin by becoming familiar with the GPSS World Simulation Environment before we look at the GPSS language in any detail.
Well, letís get started. If you have not yet installed GPSS World on your 32 bit Windows-compatible system, please refer to the GPSS World Reference Manual and do so. Unless you are using the Student Version of GPSS World, you will need to get a numeric software key to activate your installation. Here, we'll assume all this has been taken care of.
Normally, installing GPSS World places an item on your Start Menu. Actually, it goes in the Programs submenu. If you prefer to customize your installation by adding a shortcut to GPSS World to your desktop, it's easy to do. Please consult your operating systems documentation for details. In this tutorial we will use only the Start Menu.
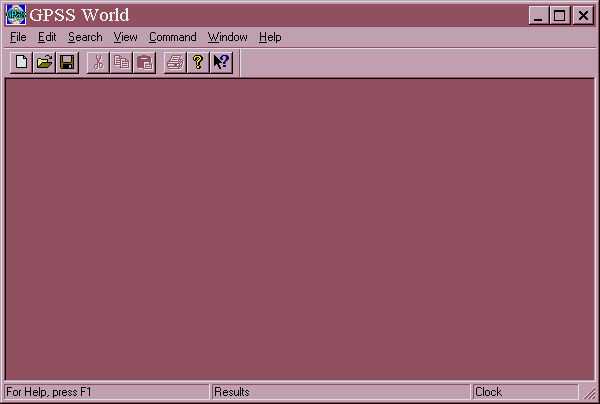
To start GPSS World click the Start button, then click Programs, and finally click GPSS World Xxxxx Version on the submenu, where Xxxxx is "Student" or "Commercial", or whatever. If a Notices Window appears, go ahead and Cancel it. You have now opened the GPSS World Main Window.
If you get any error messages you can look them up in Chapter 14 of the GPSS World Reference Manual.

Figure 1ó1. The GPSS World Main Window
There are two ways to open a Model Object. You can double click on the file icon in a Windows folder, or you can begin by opening the GPSS World Main Window as we have just done and then use File/Open as described below.
To open a model file, you will have to go to the Samples Folder. The Samples Folder is located as follows:
C:\Program Files\Minuteman Software\GPSS World ...\Sample Model Files
Now let's start to learn some of the features of your new software.
CHOOSE
File/Open
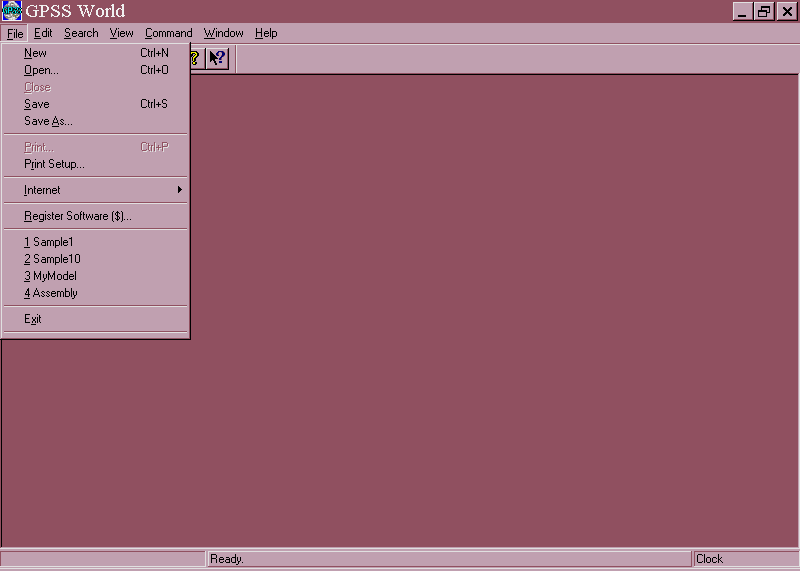
Figure 1ó2. The File Menu of the Main Window
A dialog box similar to the one shown below will appear.
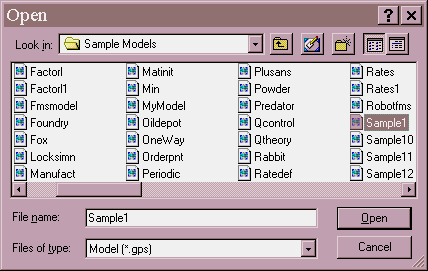
Figure 1ó3. The Open File Dialog
GPSS World Windows are described in Chapters 2 and 5 of the GPSS World Reference Manual. If you like, you may want to refer to that material. You do not need it to complete this lesson. At the end of this chapter there is an outline of the various drop down menus found across the top of the GPSS World Main Window. Choosing items from these menus causes the opening of dialog boxes into which you will enter requested information through the keyboard or with your mouse. These menus also allow you to execute commands.
Now, letís continue. Double click on the Samples Folder. You will see the list of GPSS World Sample Model Files that are available. Double Click on the icon to open SAMPLE1.GPS. You may have to use the scroll bar in the Open File Dialog to find SAMPLE1.GPS in the SAMPLES folder.
CHOOSE
Sample1SELECT
Open
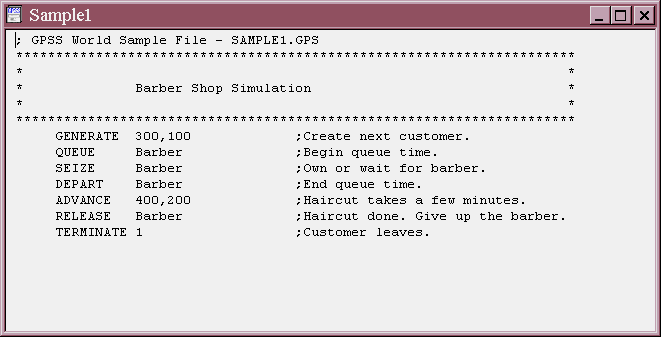
Figure 1ó4. The Model Window ó Text View of Sample1.gps
The SAMPLE1.GPS file should now be displayed in the Model Window. Youíll notice that unlike Minutemanís DOS Version of GPSS (GPSS/PCTM), GPSS World ignores any line numbers in the text lines.
However, GPSS World does use ordinal line numbers, assigned by the full screen text editor, to identify the Statement associated with errors and other conditions. You do not have to worry about these. Later, you can use the Search / Go To Line ... menu item to jump to a specific text line in the Model Window.
When you open a Model File, the model has not yet been translated and is not ready to run. Before we run the simulation, letís explore some of the settings and menu items we can use to manipulate it.
The Main Window is the starting point for GPSS World. You can use its menu to display a text view of your Model Object in a Model Window. From it you create a separate Simulation Object and from that point on, all interactions are seen in the Journal Window or Entity Windows, which are views of the Simulation Object. The Statements in the Model Object must be "Translated" in order to create the corresponding Simulation Object.
Spend a few seconds now, familiarizing yourself with the general organization of the Model Window. For easy reference, an outline of its menus is in the Appendix of this manual.
GPSS World has a full screen text editor with many features found in popular word processors. We will explore the use of this editor in a later chapter.
Letís use the File menu to Save the model to a file with a different name.
CHOOSE
File / Save Asand when the dialog box appears, enter the file name TMP in the highlighted area that currently says SAMPLE1. Then
SELECT
SaveThe file name at the top of the Model Window changes to TMP. The screen will appear as shown below.
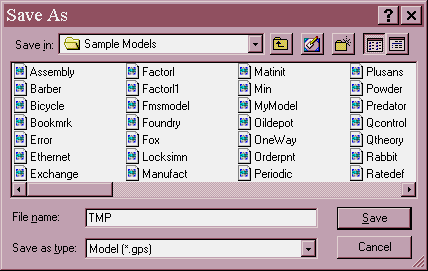
Figure 1ó5. The Save As Dialog
The file, which is the same as SAMPLE1.GPS is visible in the Model Window. Letís add a BUFFER Block after the GENERATE Block. Use the mouse to position the cursor anywhere in the Queue Barber line by moving the mouse pointer to the position and clicking once.
CHOOSE
Edit / Insert LineThe cursor is now positioned at the beginning of a new line, directly before the QUEUE Barber line. You can space or tab to position the new Block under the other Block names. Although it is not necessary to line up the GPSS Block statements, doing so makes them easier to read.
TYPE
BUFFERYou need not type in upper case letters. We have done so in the models in this manual to make the GPSS World reserved words stand out. Letís adjust some of the model settings.
CHOOSE
Edit / SettingsYou will see the Simulate Page of the Model Settings Notebook. There is an in depth discussion of the choices in the Model Settings Notebook in Chapter 2 of the GPSS World Reference Manual.
Letís leave the Simulation Page Options as they are.
CLICK ON
Reports
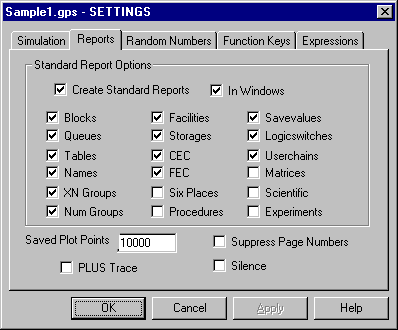
Figure 1ó6. The Report Page of the Model Settings Notebook
You may want to take a brief look at the Random Numbers, Function Keys and Expressions pages of the Model Settings Notebook. They contain options that allow you to assign the use of particular Random Number Generators, to assign operations to Function Keys, and to add expressions to the Expression Window. For now, letís leave those pages set as they are.
SELECT
OKto exit the Settings Notebook.
When you create a simulation a Journal Window is automatically opened. It will record any interactions or messages generated by GPSS World.
Letís create a simulation.
CHOOSE
Command / Create SimulationThis action translates the model into a simulation. If there were syntax errors in the model, they would be detected at this time and you would be given a chance to correct them.
We are now ready to run the simulation, but first, letís take a brief look at the Blocks Window.
CHOOSE
Window / Simulation Window / Blocks Window
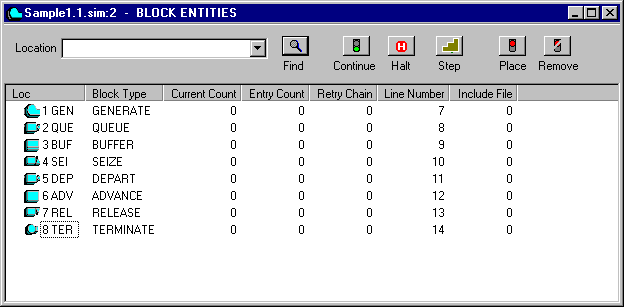
Figure 1ó7. The Detailed View of the Blocks Window
The detailed view of the Blocks will appear in a new window that now appears on top of the Model Window and the Journal Window. Remember you can resize and reposition any of the windows. Also by clicking anywhere on the window, you can bring any window to the front, making it the active window. Stop to review Windows windowing if you are unsure of the manipulation of the windows. There is one useful trick that is worth mentioning here.
If you chose to just look at the Blocks Window, you will now be looking at the non-detailed view of the Blocks in the model. This window will experience on-line update as the simulation runs. Now, in the View menu
CHOOSE
View / Entity Details
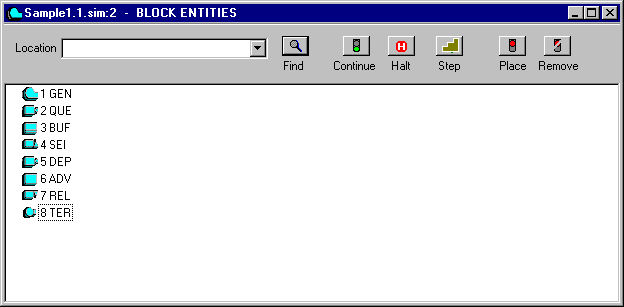
Figure 1ó8. The Non Detailed View of the Blocks Window.
You should now see the non detailed view of the Blocks Window. Let's go back to the detailed view.
CHOOSE
View / Entity DetailsLetís start the simulation and watch it run in the Blocks Window. Before you do that, resize the Blocks Window so you can see all the Blocks in the model, from GENERATE to TERMINATE.
Letís now enter an interactive START 300 Command.
CHOOSE
Command / STARTon the main menu bar of the GPSS World Main Window. When the START dialog box appears, replace the 1.
TYPE
300and
SELECT
OKCLICK ON
Anyplace on the Blocks Windowto see the model running in the window.
Now close the window.
DOUBLE CLICK ON The Block Icon in the Upper, Left Corner-Blocks Window
to close the window.
The simulation will now run very quickly with the window closed. On-line windows always make the simulation run much more slowly than normal.
The simulation should complete quickly. You will see a Report Window open up automatically when the simulation ends. Report Objects are normally created when the simulation's Termination Count reaches zero. Enlarge the window to examine the contents of the report. You should see something like the window shown below.
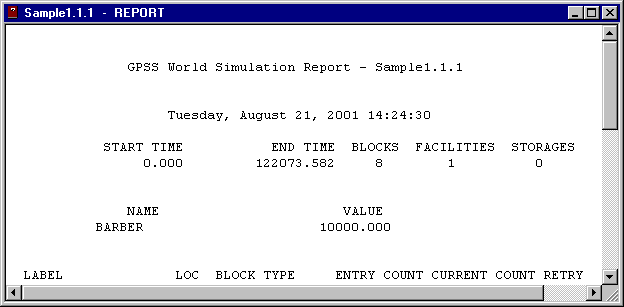
Figure 1ó9. Report Window with a Standard Report
At this point, letís print the report. If you donít have a printer available, just skip this part.
CHOOSE
File / PrintMake sure you have the correct printer chosen and that the Report Window is the active window.
SELECT
OKRemember, while you are running a simulation, only keep open the windows that you are actively viewing. If you are finished with a window and will not need it again, close it. The
Window / Tile and the Window / Cascade menu commands are sometime useful to tidy up a lot of windows.If you will want to view a window again later, you can minimize it by clicking on the button just to the right of the title bar of the window. You can instantly retrieve a minimized window, as well. Icons for minimized windows are found just above the status line.
Donít forget that when an on-line Window is open or minimized, a continuing sequence of update messages must be sent to it. This means that the simulation run time will be slowed considerably. Snapshot type Windows, on the other hand, are not updated on-line and therefore do not affect the performance of the simulation.
Letís minimize the Journal Window.
CLICK ON
Anyplace on the Journal Windowto make it the active window.
CLICK ON
The Left Button in the group of three Right of the Title Bar of the Journal WindowNow, letís bring it back.
CLICK ON The First or Second button on the Right of the Minimized Window
You can see how easy it was to retrieve the window.
Letís review. We have opened a Model File and we saved a GPSS World Model Object after altering its settings and structure. We have Created the Simulation Object and used two views in the Blocks Window to watch Transactions circulate in the simulation. We have minimized the Journal Window. Finally, we have printed and examined a Standard Report in a Report Object. Next time we will simulate customers arriving at a barber shop.
Letís end the Session. In the GPSS World Main Window, in the Main Menu,
CHOOSE
File / ExitYou will be given a chance to save the Model Object, the Simulation Object, and the Report Object.
When asked if you want to save the changes
SELECT
NoGPSS World will close without saving the open GPSS World Objects.
In this lesson, we will study a small simulation. GPSS World has many interactive features which we will defer to later lessons. For now, we will be content to restrict ourselves to running a "classic" sample simulation, the barber shop.
Before we begin, we need to go over a few basic definitions. A GPSS World Model Object is defined to be a sequence of Model Statements. When you know what a Model Statement is, you will know how to build models.
A Model Statement is either a Block Statement, a Command, or a PLUS Procedure Statement. Thatís all there is to it. When you build a model, your job is to create a sequence of these Model Statements that make your model behave as if it were some real world system.
You create a Simulation Object from the Model Object by Translating the Model Statements. Normally, the Create Simulation Menu Command does this for you. You can still send additional Model Statements to a simulation, even after the Simulation Object has been created. Statements sent to an existing Simulation Object are called Interactive Statements. A START Command you send after a Simulation Object has been created is an example of an Interactive Statement.
The GPSS Commands are listed in Chapter 6 of the GPSS World Reference Manual. All Commands, except HALT and SHOW, and INCLUDE are placed on an ordered Command Queue when they are received by the Simulation Object. They are then performed in the order that they were received. These Commands are called Queued Commands.
HALT and SHOW are called Immediate Commands. They are performed regardless of what else is going on. HALT is a special case. Not only does it halt any running simulation, but also it deletes any Queued Commands not yet begun.
Let us return now to our simple first model.
In this model, customers arrive, on average, once every 300 simulated seconds. Unfortunately, the barber takes, on average, 400 simulated seconds to do a haircut. What do you think will happen?
First, start GPSS World as you did in Lesson 1.
CHOOSE
Start / Program / GPSS World ...and then once in the GPSS World program
CHOOSE
File / Openopen the Samples Folder and
SELECT
Sample1and
SELECT
Openin the list of GPSS models in the dialog box. GPSS World reads in the Model File and creates the Model Object, but does not start the simulation. We must create the Simulation Object by Translation and then issue a START Command.
CHOOSE
Command / Create SimulationBefore we start the simulation, letís set up a plot in the Plot Window. What shall we plot?
GPSS provides an extensive set of built-in statistics, called System Numeric Attributes, or SNAs. They are listed in the GPSS World Reference Manual and are extremely easy to use. All we have to do is to refer to them when we want to use them in Operands and Expressions. This is one reason why GPSS is much easier to use than a programming language for simulation.
Letís choose an SNA which indicates the state of the barber shop. The Q$BARBER SNA, which is a count of the waiting line, is a good choice.
CHOOSE
Window / Simulation Window / Plot WindowA dialog box appears. Enter the following information as shown in the screen view below. Place the cursor at the start of each entry field to type in the information or use the Tab Key to move from field to field. Do not press [Enter] to go from field to field. [Enter] signifies that all information has been entered. This will plot the barberís queue during the run of the simulation.
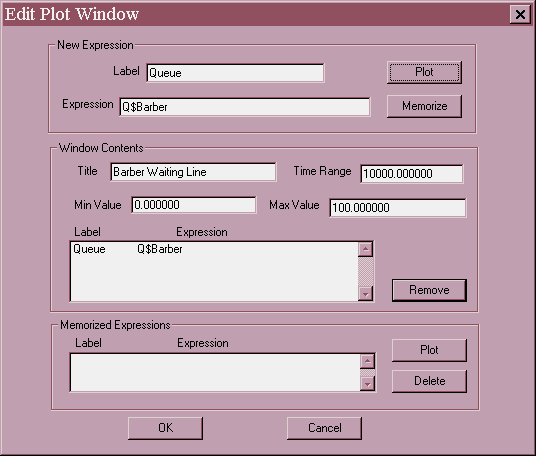
Figure 2ó1. Initializing an on-line Plot
Make sure you click on Plot and Memorize. Memorize will save the plot definition of a particular. It can then be retrieved when you run the simulation again or if you wish to use the definition in the Expression Window as you'll see in a minute.
Once you have completed the information, in the New Expression group box
CLICK ON
PlotThen
CLICK ON
MemorizeThen
SELECT
OKGPSS World responds by setting up the axes of the plot in a Plot Window. The plot will be filled in when we start the simulation. You can expand the Plot Window by dragging a corner of the window to a reasonable size for viewing.
The screen should look like this.
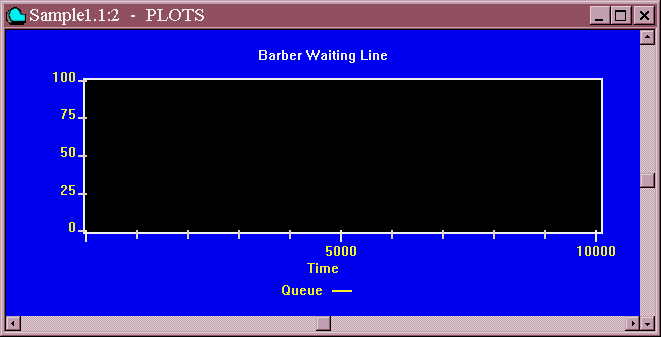
Figure 2ó2. The Plot Window
Now letís start the simulation.
When you choose the next command you will be watching the progress of the simulation unfold right in the PLOT Window. Letís stop the simulation before it completes. Once you see the Plot being drawn, halt the simulation using either of the two following methods. The function key [F4] has been preloaded with the HALT command.
First, letís send a START 100 Command.
Ready?
CHOOSE
Command / STARTand in the dialog box, replace the 1.
TYPE
100and
SELECT
OKThen, watch the plot, for a short time and halt the simulation.
PRESS
[Ctrl]+[Alt]+[H] orPRESS
[F4]to halt the simulation.
Since we are in the middle of a simulation we might want to enter debugging commands.
For now, though, letís finish the simulation.
CHOOSE
Command / Continueor
PRESS [Ctrl]+[Alt]+[
C]or
PRESS [F
2]The barber shop simulation takes a few seconds. When it is done, GPSS World will signal you with a "The Simulation has Ended" message in the Status Line at the bottom of the Main Window, followed by "Report is Complete".
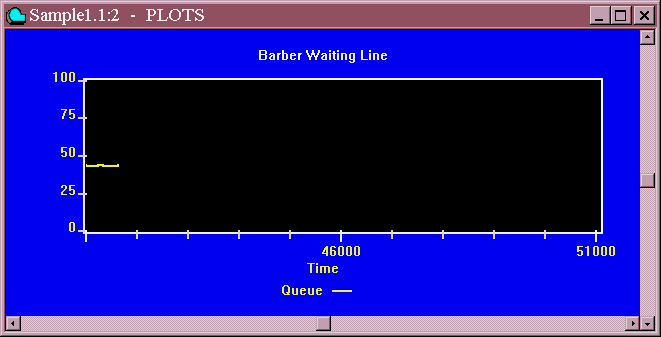
Figure 2ó3. Plot Window at Completion of the Simulation
At this point we could choose to print the plot by using the Print Command from the file menu in the Plot Window. If you wish to examine the Plot in more detail, you may do this now.
Notice that the value of Q$Barber changes in vertical jumps. Such changes are happening at discrete instants. A plotted value is sampled after every Block entry in the simulation. Each time the value changes, a message is sent to the Plot Window.
You will have noticed that when the simulation completed, GPSS World wrote a report to the Report Window. The Report Window opens automatically at the end of a simulation run. Take a brief look at the Standard Report.
You can examine the report by resizing the window, or you can print the report for more detailed study later. In a later lesson, we will study the sequencing and file structure of reports in GPSS World. When you are finished with the report, close the window without saving the report.
CLICK ON
The X in the Upper Right-Report WindowNow that the simulation has ended, let us explore some results. The SHOW Command is ideal for this. First, make sure that the Journal Window has the focus so that you can see the results of the Show Command. Click on the Title Bar of the Journal Window if it's not the top window. Then
CHOOSE
Command / SHOWand
TYPE
C1then
SELECT
OKThis command causes the relative system clock value to be written in the Status Line as well as in the Journal. The C1 value is the simulated time when our first simulation ended.
Letís try one more. This time, after you have selected SHOW and the dialog box is open
TYPE
QM$BarberSELECT
OKThis shows the maximum content of the Queue Entity named Barber. If you would like to try your own favorite SNA at this time, please do so.
GPSS World allows you to view the simulation environment in many different ways. Each of the major GPSS Entity types has a window for viewing its dynamics as the simulation runs. In addition, there are Snapshots that can be viewed in a window or be printed. Also, you can open the Expression Window, which can contain a list of labeled expressions. Each one can be any valid PLUS Expression. The most simple ones are variables or SNAs. The Simulation Windows are updated dynamically while the Simulation Snapshots show the state of a particular chain, group or Transaction at one point in simulated time.
Letís open an Expression Window on the Clock, the Customer Queue Length, and the Active Transaction number.
CHOOSE
Window / Simulation Window / Expression WindowThen, Edit the Expression Window
Next to Label
TYPE
Clockand for the Expression
TYPE
AC1Then, you can choose one or both of the View or Memorize options. Remember as in the Plot Window, View will allow you to see the expression(s) for this run only while memorize will allow you to use the expression(s) in future runs without having to type all the information again.
CLICK ON
ViewCLICK ON Memorize
If you have done this lesson from the beginning, you see that if you memorized the Q$Barber in the Plot Window, it is accessible here as well. See the Plot and Expression Windows in the Reference Manual for more details.
For expressions after the first, you only have to type new values in the Label and Expressions boxes and then choose View or Memorize or both.
In the box for the Label
TYPE
Act Transand for the Expression
TYPE
XN1then
CLICK ON
ViewCLICK ON Memorize
Finally, If you wish to view the Barber Queue,
CLICK ON
The expression Q$Barberin the Memorized Expressions box
then
CLICK ON
ViewSELECT
OKWe now will be able to view the Clock, Active Transaction Number, and size of the Barber Queue while the simulation runs.

While the simulation is running, letís also open the Facilities Window to look at the GPSS Facility Entity which represents the barber. Donít forget, you can interrupt a simulation by pressing [Ctrl]+[Alt]+[H] or [F4].
First, close the Plot Window since we no longer wish to watch it.
DOUBLE-CLICK ON
The Block Icon in the Upper Left-Plot Window
CHOOSE
Window / Simulation Window / Facilities WindowPosition the two windows so that you can see both as the simulation runs.
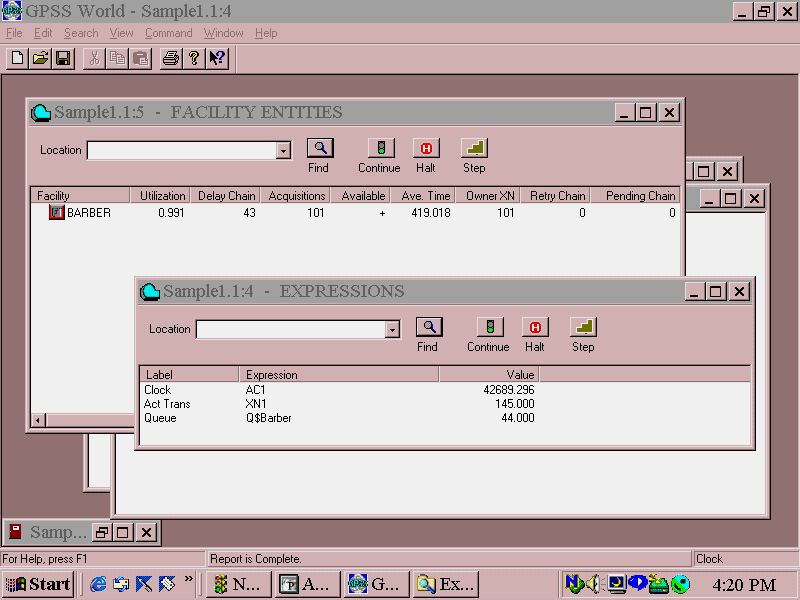
Figure 2ó5. The Expression Window and the Facilities Window
Now start a simulation. We will suppress the Standard Report this time by using NP (for "No Printout") in operand B of the START statement.
CHOOSE
Command / STARTIn the dialog box, replace the 1.
TYPE
100000,NPSELECT
OKNow, you can watch the vital statistics of the barber change according to conditions in the simulation, as well as watch the values of specific interest to you in the Expression Window. The details of the Facilities Window are described in Chapter 5 of the GPSS World Reference Manual.
Watch the statistics as the simulation runs. We have one very busy barber.
Itís easy to open any of the simulation windows in this manner. However, in our simple barber shop simulation we have not defined enough entity types to make use of the other windows.
Letís do one more thing before we end the simulation. First, let's halt the simulation.
PRESS
[F4]or
CLICK ON
The Halt icon in the Facilities Window Debug ToolbarThen, close the Expression and Facilities Windows.
Next open the Blocks Window.
CHOOSE
Window/ Simulation Window / Blocks WindowWeíll use this window to put a Stop Condition on a Block, and trap a Transaction. We will choose the DEPART Block to stop a Transaction.
Halting interrupts the simulation and clears out any Queued Commands that have not yet begun. In our current simulation, there were no additional Queued Commands to be deleted. If there had been, they would be gone forever. The interrupted state of the simulation is easily restarted by a CONTINUE Command, which is itself a Queued Command.
Now letís set a Stop Condition. In the Blocks Window,
CLICK ON
The DEPART Block IconCLICK ON
The Place Icon in the Debug Toolbar at the Top of the Window
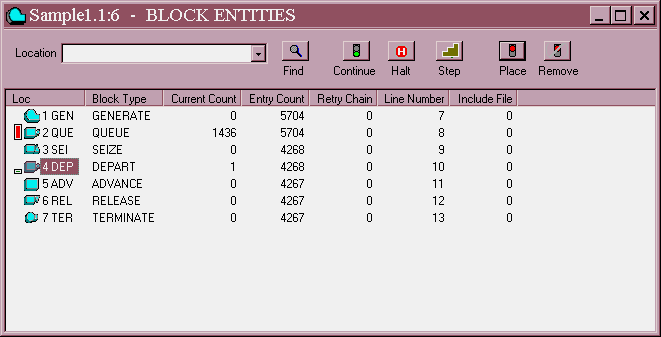
Figure 2ó6. The Blocks Window with a Selected DEPART Block
Now, restart the simulation.
PRESS
[F2]or
CLICK ON
The Continue Icon in the Debug Toolbar at the Top of the WindowThe simulation will stop when the next Transaction tries to enter the DEPART Block. At this point, in the Model Window menu
CLICK ON
Anywhere on the Journal / Simulation Windowto give it the focus. Move the window to a convenient place for viewing along with the Blocks Window. You may have to resize the windows to do this.
Now, letís send a Block Statement to the simulation.
CHOOSE
Command / Customin the dialog box and
TYPE
TraceThis will cause the Trace Indicator to be set in the Active Transaction. From now on, each Block entry by this Transaction will cause a trace message to be sent to the Journal Window.
We have just used Manual Simulation Mode to pass a Transaction through a Block that does not become a permanent part of the model. Look at the Journal Window to see the first Trace message. Now we must remove the Stop Condition or every Transaction will be detained before entering the DEPART Block. Make the Blocks Window the active window.
CLICK ON
Anyplace on the Blocks WindowCLICK ON
The DEPART Block in the Blocks WindowCLICK ON
The Remove Icon in the Debug Toolbar at the Top of the Windowto remove the Stop Condition on the DEPART Block. You could remove one or multiple STOP conditions by selecting Window / Simulation / Snapshot / User Stops. Try it if you like to see the User Stops Window.
Then CONTINUE the simulation.
CLICK ON
The Continue Icon in the Debug Toolbar at the Top of the Windowor
PRESS
[F2]or
PRESS
[Ctrl]+[Alt]+[C]This will allow us to view trace messages as the simulation produces them.
You will see the rest of the trace messages for this Transaction until it enters the TERMINATE Block. Notice that there were no trace messages generated as other Transactions moved while the traced Transaction was delayed in the ADVANCE Block.
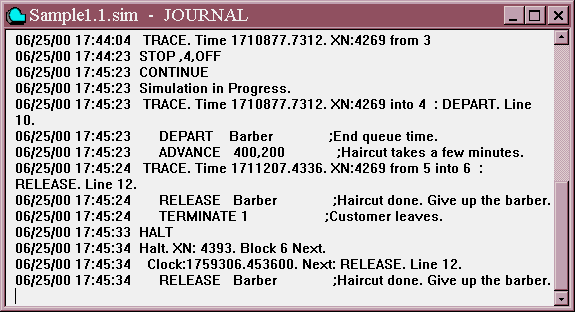
Figure 2ó7. Trace Messages in the Journal Window
If you wish to have trace messages for all the Transactions in the model, you should insert a TRACE Block in the model. However, this is rarely necessary. It is usually much better to selectively trace Transactions in portions of the model where their behavior is not as you expected.
Donít forget that you can print the Journal at any time by making the Journal Window the active window and choosing Print from the File Menu in that window.
Letís interrupt the simulation.
CLICK ON
The Halt Icon in the Debug Toolbar at the Top of the Windowor
PRESS
[F4]or
PRESS [Ctrl]+[Alt]+[
H]When the simulation is halted
CHOOSE
Command / CustomIn the dialog box
TYPE ReportSELECT
OKThis causes a Standard Report to be created immediately, even if the simulation has not ended.
The name of the report that you have just created is probably Sample1.1.2, but the sequence number could be different if you have other Sample1 reports on your disk.
You may now examine the report or print it using Print from the File menu. Reports are generated automatically at the end of a simulation. In a later lesson, you will learn how to customize your reports using the Settings of the Simulation Object.
When you attempt to close a Report Window, you will be given the opportunity to save the report to a file. Weíll address reports in greater detail later in this tutorial. Also, you may wish to read Chapter 11 in the GPSS World Reference Manual where the report output is discussed in detail. However, for now, our next step is to end the GPSS World Session.
CLICK ON
The X-Upper Right of the Windows Currently OpenThis returns us to the GPSS World Main Window. Close the window to return to the Windows Desktop.
In this lesson we have started a simulation, set up a plot, watched several important simulation state variables change during a simulation, interrupted a running simulation, viewed a running simulation through two graphical windows, set up expressions in the Expression Window, TRACEd a Transaction, suppressed the automatic writing of the Standard Report using the NP option of the START Command, created the Standard Report on demand using the REPORT Command, and examined the report in the Report Window.
In the next lesson we will examine what happens when things go wrong. Weíll also take a look at the On-line Help Facility and some other assorted useful tidbits. See you next time.
Sooner or later youíre bound to run into problems. When you get an error message, usuually you should be able to determine what went wrong and how to fix it. If you need a fuller explanation you can look up the message in Chapter 14 of the GPSS World Reference Manual. In addition, there are several ways to get specific help. The first thing to know is that the [F1] key retrieves help immediately. This simple action will open a context sensitive help panel no matter where you are in GPSS World. In addition, some dialogs have a Help Button, as well.
Letís try it. Start GPSS World as you did in Lesson 1.
CHOOSE
Start / Program / GPSS World ...From the Main Menu
CHOOSE
Help / Help TopicsYou should see a standard Windows Help Panel, with controls for searching, moving from panel to panel, and using the index. All these are at your disposal. Feel free to explore the Help Subsystem until you feel comfortable using it, because it can save you a lot of time.
Now, close the Help Panel.
CLICK ON
The X-Upper Right-Help Windowor
CLICK ON
The X-Upper Right-Help WindowBefore leaving the Help Subsystem, letís get help for a menu item in the File Menu of the Main Window. Drag down a menu with mouse button 1, but do not release the button. This highlights one of the drop down menu items. (You can do the with the [Alt] and arrow keys, also). Before you release the mouse button, press [F1] .
You should see context sensitive help specifically for the menu item
Again, close the Help Panel.
CLICK ON
The X in the Upper Right-Help WindowSo much for On-line Help. During the lessons in this tutorial, you should use it just to get used to it. Feel free to press [F1] at any time. For now, letís move on to some other things.
Hereís something thatís really handy. Itís especially useful when youíre interacting with a running simulation. Itís the Assignable Function Key feature. To assign a Command to a function key, you should do the following.
Open the SAMPLE10 model
CHOOSE
File / OpenSELECT
Sample10and
CHOOSE
OpenLet's take a look how to quickly get into the GPSS World Language Reference in the Help system. Double click on the word GENERATE so that it becomes selected. Now,
PRESS [F1]
The Help system responds by showing you occurrences of GENERATE in the Reference Manual. Select the Block Statements line item to view the definition of a GPSS Block Statement. Then
CLICK ON
DisplayGreat! Scroll down to view all the details. But this is only the beginning. You can research all the GPSS World Command, Blocks, Procedures, SNA Classes, Probability Distributions, and other keywords. All you have to do is find some Text Window where you can select it and then open the Help System. If you can't find the keyword anywhere, just type it in temporarily and delete it when you no longer need it.
Close the Help Panel when you are finished looking at it.
Now, lets look at some features provided by Model Settings. Incidentally, when you create a Simulation Object, it inherits its Settings from the Model Object. Well, anyway, for now
CHOOSE
Edit / SettingsIn the Settings notebook, choose Function Keys. When you are on the Functions Keys page, you will see that you can enter any command next to a function key. Each model can be set to use its own unique function keys. Letís load key [F9] with "SHOW Q$Barber". Position the cursor in the box next to F9 and
TYPE
SHOW Q$Barberin the space next to the F9. Then close the notebook.
SELECT
OK
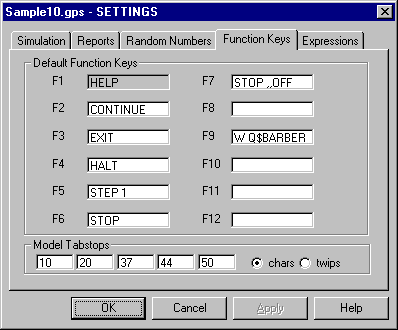
Figure 3ó1. The Function Keys Page of the Model Settings Notebook
Create a simulation with the new settings.
CHOOSE
Command / Create SimulationNow start the simulation.
CHOOSE
Command / STARTand in the dialog box, replace the 1.
TYPE
1000000and
SELECT
OKDon't wait for the simulation to complete. Interrupt the simulation
PRESS [Ctrl]+[Alt]+[
H]or
PRESS [F
4]nd then
PRESS [F
9]
Youíll see the queue for the Barber in the Status Line of the Main Window. Since this model has a Barber who canít keep up, donít be surprised if you see an unreasonable queue.
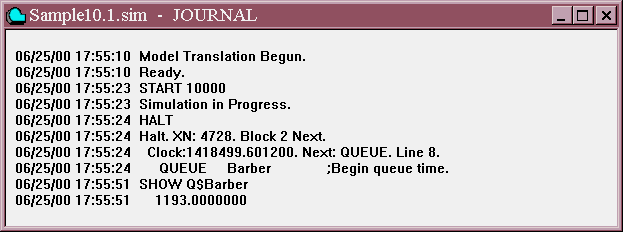
Figure 3ó2. Journal Window with Show Command displayed.
Take a moment to think about the uses of the Function Keys. When you have a single Command such as STEP 1 that you will use repeatedly to step through a simulation, you can load it into a Function Key. Even INCLUDE Commands can be assigned to Function Keys. An INCLUDE command could call in an existing plain text file with many GPSS World Commands.
A file containing a sequence of Model Statements is called a Model File. You may recall from Lesson 2 that a Model Statement is either a Block Statement, a Command, or a Procedure Definition. Model Files read into the Model Window are called Primary Model Files, any other Model Files, including Command Files, are called Secondary Model Files. You can create Text Objects (which are plain text files) to be used as Secondary Model Files using the GPSS World Model Window, or using your favorite word processor and saving them as "txt" files. You can read a whole Command File using the INCLUDE Command, and as we just discovered, you can load an INCLUDE Command into a Function Key.
Each of your models can use a unique set of Function Keys. The following function keys are preset to the values listed below when your software was shipped to you. Of course, you can override these values if you wish.
[F1] = Help
[F2] = CONTINUE
[F3] = Exit to Windows
[F4] = HALT
[F5] = STEP 1
[F6] = STOP
[F8] = STOP ,,Off
The Model Settings Notebook is discussed in more detail in the GPSS World Reference Manual.
Letís now turn our attention to the SHOW Command. You can use it as a sophisticated calculator. Stop for a moment and take a look at the mathematical functions listed in Chapter 8 of the GPSS World Reference Manual. (Select Help / Help Topics) You can combine these in complex expressions with SNAs in a SHOW command, and GPSS World will write the double precision result in the Status Line and in the Journal Window. Try it. First, some simple arithmetic.
CHOOSE
Command / SHOWin the dialog box after show
TYPE
1234+5678/345#(64+94)Notice that [#] is used to represent multiplication, not
[*], which is reserved for SNA indirect addressing. If you would rather use * for multiplication and # for indirect addressing, you can do so by changing the Settings of the Model.Now check the result on a calculator. Does it agree with the result on the screen?
GPSS World evaluates Expressions according to a hierarchy of operators listed in Section 3.3 of the GPSS World Reference Manual. If there is any doubt in your mind, you should fully parenthesize Expressions.
Next, we intentionally cause an event called an Error Stop. You will see a description of the error in the Journal Window. The Error will also be displayed in the Status Line of the Main Window.
CHOOSE
Command / SHOWand
TYPE
2/0then
SELECT
OKWell, we certainly knew that that wasnít going to work. However, take a look at the messages written in the Journal Window. They describe the error in detail.
Now close Sample10. You will have to close the Journal / Simulation Window and the Model Window.
CLICK ON
The X-Upper Right of each WindowCHOOSE
Nowhen asked if you want to save changes for each Window.
Next, letís create a two line model with an obvious error.
CHOOSE
File / Newand in the dialog box since Model for the file type is already selected.
SELECT
OKIn the Model Window
TYPE
Henerate 10TYPE
Terminate 1CHOOSE
Command / Create SimulationDid the Journal / Simulation Window open with a message to indicate an invalid number?
There are several menu items in the Search menu of the Model Window that take you directly to the error.
Search / Go to Line, Search / Next Error, or Search / Previous Error can be used to scroll through errors in a larger model. The cursor will be positioned where the error occurred, so you can fix the problem easily.

You can immediately go to the Model Window and fix the problem by making the H into a G and when you attempt again, the model should translate successfully.
CHOOSE
Command / RetranslateNow close the Journal and Model Windows.
CHOOSE
Noin both save dialog boxes.
Now, letís talk about Expressions in GPSS World. They are discussed in Chapter 3 of the GPSS World Reference Manual. We can mix SNAs right into our Expressions. Letís run a short simulation and then explore the results with the SHOW Command.
First, open the Program File. SAMPLE1.GPS
CHOOSE
File / OpenFrom the Open Model Dialog selection box
SELECT
Sample1.gpsin the Files list box, then
SELECT
OpenGPSS World will read in the Model File. Letís create a simulation and open the Facilities Window to watch it run.
CHOOSE
Command / Create Simulationthen
CHOOSE
Window / Simulation Window / Facilities WindowSize the window to a comfortable viewing size. O.K. Now start the simulation.
CHOOSE
Command / STARTand in the dialog box, replace the 1.
TYPE
1000000and
SELECT
OKin the dialog box. Notice that the Facility Entity was not created until it was referenced in the simulation. Other entity types, like Storage and Table Entities, which require a special declaration, are created when they are defined.
Letís use the Expression Window.
CHOOSE
Window / Simulation Window / Expression WindowNow, we will mix in state variables from the simulation. Letís try a fancy one, the natural logarithm of the relative system clock plus the square of the maximum queue length in the barber shop.
In the Label field
TYPE
Fancy oneand in the Expression field
TYPE
LOG(C1)+(QM$Barber)^2CLICK ON
ViewYou can create logical expressions using the operators ĎANDí, ĎORí, and ĎNOTí. These yield 1 (true) or 0 (false) as a result of the operation, and they can be mixed in with arithmetic Expressions as well. When you use logical operators, donít forget to include single quotes and donít allow intervening blanks between operator and operand(s). Letís try an additional one. In the Expression Window dialog box, in the Label field
TYPE
<6 Waiting?then position the cursor in the Expression box and
TYPE
1+99#((Q$Barber)íGEí6)CLICK ON
ViewSELECT
OKThis Expression results in 1, if there are less than 6 customers waiting, or 100 otherwise. Remember that unless you alter a Setting, # is used to represent multiplication, not *, which is reserved for SNA indirect addressing.
Now letís look at a random number stream.
CHOOSE
Command / SHOWand when the dialog box opens
TYPE
RN1000SELECT
OKThe RN SNA returns a random integer from 0 to 999 in the Status line and in the Journal Window. Use the Command again. When the dialog box opens
TYPE
RN1000SELECT
OKA second call to the same random number generator returns a different result. If the result took some time in returning, remember, we have a lot of windows open. You may want to close all but the Model and Journal / Simulation Windows now since their continuing update slows the running of the simulation and the response to interactive commands.
But wait a minute! We didnít have to type in the SHOW command again. We could have loaded it into a function key. Letís do it.
CHOOSE
Edit / Settingsand select the Function Keys Page and enter the SHOW Command next to F9.
TYPE
SHOW RN1000then
SELECT
OKand
PRESS
[F9]several times. As you can see, a random number stream returns a different random number on successive calls. This happens when you call SNAs that access random numbers within a simulation, too.
Time for a break. Letís review. This lesson was an introduction to the entry and correction of statements from the keyboard. In this lesson we used the On-line Help facility, used the Assignable Function Key feature, investigated Expressions in GPSS World, and worked with the Facilities and Expression Windows.
In the next lesson, we look at the full screen text editor in.
Now end the Session. In the Main Window
CLICK ON
The X-Button on the Upper Rightand when asked if you want to save the changes in any of the Windows
SELECT
No
The integrated editor is a powerful full screen text editor with many of the features of word processors such as Cut, Paste, Copy, and Search. In addition, there are features that allow you to find model Translation errors quickly. It is discussed in detail in Chapter 3 of the GPSS World Reference Manual.
Letís open a new model and do some editing.
CHOOSE
File / Openthen in the dialog box
SELECT
Sample2and
SELECT
OpenNow letís Edit the Model File.
Highlight the line that begins with ADVANCE by placing the cursor at the beginning of the line and dragging it across the page using the mouse with the left button continually depressed while moving it. The highlighted text is said to be selected. This is "swipe" selection.
Thereís a second way to select text, as well. Click just to the left of the first letter of ADVANCE. This removes the selection you just did. Now press and hold [Shift] while you click just to the right of the last letter of ADVANCE. You have just selected text using "enhanced" selection. Sometimes this method is more convenient. Yet another selection method is to double click to select a single word.
Now, lets place a copy of the selected text into the clipboard.
CHOOSE
Edit / CopyNow you can paste in another ADVANCE Block after the RELEASE. Place the cursor in the RELEASE Block line and
CHOOSE
Edit / Insert Lineand
CHOOSE
Edit / PasteYou can also use the keystrokes [Ctrl]+[X], [Ctrl]+[C],. [Ctrl]+[V] for Cut, Copy and Paste, respectively after you have selected text.
We now have additional ADVANCE Block right before the TERMINATE. Now add spaces as necessary to line up the Block names. Then add an Operand A for the ADVANCE Block. Space just to under the word Barber on the previous line, and
TYPE
200You can explore other options of the
Edit menu. Make a change and then choose Undo to restore the file to its state just before the change was made. Delete and insert lines. Delete deletes the line in which the cursor is positioned. Insert puts a new line after the line where the cursor is positioned. The Font option lets you change the font and color of your display. Remember, Courier New is a monospaced font that lets you line up columns in your model easily since all characters take up the same amount of space. Also, you can modify the Settings of a Model Object in order to change the tabstops, if you choose to use tabs.Now letís take a look at the
Search commands. The text Find / Replace operations are similar to those commands found in common text editors and word processors. You can find, change or do mass changes on text in your model. When using the Find / Replace Window, you should note that the Search only operates in one direction and will stop when it reaches the end of the file. It is best to position the cursor at the beginning of the file when doing a search. The Find/Replace Box is shown below.CHOOSE
Search / Find / Replace
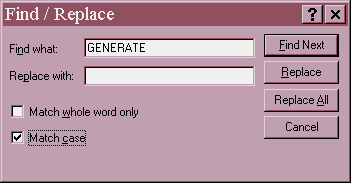
Figure 4ó1. The Find / Replace Dialog Box
As with all the windows, you can move it to a more convenient place by clicking on the title bar and dragging the window to a new location. To do this just place the mouse pointer over the Title Bar of the window, click and hold mouse button 1 while you drag the window, then release.
Go ahead and close the Find/Replace box.
Now Close the Sample2.gps Model Window
CLICK ON
The X-Upper Right of Model Windowand when the "unsaved change" box appears
SELECT
NoThe Bookmark feature is a little more complex so weíll do some practice with it. Open the model Bookmrk.gps. This is really the model Telephon.gps
CHOOSE
File / Openand in the open model box
SELECT
Bookmrk.gpsand
SELECT
Open
; GPSS World Sample File - BOOKMRK.GPS
100 *****************************************************
110 * *
120 * *
130 * Telephone System Model *
140 * by Gerard F. Cummings *
150 * *
160 *****************************************************
170 * Simple Telephone Simulation *
180 * Time Unit is one second *
200 Sets STORAGE 2
210 Transit TABLE M1,100,100,20 ;Transit times
220 GENERATE 100,60 ;Calls arrive
230 Again GATE SNF Sets,Occupied ;Try for a line
240 ENTER
Sets ;Connect call
250 ADVANCE 180,60 ;Speak for 3+/-1 min
260 LEAVE
Sets ;Free a line
270 TABULATE Transit ;Tabulate transit time
280 TERMINATE 1 ;Remove a Transaction
290 Occupied ADVANCE 300,60 ;Wait 5 minutes
300 TRANSFER ,Again ;Try again
310
*******************************************************
Now, place the cursor in line 210. We have added line numbers to the TELEPHON.GPS sample model so that it will be easier to see how BOOKMARKing works. Your GPSS World models do not need to have line numbers.
CHOOSE
Search / MarkNow, position the cursor in line 300 and again
CHOOSE
Search / MarkYou have now set two Bookmarks in the file. Place the cursor in the middle of line 260.
CHOOSE
Search / Select to BookmarkWhat happened? The text from the cursor position to the last mark visited was highlighted. You should see the highlighting to just before line 300. Remember if you try to move the cursor with the arrow keys, the text will be deselected. Bookmarks can be very helpful in moving around your Model File or in deleting a large portion of text or for cutting and pasting large sections of text.
Now try moving around the file using the To Next Bookmark command.
CHOOSE
Search / Next Bookmarka number of times. Notice that the search moves through the Bookmark list in an orderly fashion. When the end of the list is reached, the search for the next bookmark goes back to the beginning. Remember, no matter where you are in the file (even if you have used other commands such as Find Next) the To Next Bookmark Command will always go to the Bookmark that is next in the list after the last bookmark visited or the last bookmark created.
If you save a file after inserting Bookmarks, they will also be saved.
Close the BOOKMRK.GPS File using the method described for the last file that we closed.
Finally, letís address finding and correcting translation errors.
CHOOSE
File / OpenFrom the open model dialog selection box
SELECT
Errorin the files list box, then
SELECT
OpenCHOOSE
Command / Create SimulationWell, we knew there were going to be errors in this model. Letís use the editing features to find and correct them. Position and size the Journal and Model Windows so that the model text and Status Line in the Main Window and the Journal Window are all visible.
Make sure the Model Window has the "focus", i.e. is the active window.
CLICK ON
The Title Bar of the Error.gps Model WindowLetís use the
Next Error search. This menu item will place the cursor in the line at the place of the error and show the error in the Status Line of the Model Window.CHOOSE
Search / Next ErrorThe cursor has been placed in the line that uses the Exponential Distribution where we have neglected to add the final right parenthesis. You will see that the error message appears in the Status Line of the Main Window.
Here's a hint. You can use a single keystroke to travel to the next error. The accelerator key to use for Search / Next Error is
PRESS
[Ctrl]+[Alt]+[N]
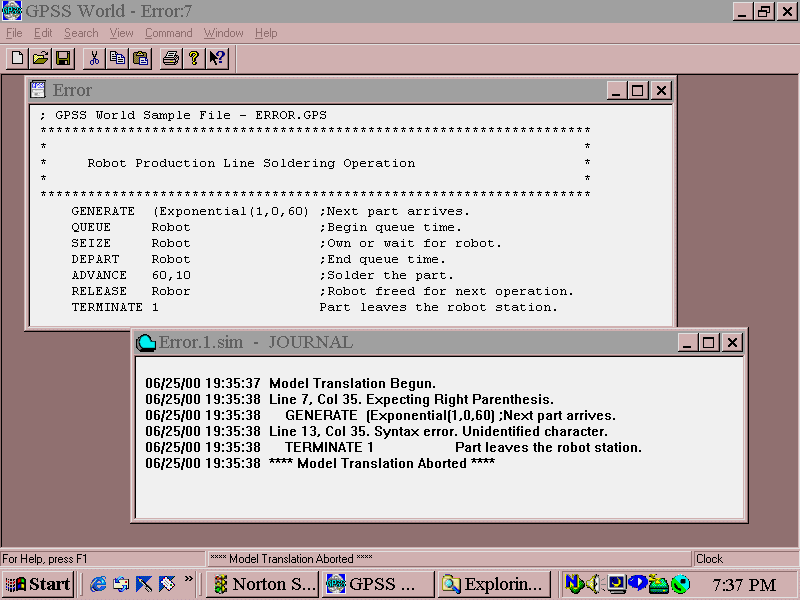
You can now insert the missing right parenthesis. Notice that the invocation of the Exponential() procedure is enclosed in parentheses. This is an important rule to remember: In general, PLUS expressions occurring outside a PLUS Procedure must be parenthesized! The good news is that you can use parenthesized expressions just about anywhere.
Search / Previous Error allows you to scroll backwards through an error list.
The error message in the Journal File tells us that the second error is at line 13. Use Search / Go To Line to find the line.
CHOOSE
Search / Go To Lineand in the dialog box
TYPE
13SELECT
OKThe cursor has been placed at the beginning of line 13. Insert the semicolon that is missing in front of the comment. Then, we should be ready to run the simulation, once it is retranslated.
CHOOSE
Command / RetranslateNow, try to run it. You will see a runtime error immediately.
CHOOSE
Command / STARTIn the dialog box, replace the 1.
TYPE
10,NPSELECT
OKThe runtime error appeared in the Journal Window telling us that we are trying to release an unowned Facility. Now use
Search / Go To Line to find and correct the name of the Facility used in the RELEASE Block. Make sure the Model Window has the focus when you do this search. Runtime errors do not create an error list like the one produced by a translation. Therefore, you canít use Next Error. Instead, a runtime error is called an Error Stop. The simulation halts and sends several messages that identify and locate the single error.If you wish to retranslate the model and test that it will run successfully to completion you can do so on your own now.
In this lesson we have explored the Edit and Search menus. We have also addressed the correction of errors.
When a Translation Error occurs, a notice is placed at the end of the internal Error List of the Model Object. You can jump from one error to the next with a single keystroke. On the other hand, when an Error Stop occurs during a simulation, you must find the line number in the group of error messages written to the Journal Window of the Simulation Object.
O.K. Now end the Session. In the Main Window
CLICK ON
The X-Button-Upper Right of Windowand when asked if you want to save the changes
SELECT
NoIn the next lesson we will begin to study the most important of the GPSS Block statements.