Lesson 12 - Reading from and Writing to External Files
GPSS World has Blocks that are designed to read from and write to external ASCII files. These Blocks can be very useful if you want to read an external data file, format your own report, or simply collect one or two pieces of data at given time intervals in an external file.
Please take the time now to read the section titled Data Streams in Chapter 4 of the GPSS World Reference Manual. Also, you should refer to Chapter 7 to better understand the use of the I/O Stream Blocks, OPEN, READ, SEEK, WRITE and CLOSE. There are equivalent library procedures, as well. When these Blocks or library procedures are used in conjunction with the string procedures in GPSS World, you can accomplish powerful data handling and formatting tasks.
In this lesson, we will use some very simple models that are designed to do nothing other than exercise the actions of the Data Stream Blocks. Each model is supplied with a matching Text Object file with which it interacts. Text Objects are simply plain text files with a (.txt) filename extension. In the case of the files that are used for writing, we have provided you with a file TSTTEMPL.TXT that can be used to restore each of the files to its original state, if you or others wish to use this lesson again.
Another way to restore the changed files is to copy the TST*.TXT files to a safe place before you start this lesson. They are located in the Sample Models folder.
When you are done with the lesson, either copy back the TST*.TXT files or copy the TSTTEMPL.TXT file to the following files.
TSTSKINW.TXT
TSTAPPW.TXT
TSTSKRW.TXT
TSTSQRW.TXT
TSTSQR2W.TXT
Next, delete these two files.
TSTCATW.TXT
The TSTRD.TXT file and the TSTSTRD file are only used to read data. They will not be altered and do not have to be initialized before you use this lesson again.
The names of the test files used in this lesson are created by a code. Here are the letters and the I/O actions that they represent.
CAT = Catenate (String Procedure) SK = Seek
I N = Insert SQ = Sequential
R = Replace ST = String
RD = Read W = Write
You will notice in the OPEN Blocks of these sample models, that there is no path specified. That means that GPSS World will use the Sample Folder as the destination for all files that are written to disk.
Let’s start by reading a file sequentially and storing the values in a GPSS World Matrix. We’ll use the model TSTRD.GPS and the data file TSTRD.TXT shown below.
Model: TSTRD.GPS
; GPSS World Sample File - TSTRD.GPS
**************************************************
; Reads a file sequentially and stores
; the values in a matrix.
; At end of file goes to label Finis
**************************************************
Total MATRIX ,10,1
GENERATE ,,,1
OPEN
("TSTRD.TXT"),,flag
Again READ Numero,,Finis
SAVEVALUE Nrow+,1
ASSIGN Numrow,X$Nrow
MSAVEVALUE Total,P$Numrow,1,P$Numero
TRANSFER ,Again
Finis CLOSE Prob,,Flag1
TERMINATE 1
Flag TERMINATE 1
Flag1 TERMINATE 1
Datafile: TSTRD.TXT
1
2
3
4
5
6
7
Now, let’s run the simulation
CHOOSE
File / OpenIn the dialog box
SELECT
Tstrdand
SELECT
OpenNow, create the simulation and open the Matrix Window so we can watch it as the simulation reads the data file and updates the Matrix.
CHOOSE
Command / Create Simulationand
CHOOSE
Window / Simulation Window / Matrix WindowThen in the Open Matrix dialog box you will see the Matrix "Total" in the drop-down box since it is the only one in this model.
SELECT
OKand size the window to a comfortable viewing size.
CHOOSE
Command / STARTand in the dialog box we will suppress the Standard Report. Replace START 1
TYPE
START 1,NPSELECT
OK
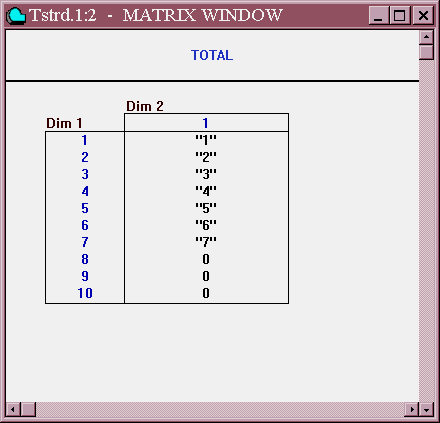
Figure 12—1. The Total Matrix.
The simulation has run very quickly filling the Matrix with the values 1 through 7 that are found in the data file. Let’s briefly discuss the way the I/O Stream Blocks are working here.
The OPEN Block is placed in a separate segment of the model since the file only needs to be opened once. A high priority Transaction opens the file to be read as the first action in the running of the simulation.
Then the Transaction that will be doing the reading of the files begins to read the file sequentially looping through the READ Block and the four Blocks that follow it. Each value read is placed into the Transaction Parameter "Numero". The next three Blocks update a SAVEVALUE counter that is then moved to a Parameter and used as the row number in the matrix. Then in the MSAVEVALUE Block, the value that has been read into P$Numero is placed in the appropriate row of the Matrix, Total. When the end of file is reached, the Transaction is sent to the CLOSE Block labeled Finis, closing the data file. Then the Transaction enters a TERMINATE Block, ending the simulation.
If any errors occur in the OPEN or CLOSE Blocks, the Transaction will go to the Blocks labeled Flag or Flag1 respectively. Such an error would be easy to spot since normally those two Blocks should have an entry count of 0.
If we were doing multiple reads and writes, we could use a high priority Transaction to open the file. After all the data is read, the file is CLOSEd.
OK. Now close all the windows related to this example. You should have a Main GPSS Window with a blank client area.
The next file will demonstrate seeking data from selected locations in a file and placing it in specific locations in a matrix.
Model: TSTSKRD.GPS
; GPSS World Sample File - TSTSKRD.GPS
*************************************************
; Read two separate text lines of a file
; using SEEK and stores the values
; in a matrix. Close file after second value
; is read and stored.
*************************************************
Total MATRIX ,10,1
GENERATE ,,,1
OPEN
("TSTRD.TXT"),,Flag
SEEK
4
TRANSFER ,DoRead
Again SEEK 6
DoRead READ Numero,,Finis
MSAVEVALUE Total,P$numero,1,P$numero
TEST E
P$Numero,4,Finis
TRANSFER ,Again
Finis CLOSE Prob,,Flag1
TERMINATE 1
Flag TERMINATE 1
Flag1 TERMINATE 1
Datafile: TSTRD.TXT
1
2
3
4
5
6
7
Now, let’s run the simulation
CHOOSE
File / OpenIn the dialog box
SELECT
Tstskrdand
SELECT
OpenNow, create a simulation and open the Matrix Window. We can watch as the simulation reads the data file and updates the Matrix.
CHOOSE
Command / Create Simulationand
CHOOSE
Window / Simulation Window / Matrix WindowThe Open Matrix dialog box has the correct name in the drop-down box.
SELECT
OKand
CHOOSE
Command / STARTand in the dialog box we will suppress the Standard Report. Replace START 1
TYPE
START 1,NPSELECT
OK
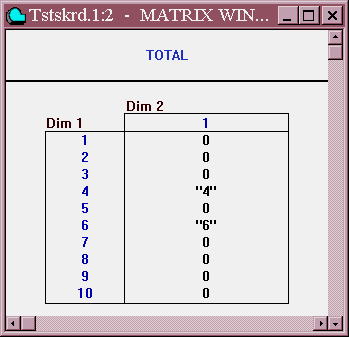
Figure 12—2. The Total Matrix.
The simulation will run very quickly, but this time only the values 4 and 6 will be entered into the Matrix in rows 4 and 6. Let’s briefly discuss the way the I/O Stream Blocks are working.
The OPEN Block is placed in a separate segment of the model since the file only needs to be opened once. First, a high priority Transaction opens the file to be read.
Then, the Transaction that will cause the reading of the files enters a SEEK Block that places the Current Line Position at line 4. Next, entry into a READ Block causes the fourth text line to be read. The value that has been read is put into the matrix and then a test is performed to see if another read should be done. Another READ is done and the second number retrieved and loaded into the Matrix. Finally, the file is closed and the simulation ended.
If any errors occur in the OPEN or CLOSE Blocks, the Transaction will go to Flag, or Flag1, respectively. Such an error would be easy to spot, since normally those two Blocks should have and entry count of 0.
OK. Now close all the windows related to this example. You should have a Main GPSS Window with a blank client area.
The next example file will demonstrate writing to a selected line in a file using random access.
CLICK ON The X-Upper Right of the Matrix Window
Model: TSTSKINW.GPS
; GPSS World Sample File - TSTSKINW.GPS
****************************************************
; Test for random write.
; Inserts 123456 before line 3 of data
; file TSTSKINW.TXT
****************************************************
GENERATE ,,,1
OPEN
("TSTSKINW.TXT"),,Flag
SEEK
3
WRITE
123456,,Flag1,On
CLOSE
Prob,,Flag2
TERMINATE 1
Flag TERMINATE 1
Flag1 TERMINATE 1
Flag2 TERMINATE 1
Datafile: TSTSKINW.TXT
This is line1
This is the info on line 2
This is line 3
Line 4
Now, let’s run the simulation
CHOOSE
File / OpenIn the dialog box
SELECT
Tstskinwand
SELECT
OpenNow, create a simulation and run it.
CHOOSE
Command / Create Simulationand
CHOOSE
Command / STARTand in the dialog box we will suppress the Standard Report. Replace START 1
TYPE
START 1,NPSELECT
OKNow, let’s look at the altered data file.
CHOOSE
File / Openand in the dialog box you must first
CLICK ON The Down Arrow at the End of the Files of type box
CHOOSE
Text File (*.txt)then from the list
SELECT
Tstskinwand
SELECT
Open
You will see that 123456 has been inserted before the third line of the file. If we had not used a SEEK Block, the data would have been inserted before the first line of the file. In this example, we have not isolated the OPEN Block since we are only doing one write and then closing the file and ending the simulation. You will see that the SEEK Block is used to position the Current Line Position to the location in the data file before text line 3 where the information in the WRITE Block is to be written.
OPEN, WRITE and CLOSE all have alternate exits in case an I/O error occurs. Not only will the Transaction go to the indicated Block, when an error occurs, but a subsequent CLOSE retrieves the Error Code, and places it into a Transaction Parameter.
OK. Now close all the windows related to this example. You should have a Main GPSS Window with a blank client area.
Next, we’ll look at a write operation that appends data to the end of a file.
Model: TSTAPPW.GPS
; GPSS World Sample File - TSTAPPW.GPS
*************************************************
; Appends 123456 at end of data file TSTAPPW.TXT.
*************************************************
GENERATE ,,,1
OPEN
("TSTAPPW.TXT"),,Flag
SEEK
10000
WRITE
123456,,Flag1,On
CLOSE
Prob,,Flag2
TERMINATE 1
Flag TERMINATE 1
Flag1 TERMINATE 1
Flag2 TERMINATE 1
Datafile: TSTAPPW.TXT
This is line1
This is the info on line 2
This is line 3
Line 4
Now, let’s run the simulation
CHOOSE
File / OpenIn the dialog box
SELECT
Tstappwand
SELECT
OpenNow, create a simulation and run it.
CHOOSE
Command / Create Simulationand
CHOOSE
Command / STARTand in the dialog box we will suppress the Standard Report. Replace START 1
TYPE
START 1,NPSELECT
OKNow, let’s look at the altered data file.
CHOOSE
File / Openand in the dialog box you must first
CLICK ON The Down Arrow at the End of the Files of type box
CHOOSE
Text File (*.txt)then from the list
SELECT
Tstappwand
SELECT
OpenThe only way that this use of the WRITE Block differs from the previous one is that we have chosen to append a value to the end of the file. You will see that the value 123456 has been added to the end of the file. We have done two things differently here. First, the SEEK Block has the value 10000 in it and the WRITE Block is in insert mode (indicated by the on). In Insert mode when the Current Line Position is set past the end of the file, the data will be appended to the end of the file.
Although we will not show it here, if Insert mode is off, meaning that the WRITE Block is operating in Replace mode, then GPSS World would fill any empty gaps with null text lines up to the line number in the SEEK, and add the data at that position.
OK. Now close all the windows related to this example. You should have a Main GPSS Window with a blank client area.
Next on the agenda is a model that uses the WRITE Replace mode. We’ve used the code SKRW in the name to indicate Seek, Replace, and Write. The SEEK Block is used to place the Current Line Position at a chosen location.
Model: TSTSKRW.GPS
; GPSS World Sample File - TSTSKRW.GPS
********************************************
; Writes 123456 on line 2 of data file
; TSTSKRW.TXT replacing original line.
********************************************
GENERATE ,,,1
OPEN
("TSTSKRW.TXT"),,Flag
SEEK
2
WRITE
123456,,Flag1,Off
CLOSE
Prob,,Flag2
TERMINATE 1
Flag TERMINATE 1
Flag1 TERMINATE 1
Flag2 TERMINATE 1
Datafile: TSTSKRW.TXT
This is line1
This is the info on line 2
This is line 3
Line 4
Now, let’s run the simulation
CHOOSE
File / OpenIn the dialog box
SELECT
Tstskrwand
SELECT
OpenNow, translate the model and run it.
CHOOSE
Command / Create Simulationand
CHOOSE
Command / STARTand in the dialog box we will suppress the Standard Report. Replace START 1
TYPE
START 1,NPSELECT
OKNow, let’s look at the altered data file.
CHOOSE
File / Openand in the dialog box you must first
CLICK ON The Down Arrow at the End of the Files of type box
CHOOSE
Text File (*.txt)CHOOSE
File / Openthen from the list
SELECT
Tstskrwand
SELECT
OpenWhat happened? Line two of the data file was overwritten with the value 123456. Once again, we did not need to isolate the OPEN or the CLOSE Blocks since we were only going once through the model. The difference here from the previous model is that the WRITE Block is in Replace mode. You have to specify
OFF for replace mode. In this example, we also used the SEEK Block to choose the line that we wanted to be overwritten.OK. Now close all the windows related to this example. You should have a Main GPSS Window with a blank client area.
Next let’s look at how Replace mode works if there is no line position specified in a SEEK Block.
Model: TSTSQRW.GPS
; GPSS World Sample File - TSTSQRW.GPS
********************************************
; Writes 123456 on line 1 of data file
; TSTSQRW.TXT replacing original line.
********************************************
GENERATE ,,,1
OPEN
("TSTSQRW.TXT"),,Flag
WRITE
123456,,Flag1,Off
CLOSE
Prob,,Flag2
TERMINATE 1
Flag TERMINATE 1
Flag1 TERMINATE 1
Flag2 TERMINATE 1
Datafile: TSTSQRW.TXT
This is line1
This is the info on line 2
This is line 3
Line 4
Now, let’s run the simulation
CHOOSE
File / OpenIn the dialog box
SELECT
Tstsqrwand
SELECT
OpenNow, create a simulation and run it.
CHOOSE
Command / Create Simulationand
CHOOSE
Command / STARTand in the dialog box we will suppress the Standard Report. Replace START 1
TYPE
START 1,NPSELECT
OKNow, let’s look at the altered data file.
CHOOSE
File / Openand in the dialog box you must first
CLICK ON The Down Arrow at the End of the Files of type box
CHOOSE
Text File (*.txt)then from the list
SELECT
Tstsqrwand
SELECT
OpenAs you might have guessed, this works just like the last model, but this time the Current Line Position has not been relocated so it is line number 1 that is replaced. Next, we’ll replace two lines, one with a text string and one with a calculation result. You can put any values in the string that you want. In a minute we’ll show you how to combine multiple values from different sources in a string.
OK. Now close all the windows related to this example. You should have a Main GPSS Window with a blank client area.
Next let’s try the multiple sequential WRITEs in replace mode.
Model: TSTSQR2W.GPS
; GPSS World Sample File - TSTSQR2W.GPS
***********************************************
; Does 2 sequential writes in replace mode
***********************************************
GENERATE ,,,1
OPEN
("TSTSQR2W.TXT"),,Flag
WRITE ("This is fun."),,Flag1,Off
WRITE
(5+5),,Flag2,Off
CLOSE
Prob,,Flag3
TERMINATE 1
Flag TERMINATE 1
Flag1 TERMINATE 1
Flag2 TERMINATE 1
Flag3 TERMINATE 1
Datafile: TSTSQR2W.TXT
This is line1
This is the info on line 2
This is line 3
Line 4
Now, let’s run the simulation
CHOOSE
File / OpenIn the dialog box
SELECT
Tstsqr2wand
SELECT
OpenNow, create a simulation and run it.
CHOOSE
Command / Create Simulationand
CHOOSE
Command / STARTand in the dialog box we will suppress the Standard Report. Replace START 1
TYPE
START 1,NPSELECT
OKNow, let’s look at the altered data file.
CHOOSE
File / Openand in the dialog box you must first
CLICK ON The Down Arrow at the End of the Files of type box
CHOOSE
Text File (*.txt)then from the list
SELECT
Tstsqr2wand
SELECT
OpenThe only difference here is that after each WRITE Block entry, the Current Line Position is increased one line. Hence, text lines 1 and 2 are replaced. We have also included an error flag for each WRITE so that if an I/O error occurs, we will know which Block is the cause of the problem.
OK. Now close all the windows related to this example. You should have a Main GPSS Window with a blank client area.
In our final two examples, we will work with strings. You can manipulate data in powerful ways using String Procedures with data that has been read in or data that you may wish to write. You can format report headers and data as well as read in and extract portions of data from a file. You might want to read further about Strings in Chapter 8 of the GPSS World Reference Manual.
Model: TSTCATW.GPS
; GPSS World Sample File - TSTCATW.GPS
***********************************************************************
*
* Barber Shop Simulation
* Time is in Minutes
*
***********************************************************************
GENERATE 5,2.5
;Create next customer.
SAVEVALUE Custnum+,1
;Total customers who stay
ASSIGN Custno,X$Custnum ;Assign number to customer
QUEUE
Barber ;Begin queue time.
SEIZE
Barber ;Own or wait for barber.
DEPART Barber
;End queue time.
ADVANCE 10,2.5
;Haircut takes a few minutes.
RELEASE Barber
;Haircut done.
; Give up the barber.
TEST G TG1,1,Fin
;Write final Avg. Queue Residence
TERMINATE 1
;Customer leaves.
Fin OPEN ("TSTCATW.TXT"),,Flg1
WRITE
(Catenate("Avg. Barber Queue Time Is ",QT$Barber)),,Flg
CLOSE
Prob,,Flg2
TERMINATE 1
Flg TERMINATE 1
Flg1 TERMINATE 1
Flg2 TERMINATE 1
Datafile: TSTCATW.TXT
This file is to be created.
Now, let’s run the simulation
CHOOSE
File / OpenIn the dialog box
SELECT
Tstcatwand
SELECT
OpenNow, create a simulation and run it.
CHOOSE
Command / Create Simulationand
CHOOSE
Command / STARTand in the dialog box we will suppress the Standard Report. Replace START 1
TYPE
START 1,NPSELECT
OKNow, let’s look at the altered data file.
CHOOSE
File / Openand in the dialog box you must first
CLICK ON The Down Arrow at the End of the Files of type box
CHOOSE
Text File (*.txt)then from the list
SELECT
Tstcatwand
SELECT
OpenIn the WRITE Block in this model, we’ve used the String Procedure "Catenate" to take text data and mix it with actual data from the simulation run. You can see that this would be most valuable in formatting reports or putting out selected information at given time intervals in a simulation run. You could have a segment of your model with the sole purpose of generating Transactions to write simulation statistics. The values from the simulation could be labeled as we have done here for easy interpretation after the simulation run is complete.
OK. Now close all the windows related to this example. You should have a Main GPSS Window with a blank client area.
Next, let’s see how we can manipulate data that we read in from a file.
Model: TSTSTRDW.GPS
; GPSS World Sample File - TSTSTRDW.GPS
*************************************************************************
* Movie Theater Food Buying Analysis
* Takes info on age and sex, reads it in and analyzes
* how mix of people will influence needs at concession
* stand. Then writes a report on wait times, queue size
* and total people served.
*************************************************************************
Fem EQU 1
Male EQU 2
GENERATE 1
TEST
E X$Finish,0,In ;After End of File-destroy
next xact
READ
Info,1,Fin ;Get Cust Age and Sex
SAVEVALUE
Info1,(Substring(P$Info,1,2))
SAVEVALUE
Info2,(Substring(P$Info,3,1))
SAVEVALUE Counter+,1
TEST
G X$Info1,8,In ;Older than 8
may buy
TEST LE
X$Info1,17,In ;Older than 17 don’t buy
TEST
E X$Info2,Male,Ques ;All Males buy
Ques TRANSFER
.50,In ;50% of Females are
dieting-don’t buy
QUEUE
Wait ;Begin queue
time.
SEIZE Salesperson
;Customer gets salesperson
DEPART
Wait ;End queue
time.
ADVANCE
6,1 ;Get
service
SAVEVALUE
Served+,1 ;Keep track of number served
RELEASE
Salesperson ;Done with Salesperson
In
TERMINATE
;Enter the viewing area
*************************************************************************
GENERATE ,,,1,10
;Make this first Transaction
OPEN ("TSTSTRD.TXT"),1,Er
;Read file
OPEN ("TSTSTW.TXT"),2,Er1
;Write file
TERMINATE
Fin SAVEVALUE
Finish,1 ;Signal EOF to new xacts
WRITE (Catenate("Average
"," Average ")),2,Er2
WRITE (Catenate(" Wait
","Line Size")),2,Er3
WRITE (Polycatenate(" ",
INT(QT$Wait)," ", INT(QA$Wait) )),2,Er4
WRITE "Total People
Served",2,Er7
WRITE (Catenate(" ",X$Served)),2,Er8
CLOSE Prob,1,Er9
CLOSE Prob1,2,Er10
TERMINATE 1
Er TERMINATE 1
Er1 TERMINATE 1
Er2 TERMINATE 1
Er3 TERMINATE 1
Er4 TERMINATE 1
Er5 TERMINATE 1
Er6 TERMINATE 1
Er7 TERMINATE 1
Er8 TERMINATE 1
Er9 TERMINATE 1
Er10 TERMINATE 1
Datafile: TSTSTRD.TXT
161
021
252
162
151
131
172
172
182
352
341
152
152
162
151
131
172
172
182
352
341
202
141
161
171
151
112
142
142
122
132
142
152
Datafile: TSTSTW.TXT
This file is to be created.
Now, let’s run the simulation
CHOOSE
File / OpenIn the dialog box
SELECT
Tststrdwand
SELECT
OpenNow, create a simulation and run it.
CHOOSE
Command / Create Simulationand
CHOOSE
Command / STARTand in the dialog box we will suppress the Standard Report. Replace START 1
TYPE
START 1,NPSELECT
OKand wait for the simulation to run. Now, let’s look at the altered data file.
CHOOSE
File / Openand in the dialog box you must first
CLICK ON The Down Arrow at the End of the Files of type box
CHOOSE
Text File (*.txt)then from the list
SELECT
Tststwand
SELECT
OpenIn this final model, we have read in values from the file TSTRDST.TXT, manipulated them first by dividing them into smaller pieces and second by taking only a portion of the information that we read at a given location in the data string. You can see how powerful String Procedures can be. Take some time to examine the String Procedures in Chapter 8 of the GPSS World Reference Manual. Also, you may want to take a breather before you tackle the ANOVA Command.
Don’t forget to initialize the data files as described in the beginning of this lesson and delete the two string output files. You may also want to delete the reports that we have created along the way. You can do that in the Windows file management system. See you when you’re ready for the next lesson.
You have probably noticed that changing nothing other than the random number seeds in a simulation can cause what appear to be large differences in output. If we are to use simulation in real problems, how can we tell which effects are random and which are real? The GPSS World ANOVA command provides a way.
This lesson is a brief introduction in the use of the statistical method known as analysis of variance. In it, we consider the ANOVA PLUS Library Procedure, which makes a first level of statistical analysis relatively easy. However, to become proficient in the application of simulation methods, you must become familiar with elementary statistical inference and the design of experiments. These topics are not covered in detail here.
When you use statistical methods to see if two alternatives are really different, you must not allow extraneous uncontrolled events to occur during the simulations. It would not be fair to load one run with additional activities at some unknown place in the simulation, and not to do precisely the same thing in all other runs. Therefore, you should generally not use interactive methods when you are running simulations that will be used for the statistics in your final report.
Let’s return now to the example of the barber who cannot keep up with arriving customers. As manager of the barber shop, you want to determine what effect a faster barber will have on the situation. You do not want to hire another barber. You want to see if a barber, who can cut hair in an average time of 5 minutes, causes a significant reduction in waiting time for the customers.
The treatment to be tested is that of barber 1 against barber 2. The barbers differ only in their average haircut times. Our experiment, then, consists of two treatment levels: 6.8 minute average haircut time, and 5 minute average haircut time. We will run 3 simulations at each level. In general, you will want to run more.
If our results are in the form of an arithmetic average of many items, we are justified in using the ANOVA command to do a statistical analysis. We can satisfy this criterion by using the average waiting time of customers as the overall measure.
We are going to build a Results Matrix of a special format that can be used by the ANOVA procedure. Let’s begin.
Since we have 1 treatment with two levels, we need 2 dimensions in our Results Matrix. The last dimension of a Results Matrix is always for replications, and we will have three of them at each treatment level. Therefore we will use a 2 x 3 matrix.
Now start the GPSS World Session.
CHOOSE
File / OpenIn the dialog box
SELECT
AnovaSELECT
OpenHere’s a copy of the program that you should now see in the Model Window.
; GPSS World Sample File - ANOVA.GPS
***********************************************************************
*
* Barber Shop Simulation
* Time is in minutes
***********************************************************************
GENERATE 5,1.7
;Create next customer.
QUEUE
Barber ;Begin queue time.
SEIZE
Barber ;Own or wait for barber.
DEPART
Barber ;End queue time.
ADVANCE Cut_Time
;Cut takes a few min.
RELEASE Barber
;Give up the barber.
TEST G
TG1,1,Doout ;Last XN writes Anova data.
TERMINATE 1
;Customer leaves.
Doout OPEN ("BARBER.RST"),,Prob ;Open Anova database.
SEEK
10000 ;Place pointer at end of file.
WRITE
(Polycatenate(QT$Barber," ",Treatment,"
")),,Prob,On
CLOSE
Errorcode,,Prob ;Close,send to Prob if error.
TERMINATE 1
Prob TERMINATE 1
;Terminate here if I/O error.
Notice that our main experimental parameter in the ADVANCE Block is represented by a User Variable, Cut_Time. This will allow us to change the time it takes to complete a haircut. We will use a three digit random number seed varying only the middle digit to indicate which run of the simulation is being executed, run 1, 2 or 3. In the second set of runs with the faster barber, we will use the same random number seeds and change only the speed at which the barber works.
Before starting the simulation, let’s take a look at the Include-file that we will use to execute multiple simulation runs for us.
RESULTS MATRIX ,2,3 ; Set up for 3 replicates of two levels
Cut_Time EQU 6.8
Treatment EQU 1
RMULT 411
Start 100,NP
MSAVEVALUE RESULTS,1,1,QT$Barber
Clear Off
RMULT 421
Start 100,NP
MSAVEVALUE RESULTS,1,2,QT$Barber
Clear Off
RMULT 431
Start 100,NP
MSAVEVALUE RESULTS,1,3,QT$Barber
Clear Off
Cut_Time EQU 5
Treatment EQU 2
RMULT 411
Start 100,NP
MSAVEVALUE RESULTS,2,1,QT$Barber
Clear Off
RMULT 421
Start 100,NP
MSAVEVALUE RESULTS,2,2,QT$Barber
Clear Off
RMULT 431
Start 100,NP
MSAVEVALUE RESULTS,2,3,QT$Barber
Let’s look at what will happen when we Translate the Include-file. First, it defines a Global Matrix named Results, which will be used to hold the numeric values for the Analysis of Variance. The Matrix has two dimensions, supporting 2 treatment levels, with 3 replicates of each.
Next, you will see that an EQU Command has been used to set the average haircut time equal to 6.8 minutes. Then, after three runs of the simulation and collection of appropriate data, the time is set to 5 minutes, allowing for a faster barber than in the first series of runs. You will also see that we set a Treatment value before each series of runs. This will differentiate the runs done with the 6.8 minute Cut_Time (Treatment 1) from those done with the 5 minute Cut_Time (Treatment 2).
Notice that we CLEAR OFF statistics between runs to avoid correlation between one simulation and the next. The OFF parameter is necessary to avoid resetting the Results Matrix. Also, in our simple example, we have not built in allowance for an empty barber shop at the start of each simulation. In your own simulation studies, you will want to ensure that startup effects are insignificant. This can be done by ignoring a transient startup period, using the RESET command some time into the simulation. The GPSS World PLOT command is useful for identifying transient periods that you might want to exclude. We could then gather the waittime values for each of the runs based on a start with a full shop. For now, let’s just concentrate on our simpler example.
Finally, we do two additional things. We run with the NP option as the B operand of START. This suppresses the Standard Report. Reports can also be controlled by the Settings of the Simulation Object. Also, we set the seeds of the random number generators in the Command File. The same seeds are used in the second series of runs so that the only difference in the model is in the time it takes to cut hair. This reduces variance in the results.
Now, create a simulation.
CHOOSE
Command / Create SimulationThis creates the Simulation Object and opens its Journal View. Next, we’ll use an Include-file to run the simulations. Remember, GPSS World will look for the Include-file in the same folder where the model object exists, if the simulation has not been saved, as in this case. If the simulation has been saved, it will look in the folder where the simulation object resides. Now do the Commands in the Include-file:
CHOOSE
Command / CustomTYPE
INCLUDE "ctlanova.txt"SELECT
OKWhat happened? The simulation started to run automatically. You will see that the simulation has run 6 times in a few seconds. Now, let’s look at the Results Matrix we have built for the Analysis of Variance.
CHOOSE
Window / Simulation Window / Matrix Windowand when the Matrix Window Cross Section Dialog appears,
CHOOSE
OKThis opens the Matrix Window on the Results Matrix. You may want to expand the window if all the cells in the Matrix are not visible. Here, we can see the results of each individual simulation.
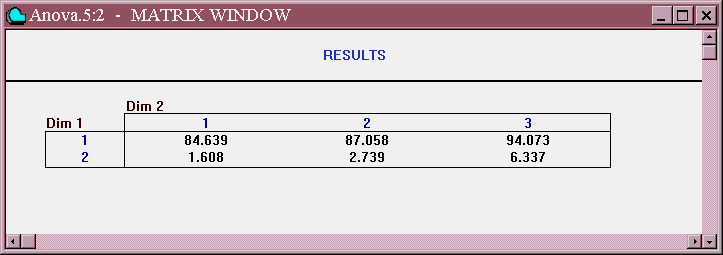
Figure 13—1. The Results Matrix.
Now, its time for the analysis.
CHOOSE
Command / Custom TYPE SHOW ANOVA(Results,2,1)and
SELECT
OKThe ANOVA Procedure writes an ANOVA Table into the Journal Window and returns the F value of the analysis.

Figure 13—2. An ANOVA Table in the Journal Window.
Let’s now interpret our results. The primary question is whether or not the effect of the faster barber is above the random noise level.
Look at the line for factor A in the ANOVA Table in the Journal Window. We find that the critical value of F for this experiment, at the 95% level, is 7.71. Since our calculated F value is much greater, we conclude that the effect of the faster barber is statistically significant.
Sometimes it is possible to expose real effects by increasing the durations of the simulations and/or the number of replications. We don’t need to worry about that here. The statistical significance of the faster barber is overwhelming.
Now look at the last line in the Journal. It shows the value returned by the ANOVA Library Procedure, 3.8797650. This is the Standard Error of the analysis and is available for use by Procedures which call the ANOVA routine.
The GPSS World ANOVA feature provides a very easy first level of statistical analysis. However, you may want to do more. In that case you may find that you want to create a results text file for input to a separate statistical analysis program. This is relatively easy using the OPEN, CLOSE, READ, WRITE, and SEEK GPSS Blocks, and the String formatting routines in the PLUS Library.
Also, the powerful GPSS World EXPERIMENT Procedure can be used to automatically direct and analyze the progress of an experiment involving many simulation runs. Lesson 19, below, goes deeper into the subject. We have really only touched the surface here.
As usual, close up all the windows before going on to the next lesson. You can leave the Main Window open if you don’t intend to stop now.
In the next lesson, we turn to an easier topic. We will look at how Reports are handled in GPSS World. See you then.
The Report management system contains a number of unique capabilities. First you should know that reports are never automatically deleted and are always created unless you suppress them using NP as the B operand of the START Command. Each report is given a name that indicates the simulation that produced it. e.g., SAMPLE2.1.1, SAMPLE2.1.2, etc. The default name is derived from the file name of your model, the sequence number of the simulation created from that model and finally, the report number for that simulation version. These reports will remain even after the Session is ended.
If you choose to use a REPORT Command you can only use it interactively as
REPORT
You can no longer give your reports names. Since reports are specially formatted files, if you wish to name them differently, you can copy the report to the clipboard and from there to a file with the name you choose to assign. Reports have an extension of "gpr". The numbering scheme is meant to keep your reports ordered. If you wish to reset the simulation number, you can do so in the Settings Notebook.
CHOOSE
File / Openand
SELECT
Sample9and
SELECT
OpenCHOOSE
Edit / SettingsCLICK ON The Random Numbers Page
The setting "Child Object Sequence Number" sets the number of the simulation filename. If you have saved simulations from this model, the number would be >1. You can reset it to any value. This is the value used in the report name.
When you start a new GPSS World Session, reports generated during that Session using the default name (simulation name plus simulation sequence number plus report sequence number) will be numbered starting with the first available sequence number after the highest number. Therefore, if you have deleted selected reports, you could have sequence numbers in a Session that are not contiguous.
The REPORT Command
REPORT used in a Custom Command dialog box is used to produce a report interactively at any time. The A operand of the Report Command, as used in GPSS/PC
tm, is no longer used.
The REPORT Settings
Now let’s look at some report settings.
Move to the Reports Page in the Model Settings Notebook.
CLICK ON The Reports Page
You can see the default information that is included in reports created by running the simulation that we just created. You can try changing the choices if you like.
Also, the settings are discussed in detail in chapter 2 of the GPSS World Reference Manual.
Let’s create a simulation from the opened model. first close the Settings Notebook.
Then
CHOOSE
Command / Create SimulationNow, see how a report is generated
CHOOSE
Command / STARTWe’ll use the 1 that’s already there.
SELECT
OKWhen the simulation completes, you’ll notice that a Report Window appears automatically as we expected. If you wish, you can increase the size of the window and examine the report more closely. For a detailed discussion of the items in the report, read Chapter 11 in the GPSS World Reference Manual.
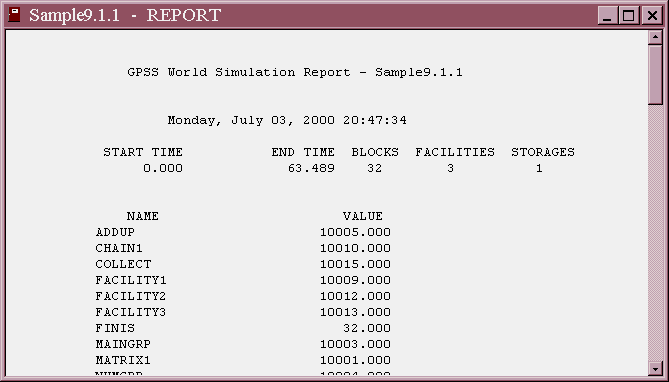
Figure 14—1. The Report Window.
Let’s run the simulation one more time so we have two reports.
CHOOSE
Command / STARTWe’ll use the 1 that’s already there.
SELECT
OKWhen the simulation ends, you should see a second Report Window. Next, let’s close one of the Report Windows.
CLICK ON The X-Upper Right - SAMPLE9.1.2 Window
CLICK ON No
when asked if you want to save the file. Then close the second report window, but save this one.
CLICK ON The X-Upper Right - SAMPLE9.1.1 Window
CLICK ON Yes
CHOOSE
SaveNow let’s open the report again.
CHOOSE
File / OpenCLICK ON
The down arrow at the end of the Files of type boxSELECT
ReportSELECT
Sample9.1.1SELECT
OpenExamine this report now if you like. Remember that you can always print any report from a Report Window by using the
File / Print option in the Main Menu.Let’s try using the REPORT Command. First, we’ll start the simulation running for a long time and interrupt it.
CLICK ON
Anywhere in the Journal WindowCHOOSE
Command / ClearCHOOSE
Command / STARTReplace the 1,
TYPE
11111SELECT
OKOnce the simulation is running, interrupt it.
PRESS
[F4]CHOOSE
Command / Customand
TYPE
REPORTSELECT
OKIn this lesson, we’ve learned about the sequence numbering that is used for reports; have examined the settings for reports and the contents of the GPSS World Report. We have also used the REPORT command.
If you wish to go on to the next lesson, close all windows. Don’t forget to delete all the reports that we have created that you no longer wish to keep using the Windows file management system.
CLICK ON The X-Upper Right of Each Window
and answer the appropriate questions.
In the next lesson, we will look at the Simulation Journal use in GPSS World.
This lesson considers the GPSS World Journal. We have used the Journal earlier in the this manual, but now we will examine it in a little more detail.
The Journal is a chronology of statements written to the Journal / Simulation Window. When you save a simulation, all messages in the Journal / Simulation Window are saved.
The Session Journal collects trace messages, error messages, and any interactive Commands.
Let’s use SAMPLE5 to study the Journal / Simulation Window.
CHOOSE
File / Openand
SELECT
Sample5and
SELECT
OpenWhen we create a simulation and run it, the Journal / Simulation Window will record any errors as well as any interactive actions such as SHOW or STEP commands. Now, let’s see how we can use the Journal Window for interactive debugging.
CHOOSE
Command / Create SimulationLet’s put a universal Stop Condition on the model so we can use the STEP Command and see the record in the Journal.
CHOOSE
Command / Customand in the dialog box
TYPE
StopSELECT
OKand then
CHOOSE
Command / STARTand in the dialog box replace the 1
TYPE
11and
SELECT
OKThe simulation will stop immediately. Let’s use the STEP command.
PRESS
[F5]a few times. Then look at the Journal Window. You may want to enlarge its size or print it to look at the messages created. You can imagine how helpful this window can be in tracking down errors.
Let’s try something new. Let’s end the GPSS World Session with no questions asked!
CHOOSE
Command / Customand
TYPE
EXIT(1)SELECT
OKWow! The whole GPSS World environment disappeared!
It was quick, but it also bypassed the "Do you want to save ..." queries designed to prevent you from losing your precious work. So be very careful with this. The EXIT Command is discussed more fully in Chapter 6 of the GPSS World Reference Manual.
In the next lesson, we will go into the use of the INTEGRATE Command.
When you can express changes to variables in terms of their derivatives with respect to time, GPSS World can automatically keep their values up to date. By using the INTEGRATE Command, you can incorporate a system of ordinary differential equations of any order into your simulation. Although continuous modeling is quite general, and easily handles nonlinear systems, it is usually slower than other methods.
Please familiarize yourself with the basic concepts by reading the section, Continuous Simulation, in Chapter 4 of the GPSS World Reference Manual. See you when you get back.
As you have seen, the primary tools for continuous modeling are the INTEGRATE Command, which sets up the differential equation and thresholds, and the INTEGRATION Block, which can turn each integration on or off.
It’s easy to set up a continuous variable. All you have to do is to initialize the User Variable and assert the INTEGRATE Command. This gives GPSS World the starting value and all it needs to know in order to keep updating it. Let’s try it.
CHOOSE
File / NewCHOOSE
Modelin the dialog box.
SELECT
OKLet’s assume that we have a manufacturing system that creates 2 widgets a second. When a full truckload of widgets has been produced, the supervisor sends for a truck to hauls away a full load to one of the distribution centers. We start the simulation with an inventory of 0.
TYPE
Inventory EQU 0to set up the initial condition. On the next line
TYPE
Inventory INTEGRATE 2,Full_Load,Get_Truckto set up the derivative. Usually, you will need to use a PLUS Procedure to define the derivative. Then, you would use a parenthesized procedure call in Operand A of the INTEGRATE Command.
Notice that when the threshold is crossed a transaction will be generated. We will use this to end the simulation.
TYPE
Full_Load EQU 50Now when 50 widgets are created, a transaction will be sent to the Block labeled Get_Truck.
That is all you need for the continuous part. For the discrete part, add the following statements to the model.
TYPE
You always need the discrete part to start and end the simulation. In this case we will use the threshold to decrease the Termination Count.
Save the model if you might want to experiment later and don’t want to type it in again.
CHOOSE
Command / Create SimulationBefore we start the simulation, open a Plot of the User Variable Inventory,
CHOOSE
Window / Simulation Window / Plot WindowThen in the Edit Plot Window
TYPE
Inventoryin all three fields: Label, Expression, and Title. Leave the other values as they are.
CLICK ON The Plot ButtonCLICK ON The Memorize Button
Let's mark the threshold on the plot, as well. In the Edit Plot Window in the Label entry field replace the current value
TYPE
Thresholdand in the Expression entry field replace the current value
TYPE
Full_LoadLeave the other values as they are and
CLICK ON The Plot Button
CLICK ON The Memorize Button
SELECT
OKExpand the Plot Window to a good viewable size. Now start the simulation.
CHOOSE
Command / STARTSELECT
OKYour Plot Window should look like this.
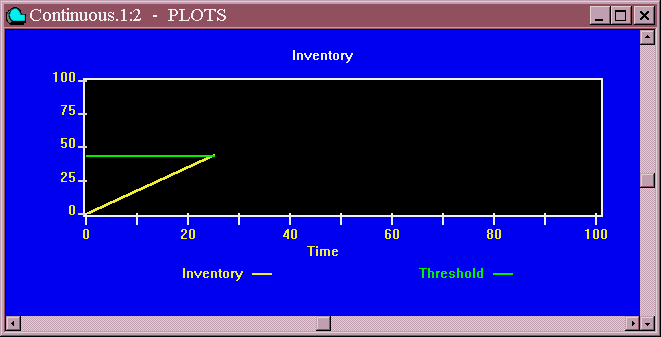
Figure 16—1. Inventory Plot.
You should see the Inventory value increase to 50 very quickly, causing the simulation to end. In the Standard Report, it shows that it only took 25 simulated minutes to do the job. Therefore, you can determine that two widgets were manufactured per minute. The threshold was crossed at 25 simulated minutes, a transaction was created and sent to the Block labeled Get_Truck. The INTEGRATION Block is available for Transaction-level control. It’s described in Chapter 7 of the GPSS World Reference Manual.
This was a very simple example for showing the basics. Most integrated variables do not have constant derivatives. A more realistic model is in Chapter 2 of this manual, under PREDATOR.GPS.
If we had wanted to cause the Inventory value to drop when the truck left, we would have to decrease the value in a User Variable. Since the EQU Command cannot be asserted by a Transaction, how would we do this?
The answer is a PLUS Procedure, which we will consider in the next lesson. Close the Plot Window before you move on to the next example.
Now let’s turn to an example where we know the solution before we even start.
Consider the following system of ordinary differential equations:
x_’ = y_
y_’ = -x_
and at time t = 0,
x_ = 1
y_ = 0
The solution is
x_ = sin( t )
y_ = -cos ( t )
Here we are using underscores to ensure that our variables will not clash with GPSS World keywords.
Let’s see what happens when we simulate this system. First close all open windows, leaving only the GPSS World Main Window.
To run the simulation and create a Plot, in the Model Window.
CHOOSE
File / OpenSELECT
Sample13and then
SELECT
OpenNext, the simulation must be created.
CHOOSE
Command / Create SimulationNow, we set up a Plot of the User Variables, to observe the dynamics.
CHOOSE
Window / Simulation Window / Plot WindowThen in the Edit Plot Window,
for the Label,
TYPE
x_and in the Expression field
TYPE
x_In the Plot Title,
TYPE
Sine / Cosine Sampleand for a Time Range
TYPE
120For Y values for the Min
TYPE
-2and for Max
TYPE
2and
CLICK ON
The Plot ButtonCLICK ON The Memorize Button
Now, add the other variable to the plot. In the Edit Plot Window, replace the Label and Expression fields
TYPE
y_in both and leave the other values as they are.
CLICK ON
The Plot ButtonCLICK ON The Memorize Button
CHOOSE
OKBefore we begin the simulation, arrange the Plot Window so that it is large enough to view the details.
Now, play out the integration. From the Main Window menu
CHOOSE
Command / STARTand
SELECT
OKYour plot should look like this.

Figure 16—2. Sine Wave Plot.
As you can see, the familiar sine wave unfolds for both variables. When the simulation completes, examine the Standard Report. Compare the x_ variable with the Savevalue x_exact, which is calculated from the analytic solution. Do the values agree?
When you have the solution to the differential equations, consider yourself lucky and use it everywhere you can. Most real world systems of equations are much too unwieldy for that. Usually, you will be forced to play out the integration numerically, using one or more INTEGRATE Commands, which takes a lot more computer time.
Now, close all open windows.
We.., that's all for now. In the next lesson, we will learn about GPSS World's built-in Programming language called PLUS.
This lesson considers PLUS, the Programming Language Under Simulation. See the "PLUS Primer" at the end of this lesson for practical examples of the use of PLUS.
As we have learned, Model Statements are the building blocks of Models, and they can be sent interactively to an existing simulation.
However, the only PLUS Statements that are Model Statements are the PROCEDURE and EXPERIMENT Statements. All other PLUS Statements can exist only within the body of a Procedure. PLUS Expressions are a little different. They can exist within PLUS Statements, or, when parenthesized, within the operands of GPSS Statements.
There are only a few different PLUS Statement types. They are:
EXPERIMENT — Define a PLUS Experiment.
PROCEDURE — Define a PLUS Procedure.
TEMPORARY — Define and restrict the scope of a User Variable.
TEMPORARY MATRIX — Define and restrict the scope of a Matrix Entity.
BEGIN / END — Compound Statement. Create a block of PLUS Statements.
Assignment — Set the value of a Named Value or Matrix element.
Procedure Call — Invoke a Library Procedure.
IF / THEN — Test an expression and act on a "TRUE" result.
IF / THEN / ELSE — Test an expression and act on the result.
WHILE / DO — Perform action repetitively.
GOTO — Jump to a new location within the Procedure.
RETURN — Finish the processing and, optionally, give a result to the caller.
Please turn now to Chapter 8 in the GPSS World Reference Manual, and read about the PLUS Language.
Welcome back. Did you notice that a PROCEDURE Statement has a slot for only one statement? Usually, you will use a Compound Statement there, and it will enclose a Statement List. However, any single valid PLUS Statement goes there just as well.
In this lesson we will not use all the PLUS Statements. Here we will demonstrate the definition and interactive redefinition of Procedures, and some tips on debugging PLUS Procedures interactively.
Let’s begin by defining a Procedure that can set the value of a User Variable.
CHOOSE
File / NewCHOOSE
ModelThen
SELECT
OKTYPE
PROCEDURE SetPop(level) Foxes = level ;Although most PLUS Procedures are more complex, this is all that is needed to define one. It doesn’t even declare a return value, so a return value of 0 would be used by default. Return values are useful when a PLUS Procedure passes information to a calling Procedure. We don’t use it in this simple example.
Now save the model.
CHOOSE
File / Save AsThen
TYPE
Foxfor the name of the model and
SELECT
SaveCHOOSE
Command / Create SimulationWe have included the Procedure SetPop as part of the Model and then created the Simulation. Any invocations of SetPop interactively or within the simulation will now use this definition.
CHOOSE
Command / SHOWand in the dialog box
TYPE
SetPop(100)and
SELECT
OKNotice that the return value from the SetPop Procedure was 0. Let’s look at the population level.
CHOOSE
Command / SHOWand in the dialog box
TYPE
Foxesand
SELECT
OKSee? The User Variable Foxes was updated when we did the first SHOW. Now lets redefine the SetPop Procedure interactively.
CHOOSE
Command / CustomTYPE
PROCEDURE SetPop(level) Foxes = level # 10 ;and
SELECT
OKNow, when the SetPop Procedure is invoked, the population will be set to ten times the argument. Again
CHOOSE
Command / SHOWand in the dialog box
TYPE
SetPop(100)and
SELECT
OKNotice that the return value from the SetPop Procedure was 0 again. We could have inserted a RETURN Statement into SetPop. In fact, SetPop could be nothing more than a single RETURN Statement.
Let’s look at the population level.
CHOOSE
Command / SHOWand in the dialog box
TYPE
Foxesand
SELECT
OKAs you can see, although the simulation had already been sent to the Simulation Object, we were able to redefine the Procedure interactively. This can be useful when you need to debug your own PLUS Procedures, as we will discover next.
For now, close both the Model Window and the Journal Window.
Debugging PLUS Procedures
When you are debugging your PLUS Procedures, the first thing to do is to turn on the PLUS Trace in the Reports Pages of the Settings. Then every invocation causes a record to be written to the Journal Window. These traces are indented to show the depth of the processing, and they list the evaluated arguments of the invocation. It’s easy to trace within PLUS Procedures as well. Just create one or more dummy PLUS Procedures that do nothing. Then you can pepper your primary PLUS Procedure(s) with calls to this debugging Procedure, and when the PLUS Trace is on you will receive traces in the Journal Window showing the state of your variables.
CHOOSE
File / Newand since Model is already highlighted
SELECT
OKEnter the following PLUS Procedures.
TYPE
PROCEDURE RabbitRate() BEGIN
PROCEDURE Dummy( argument ) RETURN;
Don’t forget the final semicolons. We have defined a dummy procedure for the sole purpose of tracing the value of our local variable. The PLUS Trace must be on for this to work. Let’s turn it on
CHOOSE
Edit / SettingsCLICK ON The Reports Page of the Settings Notebook
CLICK ON The PLUS Trace box
Now, save the model.
CHOOSE
File / Save AsThen for the name of the file
TYPE
RatesSELECT
SaveNext, create the simulation
CHOOSE
Command / Create SimulationSo far, so good. If you inadvertently made typing errors, use
Search / Next Error in the Model Window to find and correct them. Now invoke the Procedure.CHOOSE
Command / SHOWand in the dialog box
TYPE
RabbitRate()and
SELECT
OKWe got an error message. Take a close look at each line in the message. It tells us the line number where the error occurred. Let’s put the cursor at that point. Make sure that the Model Window has the focus.
CHOOSE
Search / Go To LineTYPE
5and
SELECT
OKApparently, this line is trying to use a value from a Temporary User Variable that was never initialized. As we can see this is true for the TotRate Variable. We forgot to initialize it. Just above the line in error,
TYPE
TotRate = BirthRate - DeathRate ;and, after that
TYPE
Dummy(TotRate);This time we are NOT going to Retranslate the Model. We are going to redefine the Procedure and still maintain the existing simulation environment. We do this by using an Interactive INCLUDE Command. This may seem cumbersome, but it is meant to show you the power of the INCLUDE Command.
First, copy the text in the Model Window to the Window Clipboard. Next, we will create a text file.
CHOOSE
File / NewSELECT
Text FileSELECT
OKand then paste the Clipboard contents into the new Text File and save the file.
CHOOSE
File / Save AsTYPE
RateDeffor the file name and
SELECT
SaveThis creates a TEXT file that can be used as the Include-file. All Include-files must be plain text files. Now, let’s redefine SetPop() in the existing simulation. That means using INCLUDE, not Retranslate.
CHOOSE
Command / Customand in the dialog box
TYPE
INCLUDE "RateDef.txt"and
SELECT
OKSo far, so good. Notice that we did not Retranslate. Now invoke the Procedure.
CHOOSE
Command / SHOWand in the dialog box
TYPE
RabbitRate()There. That fixed the problem. It was easy to redefine the Procedure interactively.
You may find it convenient to make minor modifications to the PLUS Procedure when you are testing it. First, you may want to "comment out" TEMPORARY Statements, as long as none of the Temporary User Variable or Matrix Names clash with global entities. If there is a conflict, global variables could be altered. It is best to keep the Temporary names unique. Simply place /* at the beginning of each TEMPORARY or TEMPORARY MATRIX Statement, and */ after it. This will cause your intermediate results to be available after the Procedure ends. Second, you can add additional Assignment Statements and RETURN Statements to stop the Procedure wherever you like.
Don’t forget that you can always insert calls to a dummy PLUS Procedure to get watch how your variables are changing. Of course, the PLUS Trace must be turned on in the Settings of the Simulation in order to get the traces in the Journal Window.
Hopefully, reviewing the example models in this lesson and the examples in the Plus Primer that follows will help you to understand some of the potential of PLUS. Also, the sample model PREDATOR.GPS in Chapter 2 of this manual uses a PLUS Procedure.
PLUS PRIMER
PLUS is a powerful programming language that can be used nearly anywhere in a GPSS World model. Most GPSS Statement operands can take a PLUS expression wrapped in a pair of parentheses. Stop for a moment to consider what that means. Sure, PLUS expressions can be a set of elements including SNAs and numeric values. But they can also contain calls to PLUS Procedures defined by you. You may only need a special calculation to be incorporated into the expression evaluation. But at times you may want to use a PLUS Procedure for its ability to change permanent values.
The purpose of this section is to augment the PLUS Lesson with uses for this powerful language that is included in your GPSS World software. It gives some additional practical examples, and a step by step description of how each Model and Plus Procedure work. The examples are included with the sample models. Unless you have changed their destination on installation, you will find them in the GPSS World Samples Folder.
PLUS Procedures must be defined before you can use them. You define them in PROCEDURE Statements, and you use them by placing Procedure Calls in expressions.
Every PLUS Procedure Statement starts with your Procedure name and the formal argument list. This latter is a list of zero or more replacement names that determine how arguments supplied in the Procedure Call are to be used.
Although the arguments used in a Procedure Call are called "Actual Arguments", each one can be a complicated expression, which is evaluated at the time the Procedure Call is evaluated. It is the result of each of these argument evaluations which is used in place of the "Formal Arguments" declared in the Procedure definition. The final value of each argument is matched by position only.
In the examples that follow, you will find PLUS reserved names in upper case letters. They need not be upper case when you use them in your Models.
; GPSS World Sample File - PLUSANS.GPS
;
; This model uses the same PLUS Procedure to do
; different operations dependent on the Arguments
; passed to it.
;
GENERATE ,,,1
ASSIGN 1,500
ASSIGN 2,1234
ASSIGN Type,1 ;Assign calc type.
SAVEVALUE Ans,(Comp(P1,P2,P$Type))
;1st result
TERMINATE 1
GENERATE ,,,1
ASSIGN 1,260
ASSIGN 2,2
ASSIGN Type,2 ;Assign calc type.
SAVEVALUE Ans1,(Comp(P1,P2,P$Type))
;2nd result
TERMINATE 1
PROCEDURE Comp(Arg1,Arg2,Arg3)BEGIN
TEMPORARY Name1;
IF (Arg3=1) THEN BEGIN
Name1=((Arg1#Arg2)/3);
RETURN (Catenate(Name1," is the answer."));
END;
ELSE BEGIN
Name1=(Arg1+Arg2);
RETURN (Catenate(Name1," is the second answer."));
END;
END;
In this example, a PLUS Procedure is called when operand B of a SAVEVALUE block is evaluated. The same Procedure is used in two different places in the model and the action in the Procedure is determined by one of the arguments that identifies the type of operation to be used. When the Type passed as Arg3 is 1, the first part of the IF..THEN..ELSE is executed, if the Type is 2, the ELSE portion of the statement is executed. In both cases, a TEMPORARY variable is created inside the Procedure to receive the results of the calculation. The calculation could also be done directly in the RETURN statement and then the TEMPORARY variable would not be necessary. It is used more for clarity. A TEMPORARY variable only survives until the Procedure returns. In the call to the Procedure where the value to be placed in the SAVEVALUE Ans is being calculated, The values 500 and 1234 are received by the Procedure in Arg1 and Arg2. Arg3 receives the value in the Type parameter. Since Arg3=1 the following two steps after the IF....THEN statement are performed. The RETURN statement uses the String Library command CATENATE to combine two values into a single string which is then placed in the SAVEVALUE Ans and the Procedure ends. The BEGIN and END statements surrounding the IF and ELSE are necessary to insure that both actions are performed.
Note that all PROCEDURE definitions surround the PROCEDURE with a BEGIN and END. Also each statement ends with a ";". Even Statements within an IF...THEN....ELSE Statement end in a ";".
To run this model, after it is translated, use a Start 2. When the model has run to completion, you can view the values in the SAVEVALUES Ans and Ans1 by pressing [F8] and [F9]. These Function keys have been preloaded with Show commands on the Function Keys page of the Model Settings Notebook.
; GPSS World Sample File - MIN.GPS
;
; This model takes a series of numbers that are picked according
; to probabilities as defined in the Function, Myfunc and then
; uses a PLUS procedure to select the minimum value. The result
; is placed in the Savevalue, Low. When the model has run, the
; four values, Val1, Val2, Val3, and Val4 can be displayed in
; the status line by pressing the function keys [F5], [F6], [F7]
; and [F8],
respectively. The lowest value is displayed by pressing
; function key [F9].
These keys have been preset in the Model
; Settings Notebook on the Keys page.
;
GENERATE ,,,1 ;Create 1 Xact.
Myfunc FUNCTION RN2,D4 ;Random probabilistic pick of values.
.25,5/.50,7/.80,8/1,2
SAVEVALUE Val1,FN$Myfunc ;Assign value.
SAVEVALUE Val2,FN$Myfunc ;Assign value.
SAVEVALUE Val3,FN$Myfunc ;Assign value.
SAVEVALUE Val4,FN$Myfunc ;Assign value.
;Send values to PLUS to select
; min value and put in Savevalue.
SAVEVALUE Low,(Minimum(X$Val1,X$Val2,X$Val3,X$Val4))
TERMINATE 1 ;End simulation.
PROCEDURE Minimum(Arg1,Arg2,Arg3,Arg4) BEGIN
TEMPORARY Lowval;
IF (Arg1<=Arg2) THEN Lowval=Arg1;
ELSE Loval=Arg2;
IF (Lowval>Arg3) THEN Lowval=Arg3;
IF (Lowval>Arg4) THEN Lowval=Arg4;
RETURN (Lowval);
END;
This model can be run with a START 1. After four
values have been assigned to four SAVEVALUES using the GPSS Discrete
Random Function called Myfunc, the lowest value is placed in the
SAVEVALUE "Low" by calling the Procedure "Minimum".
This PLUS Procedure compares the values by using a series of IF
Statements. The TEMPORARY variable "Lowval" is used to hold
the intermediary values and finally the value that is determined to be
lowest by comparison. That value is then returned to Operand B of the
SAVEVALUE block. When the model run completes, press [F5], [F6],
[F7],
and [F8] to
see the values that were compared in the Status Line of the Main Window.
[F9] will
show you the lowest value chosen from the four.
; GPSS World Sample File - FACTORL.GPS
;
; This model uses a PLUS Procedure to calculate
; factorials.
; You can either change the Initial statement to
; calculate factorials based on different values
; or use the Initial command after the model is
; Translated to Initialize the SAVEVALUE Facval.
; After the model has run, you can press the
; function key s
to display the value of the
; calculation in the status line. This function
; key has been preset to display X$Answer.
; This PLUS Procedure is designed to calculate
; Factorials for positive integers only.
;
INITIAL X$Facval,10
GENERATE 1
SAVEVALUE Answer,(Factorial(X$Facval))
TERMINATE 1
PROCEDURE Factorial(Arg1) BEGIN
TEMPORARY Result;
Result=1;
WHILE(Arg1>1) DO BEGIN
Result=Result#Arg1;
Arg1=(Arg1-1);
END;
RETURN Result;
END;
This PLUS Procedure uses a WHILE loop. It takes an Argument that is provided via the evaluation of a SAVEVALUE and finds the factorial of that value by looping through the WHILE DO, accumulating a result by multiplying the TEMPORARY "Result" (which is originally set equal to 1) by the variable Arg1. With each loop, Arg1 is decreased by one until it reaches 1. At this point, the loop is ended and the RETURN is executed which passes the final accumulated value back to Operand B of the SAVEVALUE Answer. You can view the SAVEVALUE, Answer, by pressing [F8], which has been preset with a Show command in the Model Settings Notebook. Use START 1 to run the simulation
You can call PLUS Procedures interactively, as well, once you have translated the model. Try this using a Custom Command:
SHOW Factorial(10)
This can be useful in model verification and debugging. Procedures can even be redefined inertactively, as well.
; GPSS World Sample File - FACTORL1.GPS
;
; This model uses a recursive PLUS Procedure to
; calculate factorials.
; You can either change the Initial statement to
; calculate factorials based on different values
; or use the Initial command after the model is
; Translated to Initialize the SAVEVALUE Facval.
; After the model has run, you can press the
; function key [F8] to display the value of the
; calculation in the status line. This function
; key has been preset to display X$Answer.
; This PLUS Procedure is designed to calculate
; Factorials for positive integers only.
;
INITIAL X$Facval,10
GENERATE 1
SAVEVALUE Answer,(Factorial(X$Facval))
TERMINATE 1
PROCEDURE Factorial(Arg1) BEGIN
IF (Arg1<=1) THEN RETURN 1;
ELSE RETURN (Arg1#(Factorial(Arg1-1)));
END;
This approach to calculating the Factorial uses a recursive Procedure call. A Procedure actually calls itself from within itself repeating again and again until Arg1 reaches 1. PLUS can also call other Procedures from within a Procedure. Arguments in such calls are kept as long as needed on a stack of arguments called the Procedure Call Stack. The maximum stack size can be changed in the Model Settings Notebook. Again, use START 1 to run the simulation.
The following are the input and output files associated with the GPSS World model, MATINIT.GPS that follows.
Input File - Inpt.txt
1 2
6
2 4
3
33 3
1
6 6
4
5 2343 1
6 45
4
Output File - Outpt.txt
Initial MX$Values(1,1),1
Initial MX$Values(1,2),2
Initial MX$Values(1,3),6
; GPSS World Sample File - MATINIT.GPS
;
; This model reads an external ASCII data file into
; a Matrix in GPSS World. It then cycles through
; the Matrix and writes out an Initial statement
; for each cell of the Matrix. A PLUS Procedure is
; used to separate the parts of the statement to be
; written. Since PLUS can use a multi-line format
; the statement can appear on multiple lines and
; the portions of it can be assigned to temporary
; variables that will not survive outside the PLUS
; Procedure. This makes the statement easier to
; handle and interpret than if it were strung
; across in Operand A of the Write block.
Values MATRIX ,10,3 ;Defines Matrix.
GENERATE ,,,1 ;Produce only one Xact.
OPEN ("Inpt.txt"),1,Flag ;Open external file to be read.
OPEN ("Outpt.txt"),2,Flag1 ;Open output file to which
output
; will be written.
Again READ Excel,1,Finis ;Read Inpt.dat one line
; at a time into parameter.
; Excel. At end or error;
; go to label Finis.
SAVEVALUE Rownum+,1
;Increase Matrix row by 1.
Morecol SAVEVALUE Colnum+,1 ;Increase Matrix column by 1.
MSAVEVALUE Values,X$Rownum,X$Colnum,(Word(P$Excel,X$Colnum))
;Store the value in the parameter
; in the Matrix cell.
TEST G
X$Colnum,2,Morecol ;Are there more columns to be loaded?
SAVEVALUE Colnum,0
;No more columns? Start next row
TRANSFER ,Again
; at label Again.
Finis CLOSE Prob,1,Flag2 ;Close data file.
ASSIGN Colnum,0
;Prepare to cycle
ASSIGN Rownum,0
; thru Values Matrix
Again2 ASSIGN Rownum+,1 ; from the beginning
More ASSIGN Colnum+,1
TEST LE P$Rownum,7,Finis2 ;Has final row been processed?
WRITE (WriteInitial()),2,Wrtebug ;Write Initial
; Statement using
; PLUS Procedure.
TEST G P$Colnum,2,More ;Are there more columns?
ASSIGN Colnum,0
;Set Column number to 0.
TRANSFER ,Again2
;Start Next row.
Finis2 CLOSE Prob2,2,Flag3 ;Close output file.
TERMINATE 1
;End for normal completion.
Flag TERMINATE 1
;End if errors in input file Open.
Flag1 TERMINATE 1
;End if errors in output file
; Open.
Flag2 TERMINATE 1
;End if errors in input file
; Close.
Wrtebug TERMINATE 1
;End if errors on Write.
Flag3 TERMINATE 1
;End if errors on output file
; Close
PROCEDURE WriteInitial() BEGIN
TEMPORARY Value1,Value3,Value5,Value6,Value7;
Value1="Initial MX$Values(";
Value3=",";
Value5="),";
Value6=MX$values(P$Rownum,P$Colnum);
Value7=" ";
RETURN (PolyCatenate
(Value1,
P$Rownum,
Value3,
P$Colnum,
Value5,
Value6,
Value7));
END;
This model reads an external ASCII data file into a
Matrix in GPSS World. It then writes out Initial statements that can be
used to Initial the Matrix on future runs of the model using a GPSS
World INCLUDE Command.
In this use of PLUS, a complicated, lengthy WRITE block operand is broken down into understandable pieces. The advantage of a PLUS Procedure here is that the Procedure statements can wrap around multiple lines and TEMPORARY Variables can be defined to break the statement into more easily handled pieces to make it more self documenting. The TEMPORARY Variables do not survive outside the PLUS Procedure. Actually, we could have done all the file operations inside PLUS Procedures. In that case we would have used the Open(), Close(), Read(), and Write(), Library Procedures.
You will also see that no arguments are passed to the WriteInitial PLUS Procedure. All the values needed that exist in the simulation are available to PLUS. Sometimes there is value in passing arguments to make the Procedure more readable, or for tracing the values of variables.
RETURN evaluates the complex string and returns it to the WRITE block to be written to the file Outpt.txt. The WRITE block knows to which file the data should be written by evaluating the data stream operand which in this case is 2. When Outpt.txt was opened, it was opened using data stream 2. START 1 will run the simulation.
Don’’t forget about the PLUS Trace. It is quite helpful in debugging your PLUS Procedures. It van be turned on in the Reports page of the Settings Notebook.
In the next lesson, we will explore further some of the debugging options in GPSS World, including the PLUS Trace.
GPSS World’s interactivity makes debugging and the testing of design alternatives much easier than in older versions of GPSS. In the last lesson we saw how much easier it is to debug PLUS Procedures in an interactive environment. In this lesson, we’ll try a few simple debugging techniques that can be very useful when you apply them to complex models.
The model is shown below.
; GPSS World Sample File - BARBER.GPS.
***********************************************************************
*
* Barber Shop Simulation
*
***********************************************************************
Waittime QTABLE Barber,0,2,15 ;Histogram of Waiting times
GENERATE 3.34,1.7
;Create next customer
TEST LE Q$Barber,1,Finis
;Wait if line 1 or less
; else leave shop
SAVEVALUE Custnum+,1
;Total customers who stay
ASSIGN Custnum,X$Custnum ;Assign number to customer
QUEUE
Barber
;Begin queue time
SEIZE
Barber
;Own or wait for barber
DEPART Barber
;End queue time
ADVANCE 6.66,1.7
;Haircut takes a few minutes
RELEASE Barber
;Haircut done. Give up the barber
Finis TERMINATE 1
;Customer leaves
CHOOSE
File / OpenSELECT
Barberand
SELECT
OpenBefore we go any further, let’s put some SHOW commands into Function Keys. Open the Model Settings Notebook
CHOOSE
Edit / Settingsand select the Function Keys page.
Next to [F8] and [F9] type the following two SHOW Commands. Place the mouse pointer in each box and click once before typing.
TYPE
SHOW P$Custnumand
TYPE
SHOW X$CustnumSELECT
OKYou have now loaded SHOW commands into two function keys. While debugging a simulation you can interactively examine many values at a touch of a single key. We’ll use them later.
Now, create the simulation.
CHOOSE
Command / Create SimulationLet’s also open the Blocks Window. In the Main Menu
CHOOSE
Window / Simulation Window / Blocks WindowNow, let’s put a Stop Condition on Transaction 5.
CHOOSE
Command / Customand in the dialog box
TYPE
Stop 5SELECT
OKYou should also arrange the windows so you can see both the Blocks Window and the Journal Window.
Your screen should look something like this.
Figure 18—1. The Blocks, and Journal Windows in BARBER.GPS.
In the Main Menu
CHOOSE
Command / STARTand in the dialog box replace the 1
TYPE
100and
SELECT
OKNow you see a message indicating that Transaction 5 has stopped on its first attempted Block entry in the simulation. In this case it happens to be the first GENERATE Block.
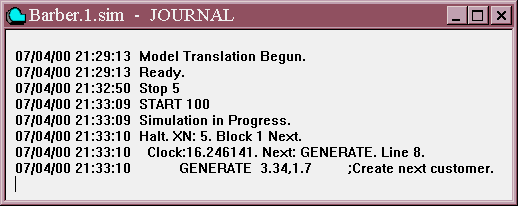
Figure 18—2. Message after Stop is executed in the Journal Window.
Now, we’ll step through the simulation using the function key that is loaded in the Model Settings Notebook with STEP 1. If you want to check the list of preassigned function key settings, go to the Function Keys Page of the Model Settings Notebook.
Now that we have control of the active Transaction, let’s first take off the Stop Condition.
CHOOSE
Window / Simulation Snapshot / User StopsCLICK ON The "5"
CLICK ON The Remove Button
SELECT
OKNow let’s invoke the STEP 1 Command using the Function Key.
PRESS [F5]
You could also execute this command by pressing [Ctrl]+[Alt]+[S] or choosing
Command / STEP in the Main Menu.Transaction 5 will enter the GENERATE Block. You’ll be able to see this in the trace messages in the Journal Window. Now STEP one more time to cause the Transaction to enter the TEST Block.
PRESS
[F5]When this Transaction enters the TEST Block, it will find that the queue for the barber is greater than 1. This customer will then choose not to wait and will leave the shop. You will see it has been scheduled for the TERMINATE Block.
Now, before going on, let’s examine some other values related to the simulation.
CHOOSE
Command / SHOWand in the dialog box
TYPE
Q$Barberand
SELECT
OKand see that the size of the queue (2) is returned to the Status Line in the Main Window, but can also be seen in the Journal Window. Now, let’s use the SHOW Commands that we loaded into the function keys.
PRESS
[F9]The value 4 will be returned in the Status Line. This tells us the number of customers who have stayed at the shop. Remember, you can also use the Expression Window to watch a whole series of values as you step through a simulation. The Expression Window was discussed in detail in the Lesson 11. Now let’s continue to Step through the simulation.
PRESS
[F5]to move Transaction 5 through the TERMINATE Block. Now let’s look at the number of customers that have stayed in the shop
PRESS
[F9]The value returned will be 4. Transaction 5 did not wait and was not added to our counter.
We’ll use the preloaded function key for CONTINUE to do this
PRESS
[F2]If the Blocks Window is open, the simulation will run more slowly than with all the windows closed. Close the Blocks Window now, but minimize the Journal Window for later use.
CLICK ON The X-Upper Right of the Blocks Window
then
CLICK ON
The leftmost of the three buttons-Upper Right of the Journal WindowThe simulation will quickly run to completion and a report will be written.
Let’s also take a quick look at one of the other windows, the Table Window.
CHOOSE
Window / Simulation Window / Table Windowand in the drop-down box, you’ll see Waittime, since this is the only Table in the model.
SELECT
OKIn this particular histogram you can see the wait times experienced in the queue for the barber. Mean waiting time was 10.709 minutes with a standard deviation of 2.702 minutes. The Table Window is dynamic, and is updated as the state of the simulation changes.

Figure 18—3. The Waittime Table
Before we go on, let’s restore the Journal Window. On the Desktop
DOUBLE CLICK ON The Minimized Block Icon in the lower left of the Main Window
Now we can watch Journal messages as we work a little more with the use of Stops.
CHOOSE
Window / Simulation Window / Blocks Windowand open the Blocks Window to a comfortable viewing size.
Now, in the Blocks Window select the RELEASE Block (Block number 9) in the model. You can do this by moving the mouse pointer over the Block labeled REL and clicking mouse button 1.
CLICK ON The Release Block in the Blocks Window
then
CLICK ON The Place Icon in the Debug Toolbar
A Stop Condition has now been put on Block 9. You can do this through the Command menu in the Main Window, as well using a Custom Command, but using the Debug Toolbar is easier. Now start the simulation.
CHOOSE
Command / STARTand in the dialog box replace the 1
TYPE
100and
SELECT
OKThe simulation will now stop when the next Transaction is ready to enter the RELEASE Block.
As you can imagine, these techniques will become even more valuable as your model becomes more complex.
The change will be implemented immediately. First Now let’s alter the structure of the model without leaving the Session.
PRESS
[F8]Remember, we loaded a SHOW Command for the customer number Parameter into s early in the lesson. The value returned in the Status line of the Main Window is 54 for the Customer Number.
Let’s remove the STOP on the RELEASE Block.
CHOOSE
Window / Simulation Snapshot / User StopsCLICK ON The Remove All Button
SELECT
OKNow let’s assume you have decided you no longer want each Transaction to carry the customer number in a Parameter. We’ll eliminate the ASSIGN Block. In the Model Window, position the mouse at the beginning of the ASSIGN Block line.
CLICK and DRAG The Cursor to the End of the Line
and
PRESS
[Del]Now in a flash you can retranslate the model and start it running again.
CHOOSE
Command / Retranslateand then
CHOOSE
Command / STARTand in the dialog box replace the 1
TYPE
11111and
SELECT
OKLet the simulation run for a second or two and
PRESS
[F4]to halt the simulation and then
PRESS
[F8]Chances are you got an error message saying that the Parameter doesn’t exist since it is no longer being assigned to new Transactions. Let’s take a look at a way we can make interactive changes in a simulation without having to retranslate the model. We’ll read in a new model to examine this option.
Before we move on, please close all windows relating to the barber model.
The model below deserves a little study before you see how GPSS World allows interactive changes to your simulation while you are in the development and test phases of a project. Take a minute to look at the model shown below.
; GPSS World Sample File - SAMPLE7.GPS
**********************************************************************
*
* Automobile Arrival Simulation
*
* For simplicity, this model only deals with one-way traffic
* in North-South and East-West directions.
**********************************************************************
GENERATE 20,10
;Create next automobile.
QUEUE Eastwest
TEST E X$EWlight,F$Intersection ;Block until green, and
; the intersection is free
SEIZE Intersection
DEPART Eastwest
;End queue time.
ADVANCE 10
;Cross the intersection.
RELEASE Intersection
TERMINATE 1
;Auto leaves intersection.
GENERATE 30,10
;Create next automobile.
QUEUE Northsouth
TEST E X$NSlight,F$Intersection ;Block until green and
; the intersection is free
SEIZE Intersection
DEPART Northsouth
;End queue time.
ADVANCE 10
;Cross the intersection.
RELEASE Intersection
TERMINATE 1
;Auto leaves intersection.
**********************************************************************
*
* Traffic Light Simulation
*
**********************************************************************
GENERATE ,,,1
Begin1 SAVEVALUE NSlight,Red ;North-South light turns red
SAVEVALUE EWlight,Green ;East-West light turns green
ADVANCE Greentime
;Light is green
SAVEVALUE NSlight,Green ;North-South light turns green
SAVEVALUE EWlight,Red
;East-West light turns red
ADVANCE Redtime
;Light is red
TRANSFER ,Begin1
Greentime EQU 200
* When the light is Green (value 0) and the intersection is not busy
* (the State Variable(SNA) F$Intersection evaluates as 0), a car may
* pass into the intersection. These conditions are tested at the TEST
* Block. When the light is red (value 100) or the intersection is
busy
* (SNA F$Intersection returns the value 1), the condition at the TEST
* Block will not be met and the car will not proceed.
Green EQU 0
Red EQU 100
Redtime EQU 300
*
* Do START 4000 EW Congestion builds. Try Greentime EQU 1000. Fine
* but NS congestion builds. Greentime EQU 400 works for both.
This model is of an intersection of two one-way streets. By changing the length of the green light, you can experiment with the effects on the traffic flow. We will open the Plot Window with two variables, one for North-South traffic and one for East-West traffic.
First, open the model
CHOOSE
File / Openand
SELECT
Sample7and
SELECT
OpenThen create the simulation and open the Plot Window.
CHOOSE
Command / Create Simulationand
CHOOSE
Window / Simulation Window / Plot WindowWhen the Edit Plot Window appears, enter the values you see below. Remember to position the mouse pointer at the start of each line and click once before you start to type or use the [Tab] key to go from box to box in a forward direction. Don’t try to use [Enter] to go from box to box.
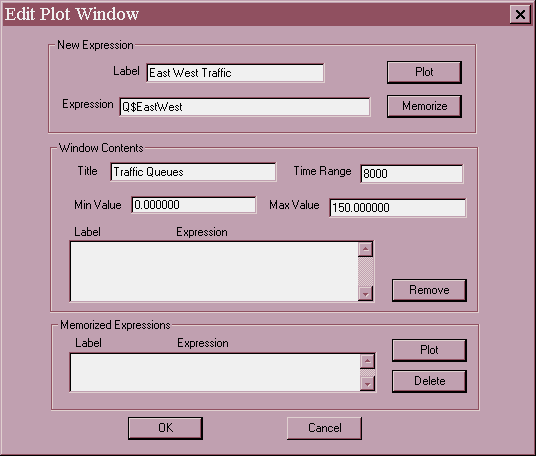
Figure 18—4. The Edit Plot Window.
The label field contains the label used in the legend at the bottom of the plot Next, the Expression box indicates the variable to be plotted. Finally, in the Title field we’ll choose a name that will describe both items that we want to plot, namely the Queues of cars in both directions. The Y-axis values have defaults of 0 and 100. We’ll change only the Max value to 150.
Finally, the time range for each view of the plot must be added. Our time range is 8000. You will want to make this time duration long enough so that it does not flash by as the simulation runs, but not so long that your plot is jammed together. You may have to experiment once or twice to get the correct value. The Plot Window will page horizontally when it reaches the end of the window. You should also be aware that by default only 10,000 plot points are saved for each expression. You can change this setting in the Model Settings Notebook. If you refresh or resize your window or do anything that causes the window to refresh automatically, such as dragging another window over the top of the Plot Window, only the remembered points can be redrawn. Of course, the more points you save, the more memory you will use for this purpose. Since GPSS World makes huge amounts of memory available to you, this is not usually a problem.
To add these values to the plot
CLICK ON The Plot button
and if you want to save the information with this simulation
CLICK ON The Memorize button
Now, you need to add the second variable that we want to plot. Enter only the new Expression and Label. For the Label replace the existing information.
TYPE
North South Trafficand for the Expression, replace the existing information
TYPE Q$NorthSouth
CLICK ON The Plot button
and if you want to save the information with this simulation
CLICK ON The Memorize button
SELECT
OKPosition and size the window for easy viewing and then start the simulation running.
CHOOSE
Command / STARTand in the dialog box and replace the 1.
TYPE
4000and
SELECT
OKYour Plot Window should look something like this. Of course, it will depend where in simulated time you are.
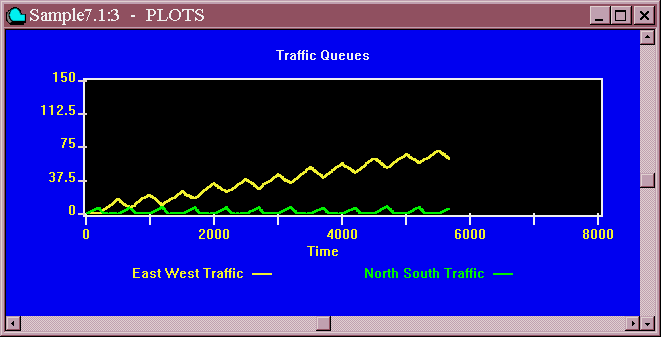
Figure 18—5. Intersection Congestion when Greentime equals 200.
Notice that East-West congestion is building. Interrupt the simulation with
PRESS
[F4]Open up a Custom Command dialog box
CHOOSE
Command / Customand
TYPE
Greentime EQU 1000SELECT
OKthen
PRESS
[F2]This will cause the CONTINUE command to be executed. Now notice that North-South congestion builds. Interrupt the simulation again
PRESS
[F4]Open up a Custom Command dialog box
CHOOSE
Command / Customand
TYPE
Greentime EQU 400SELECT
OKthen
PRESS
[F2]Now, the traffic is flowing reasonably in both directions. Let the simulation run to completion or you can halt it when you are done watching the Plot.
PRESS
[F4]if you prefer.
Close all Windows related to the Traffic Model.
CLICK ON The X-Upper Right of each Window
GPSS World can also call in Command Files consisting of INITIAL statements or other Commands. You can do this either by interactively typing an INCLUDE Command in a Custom Command dialog box or by placing this statement in a Model File.
Read in the Barbershop model.
CHOOSE
File / Openand in the dialog box
SELECT
Barberthen
SELECT
OpenCreate the simulation
CHOOSE
Command / Create SimulationThe following is an example of the command to call in an ASCII file containing Initial Statements as described above. The first command shows how it would be done interactively, the second as part of your program.
CHOOSE
Command / Customand in the dialog box
TYPE
INCLUDE "Init.txt"SELECT
OKRemember, if you have altered the location of the sample files, then, you must assert the file path in this INCLUDE Command.
The contents of this file are:
INITIAL X$One,45
INITIAL X$Two,765
Now, show the values of these Savevalues. The SAVEVALUE entities are created as they are given their initial values.
CHOOSE
Command / SHOWand in the dialog box
TYPE
X$OneSELECT
OKYou should see the value 45 in the Status Line of the Main Window and in the Journal Window. Repeat this process to see the second SAVEVALUE.
CHOOSE
Command / SHOWand in the dialog box
TYPE
X$TwoSELECT
OKand check the value in the Status Line.
Now, add the following line as the last line of the model that you currently see in the Model Window
INCLUDE "Init.txt"
Now, let’s retranslate this model.
CHOOSE
Command / RetranslateWhen the model is retranslated, it will automatically read the external file and create and initial the Savevalues. Show the Savevalues as we did above, if you wish.
Include-files can also be used as we did in the ANOVA Lesson. They make it easy to manage multiple runs of a simulation. Also, unless suppressed, a report will be produced for each completed simulation run. See the GPSS World Reference Manual and Lesson 14 of this manual for more information on report options.
Don’t forget that when you have a complex system of PLUS Procedures to debug, you can turn on the PLUS Trace in the Reports Pages of the Settings. Then every invocation causes a trace record to be written to the Journal Window. These traces are indented to show the depth of the processing, and they list the evaluated arguments of the invocation. It’s easy to trace within PLUS Procedures as well. Just create one or more dummy PLUS Procedures that do nothing. Then you can pepper your PLUS Procedure with calls to this debugging Procedure, and when the PLUS Trace is on the Journal Window will receive trace records showing the state of those variables you used as arguments to the dummy Procedure.
Well, that’s enough for now. In this lesson, you have used some of the interactive capabilities of GPSS World that can be useful when you debug your simulation.
In the next lesson, we begin to explore the experimentation features of GPSS World. We will look at how an Experiment, a special type of PLUS Procedure, can be crafted to perform multiple simulations and analyze the results automatically. See you then.
After you have fully tested your simulation under a variety of conditions, you will probably want to ask it some questions. That’s where experimentation comes in. In order to predict the effects of factors under your control, you will need to simulate each of the possibilities and determine if the result exceeds that due only to random variation. Before proceeding, your simulation should be well tested under even the most stressful of conditions. In addition, it must be equipped to deliver all the metrics to be used in the analysis.
GPSS World contains two automatic Experiment Generators. They are discussed in the next lesson, not this one. Here, we will show you how you can use PLUS to create and execute your own experiments in an efficient way, and then use the ANOVA Library Procedure to analyze the results. In our example, the experiment will consist of three runs, or "replicates" under each of four treatment levels. Replicates are runs of identical conditions except that a different set of seeds is used to prime the pseudo-random number generators. This provides a baseline of variability due only to random effects.
In GPSS World, experiments are defined when you translate a special PLUS Procedure called an Experiment. Other than the replacement of the keyword ‘PROCEDURE’ with ‘EXPERIMENT’ there is no difference between the syntax of an Experiment and that of a Procedure. Actually, there is one extra thing you can do in an Experiment (or in a Procedure called by an Experiment). That is the use the DoCommand Library Procedure. But more on that later. The bottom line is that Experiments inherit all the power of PLUS, making them fully programmable and automatic. Your computer can be grinding out results and exploring response surfaces even while you sleep. Just as with PLUS Procedures, you can insert EXPERIMENT definitions into your Model or you can send them to existing simulations using a Custom Command. In either case, you may find the INCLUDE Command useful, which can be used to point to a Text Object containing lengthy PLUS PROCEDUREs and/or EXPERIMENTs.
To actually run a previously defined Experiment a CONDUCT Command can be introduced interactively if it did not already exist in the Model. To invoke the PLUS Experiment, simply provide a full Procedure invocation as the only operand of the CONDUCT Command.
Once you have begun an Experiment with a CONDUCT Command, your ability to interact with the simulation is somewhat limited. You can always display the running Simulation System Clock ( View / Clock ), but generally you will have to HALT the Experiment in order to examine the Simulation. Then, unless you have planned ahead, you may have to restart the Experiment from the beginning. That’s another reason why it is best to have your testing done before you begin the experimentation. More on this later.
Let’s now look at an Experiment we defined for the TELEPHON.GPS sample model. But before we do, you should skip ahead to Chapter 2 Section 2 to study the internal structure of the Model. See you when you get back.
As you can see, the purpose of the model is to find the best configuration of telephone lines under a predefined set of load factors. We now turn to the ONEWAY.GPS Model that has defined an experiment for the Telephone system model. Go ahead and Open the Model
CHOOSE
File / Openand in the dialog box
SELECT
OneWayCHOOSE
OpenYou should see the following Model Statements
; GPSS World Sample File - ONEWAY.GPS
***********************************************************************
*
* Balanced Telephone System Experiment with
* One-Way Analysis of Variance.
*
* To Determine the Optimal Number of Telephone Lines.
*
* Discussed in Lesson 19 of the Tutorial Manual
*
*
* BestLines() places results in a Global MATRIX MainResult,
* and in a Results File named RESULT.TXT and then performs
* a One Way Analysis of Variance.
*
* To Create an EXPERIMENT that can be HALTed, saved,
* and resumed, you would need to use Global SAVEVALUE
* and/or MATRIX Entities to control the Runs. Also,
* when you use the CLEAR Command, you must use the OFF
* option to preserve control variables and results.
*
***********************************************************************
***********************************************************************
* Define the Global Experimental Result Matrix and Residuals Table *
***********************************************************************
* Max of 4 Treatment Levels of Factor 1, Max of 3 Replicates per cell *
MainResult MATRIX ,4,3
* Initialize Result Matrix to show missing Data
INITIAL MainResult,UNSPECIFIED
* Create Table to receive the ANOVA residuals
MainResult_Residuals TABLE ,-5,1,10
* Chapter 13 of the Reference Manual discusses residuals.
***********************************************************************
EXPERIMENT BestLines(LeastLinesToRun, MostLinesToRun, Increment) BEGIN
/* Each Result Matrix has the following dimensions:
1. Each of up to 5 Factors requires a dimension, where
each dimension indicates the number of levels used
for that factor. Each Factor is represented by a
User Variable.
2. The last dimension indicates the maximum number of
replicates to be run within a treatment combination
(i.e. within a cell of the experiment).
There may be up to a total of 6 dimensions. */
/* Put a Header into the Journal */
DoCommand("SHOW """" ");
DoCommand("SHOW (""**** Balanced Telephone-System
Experiment with
One-way ANOVA ****"")");
DoCommand("SHOW """" ");
/* Optionally, save data to a Result file for later processing. */
Open(2,"RESULT.TXT"); /* Open Stream 2 For Statistical data
*/
Seek(10000,2); /* Append the Results */
Write(2,"**** EXPERIMENT BestLines() ****"); /* Header
*/
LevelOfFactor1 = 1; /* Levels are 1-4, incl.*/
CurrentLines = LeastLinesToRun; /* Set the number of
ines to
use */
WHILE ((CurrentLines <= MostLinesToRun) ‘AND’
(LevelOfFactor1<=4)) DO
BEGIN
Replicate = 1;
WHILE (Replicate <= 3) DO BEGIN
/* Run the Simulation by calling a PROCEDURE (defined below) */
DoTheRun(CurrentLines,Replicate);
/* Store the first (and only) result of this run.
This will be used by the ONEWAY DoCommand, below.
Multiple results would require additional Results Matrices. */
MainResult[LevelOfFactor1,Replicate] =
TB$Transit;
/* Log Result in the Journal, too. This is optional. */
RunDescription =
Polycatenate("Main Result: ",
LevelOfFactor1,
Replicate),
" -
TB$Transit=",TB$Transit,"");
DoCommand("SHOW (RunDescription)");
DoCommand("SHOW """" "); /* Space after
Result */
/* Optional Example of writing to */
/* a Results File for 3rd party
Statistics */
Write(2,RunDescription);
/* Set up the next Replication */
Replicate = Replicate + 1;
END;
/* Move to the next cell of the experiment. */
LevelOfFactor1 = LevelOfFactor1 + 1;
CurrentLines = CurrentLines + Increment;
END;
/* Put the Statistical Analysis into the Journal */
DoCommand("SHOW """" ");/* Space down a
line */
ANOVA(MainResult,2,1); /* Perform the One-Way ANOVA */
/* Replicates in Dimension 2; No interactions (level 1) */
DoCommand("SHOW """" ");/* Space down a
line */
Close(2); /* Close the Optional Results File */
/* All outcomes can now be viewed in the MATRIX Window, or
the RESULTS.TXT Text Object. The ANOVA table is in the Journal. */
END;
PROCEDURE DoTheRun(NumberOfLines, ReplicateNumber) BEGIN
/* A PROCEDURE can issue DoCommand() only */
/* if it is called by an
EXPERIMENT */
TEMPORARY RandomSeed1;
/* Use a seed distinct from those of other replicates */
RandomSeed1 = 11 # ReplicateNumber;
DoCommand("CLEAR OFF"); /* Must use OFF to preserve results.
*/
DoCommand(Catenate("RMULT ",RandomSeed1));
* Here we only
use one RN stream */
DoCommand(Catenate("Sets STORAGE ",NumberOfLines));
DoCommand("START 100,NP"); /* Get past the Startup Period */
DoCommand("RESET"); /* Begin the Measurement Period */
DoCommand("START 1000,NP"); /* Run the Simulation */
END;
; From GPSS World Sample File - TELEPHON.GPS, by Gerard F. Cummings
**************************************************************
*
*
* Telephone System Model
*
*
* Discussed in Section 2.2 of the Tutorial Manual
*
**************************************************************
* Simple Telephone Simulation *
* Time Unit is one minute *
Sets STORAGE 2
Transit TABLE M1,.5,1,20 ;Transit times
GENERATE 1.667,1
;Calls arrive
Again GATE SNF Sets,Occupied ;Try for a line
ENTER Sets
;Connect call
ADVANCE 3,1
;Speak for 3+/-1 min
LEAVE Sets
;Free a line
TABULATE Transit
;Tabulate transit time
TERMINATE 1
;Remove a transaction
Occupied ADVANCE 5,1 ;Wait 5 minutes
TRANSFER ,Again
;Try again
**************************************************************
First, notice that the PLUS Experiment named BestLines calls a second PLUS Procedure called DoTheRun. This is called a "Run Procedure". Its job is to set up the conditions needed for each simulation run. In a User Experiment we must write it ourselves. In the next lesson, we will see that GPSS World can do a lot of the work for us.
When you create a Simulation from a Model, the Procedures will be Translated along with the GPSS Statements and will be registered in the Simulation Object. They are then available to be called at any time. Alternately, we could have sent these PLUS Procedures to an existing Simulation, using a Custom Command and/or an INCLUDE Command.
When we interact with this Simulation we can ignore the BestLines experiment, because it does nothing until a CONDUCT Command is sent to the Simulation. But now, let’s take a closer look at the statements in the EXPERIMENT.
The BestLines Experiment is designed to fill up a Global Matrix with results and pass it to the ANOVA Library Procedure, which creates a statistical analysis and report. We initialize the Matrix elements to UNSPECIFIED so that the ANOVA routine knows which runs have been completed. The generated experiments you will study in the next lesson tests the Result Matrix for the UNSPECIFIED state so that it doesn’t repeat runs that have already been done. You may want to look at a generated experiment as an example. Well, back to the Bestlines Experiment.
In addition to the Result Matrix, we define a GPSS Table entity to receive the residuals when the ANOVA routine does the Analysis of Variance. All we have to do to get the table of residuals is to define a Table with the same name as the Result Matrix except that "_Residuals" is appended to it.
Notice that there is an inner and outer WHILE/DO loop which perform all the simulations needed by the experiment. There is a single experimental factor, namely, the number of telephone lines, with 4 treatment levels. At each treatment level we perform 3 replicates changing only the random number seeds. This improves the estimate of the Standard Error of the Experiment.
Within the innermost loop of the BestLines Experiment, the first Statement calls the Run Procedure, here named "DoTheRun". The Run Procedure uses a set of Commands to initialize and actually run the simulations. Since DoTheRun is called by an EXPERIMENT, it can make calls to the DoCommand Library Procedure. In this way it sends CLEAR OFF, RESET and START Commands to the Simulation. Each time DoTheRun completes, the BestLines Experiment stores the result of the simulation into the corresponding element of the MainResult Global Matrix, which is defined just after BestLines() in the listing. There could be any number of Result Matrices, but each one must have a dimension for each of the experimental factors (up to 5) plus one more for indexing replicates. Since we are doing a One Way ANOVA, the first index of the Result Matrix is for the treatment level, each with a distinct number of phone lines, and a second index allows multiple replicates to be run under each treatment level. Thus, our Result Matrix has two dimensions. When the Experiment is complete, BestLines calls the ANOVA Library Procedure, which writes the statistical report to the Simulation Journal.
Here are some tips for using the DoCommand Library Procedure. Use 4 double quotes around strings within strings. Each inner string should be sandwiched by pairs of double quotes, which get reduced to single quotes when translated. Also, do not pass a string to DoCommand which contains the name of a TEMPORARY variable. Why? Well, the argument string is translated in global scope where TEMPORARY PLUS variables are not accessible. For arguments and temporary variables, construct the string first and only then pass it to the DoCommand Library Procedure.
Normally, GPSS World simulations enqueue all commands (except HALT and SHOW) on a low priority Command Queue and work on them one at a time until the queue is empty. However, DoCommand behaves a little differently. It does not return to the calling procedure until the low priority Command Queue is empty. This means that after a START Command is executed through the DoCommand Library Procedure it does not complete until the simulation is done. Only then does the DoCommand Library Procedure return to the calling statement. In this manner, the Experiment can access the results of a run immediately after it uses DoCommand to START it.
Notice that our sample PLUS Procedure DoTheRun uses the OFF option of the CLEAR Command. If it didn’t, the ResultMatrix Global Matrix would be zeroed and data would be lost. We will be able to open a window on all the results after the experiment completes. But before we do that, take a look at a few other things that are done.
Notice how the SHOW Commands are used to put messages in the Simulation Journal. This is a handy way to keep track of what the Experiment is currently working on. All it takes is a glance at Journal.
The BestLines Experiment also creates a separate plain text results file in the form of a Text Object. Using Manual Simulation mode, the EXPERIMENT sends Open(), Seek(), Write(), and Close() calls to create the Results File, "Result.txt". It can be read by other statistical and data analysis programs, or it can be used simply to make a permanent record of the experimental results.
Well, enough of the preliminaries, let’s run the experiment.
CHOOSE
Command / Create SimulationNow we have the OneWay Simulation Object. We now want to begin the Experiment with a CONDUCT BestLines(1,4,1) The arguments in the CONDUCT Command will be assigned to the LeastLinesToRun, MostLinesToRun, and IncrementLeast variables, respectively. For your convenience we have already loaded the command into a Function Key, as part of the Model Settings. So just
PRESS [F10]
Now take a look at the Journal. The Experiment is running automatically! If we wanted to get fancy, we could run multiple Experiments simultaneously, by creating more than one Simulation Object.
Let’s take a closer look at the System Clock of the running simulation.
CHOOSE
View / Simulation ClockThat puts a running display of the clock down in the lower right corner of the Main Window. Interesting, but it makes the Experiment run a little slower, so let’s turn it off.
CHOOSE
View / Show ClockDoing this again while the Clock is displayed, turns it off.
Now let the Experiment run to completion. This will take a few minutes, so you may want to take a short break.
Welcome back. Wasn’t that easy? We have completed an experiment and done a statistical analysis. First, look at the Results Matrix.
CHOOSE
Window / Simulation Window / Matrix Windowand, since there’s only one Matrix,
CHOOSE
OKIn the Matrix Window you should be able to see all the results neatly tabulated. You may need to enlarge the window in order to see all three replicates of each treatment level. Next, look at the Result File.
CHOOSE
File / Openand in the dialog box go to the ‘Files of type:’ drop-down box and
SELECT
Text File (*.txt)Then in the main box
SELECT
Resultand
CHOOSE
OpenAgain, we see the individual results of the experiment that were placed in the file by the Write() call.
Now let’s take a look at the ANOVA table in the Journal. It should look like this.
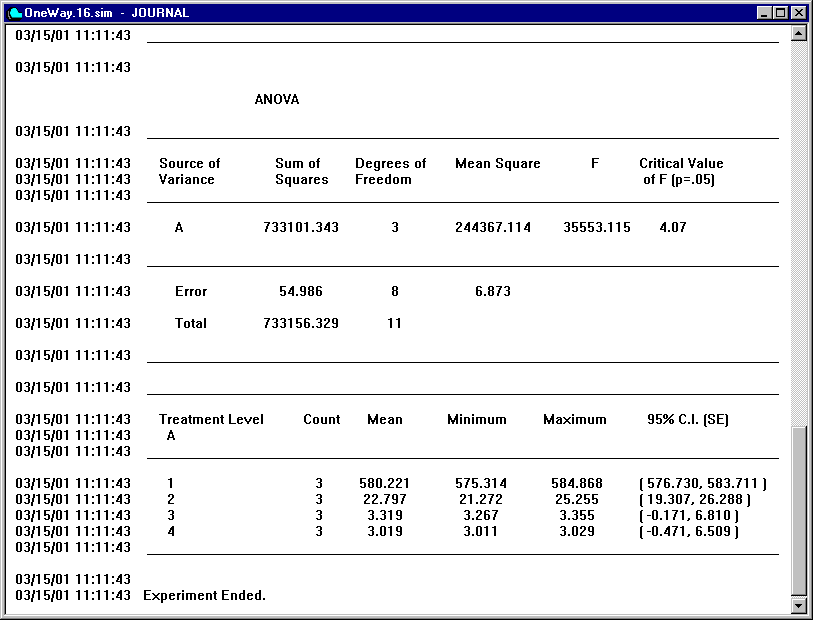
Figure 19-1. ANOVA Table for Bestlines Experiment
From the ANOVA Table we see that the F statistic is so large that there is no question of the number of lines being a determining factor. GPSS World places the "Critical Value of F", which is our standard of comparison for the F Statistic. When the F statistic calculated for a factor of the experiment is greater that the associated Critical Value, we conclude that the effect is significant (at the p=0.05 level.
We move on to the descriptive statistics following the ANOVA table. Here we see that there is only a small improvement in adding more than 3 lines in the configuration. Commonly we would find that the expense of the fourth line would not be justified. We therefore conclude that this system should be configured with three telephone lines, under these load conditions.
Now let’s examine the Table of residuals that the ANOVA routine created. We do this as a check of the assumptions behind the Analysis of Variance. Recall that we get a Table of Residuals because we defined a GPSS Table Entity named MainResult_Residuals, where MainResult is the name of the Result Matrix.
To see the table,
CHOOSE
Window / Simulation Window / Matrix Windowand, since there’s only one Table,
CHOOSE
OK
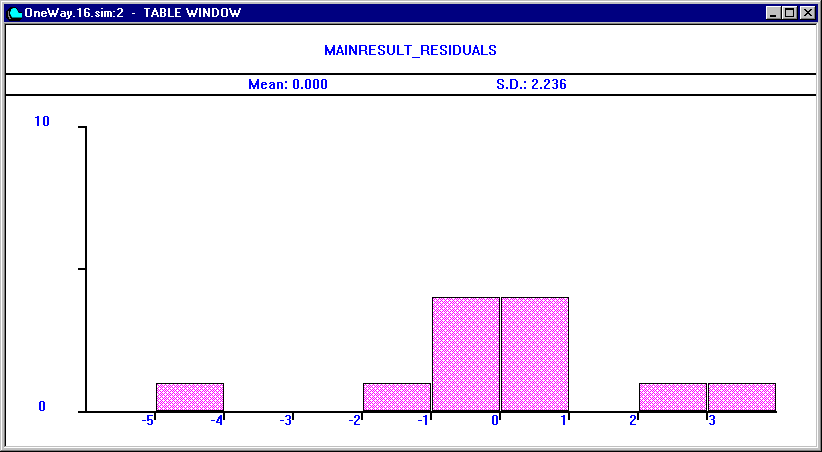
Figure 19-2. Table of Residuals for the Bestlines Experiment
We can get another view of the situation from the descriptive statistics following the ANOVA Table. The Confidence Intervals here are calculated from a pooled estimate of the Standard Error. However we do see some lack of homogeneity as the range of individual yields within a single treatment combination is seen to drop dramatically. Even so, the effectiveness of increasing the number of phone lines is beyond question.
The BestLines Experiment we used here is relatively simple. In the next lesson we proceed to experiments that are created for you from dialogs, namely Screening Experiments and Optimizing Experiments. In the case of the latter, we even get a mathematical description of the Response Surface defined by the experimental observations. Not bad for just a little work on your part to fill in the blanks. See you next time.
In the final lesson we go through the creation of a PLUS Screening Experiment. The good news is that GPSS World is going to do almost all the work for you. The creation of a PLUS Optimizing Experiment is even simpler, and so we will leave you to do that one on your own. In either case, please read Chapter 13 of the GPSS World Reference Manual before continuing.
Generating A PLUS Screening Experiment
Welcome back. We now look in detail at the ExperEther.gps sample model distributed with GPSS World. It is based on a simulation of an Ethernet network. We now go through the steps needed to create a screening experiment intended to expose the most important factors.
First, start up GPSS World and open the ExperEther.gps model in the usual way.
Now, open the Screening Experiment Generator.
CHOOSE
Edit / Insert Experiment / Screening ...This brings up the following dialogue window, which we have filled in with the information needed to generate the screening experiment.
Figure 20-1. The Screening Experiment Generator Dialog
Model Objects will remember experiments that were defined in the past. We have used that fact to fill in the dialog for you. To specify the PLUS Experiment that is about to be generated, we simply fill in the fields of the Dialog. The values you see in the dialog were saved with the ExperEther Model Object. The "Experiment Name" and the "‘Run Procedure’ Name" fields are used as the PROCEDURE names in the generated experiments. The newly created PLUS Experiment will call the Run Procedure repeatedly.
The Factors of the Experiment come next. Each factor name is actually the name of a User Variable and must obey the GPSS World naming conventions. It must begin with an alphabetic character and it must not clash with a keyword, SNA, or SNA class. Since screening experiments in GPSS World are full or fraction 2k experiments, there are two treatment levels to be specified for each factor. You must specify the names and two treatment levels for between 1 and 6 factors, inclusively. Factors must be specified consecutively starting with the A factor. The choice of treatment levels is crucial. You may want to do some preliminary experimentation so that the choices you make are good ones. Choose levels that are far apart to elicit a change of behavior.
The "Fraction" group is next. It allows us to specify what faction of the full 2k experiment is to be run. The run count that will result is specified to the right. Choose a smaller fraction to decrease the run count.
The "Result group box" has a required field. Here you must specify an expression to be evaluated as the metric of the simulation. GPSS World will automatically generate code to define and initialize a Result Matrix to receive the values of this expression. When you CONDUCT the Experiment the result of each run, called a "yield", will automatically find a distinct place in it.
Next we have two checkboxes that allow us to select options. First, you can have GPSS World generate a template Run Procedure to go along with the generated experiment. You can edit this Run Procedure to suit your needs. Second, you can have GPSS World load the appropriate CONDUCT Command into the setting for Function Key 11. If you choose this, after you create the Simulation Object, you only have to press the F11 Function Key to run the experiment.
Before we generate the experiment we should examine the Alias Groups. Let’s investigate what we can do with 4 runs. So we change from a half fraction to an eighth fraction.
CLICK ON The Eighth Button in the Fraction Group
Then we click the Alias Groups button to examine the consequences.
CLICK ON The Alias Groups Button
This brings up the Alias Groups Dialog.
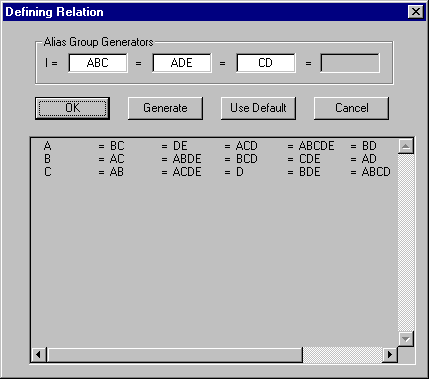
Figure 20-2. Alias Groups (eighth fraction)
In examining the Alias Groups we first look for missing effects and secondly for important effects which are indistinguishable because they are in the same Alias Group. Main effects are denoted by a single letter such as "E" for the main effect of the 5th factor. Similarly, "AE" represents the two-way interaction between the first factor and the fifth factor in the experiment. In Figure 20-2 the effects of the 1/8 fraction are very poor. The E main effect does not appear in any group and therefore even though it is a main effect we will have no information about it. Secondly, the C and D main effects are in the same group and therefore would be indistinguishable.
We could now try different generators for the alias groups. Here are the guidelines. Whatever effects you try as a generator will not appear in an Alias Group, and will therefore be lost. For this reason, high level interactions are generally the best choices. In addition, all modulo-2 products from any combination of generators and product will also be lost. For example if you use ABD and ADE as a generator, ABDADE=AABDDE=BE , that is, BE will also be lost. Each generator you choose must not be derivable from existing generators, and you may not use the identity generator, I. Don’t worry, GPSS World will tell you if you do either of these by accident.
However, in our present situation we know that since there are only 3 Alias Groups, there is no way to distinguish 5 main effects. Close the Alias Groups Dialog.
CLICK ON The Cancel Button
Returning to the Experiment Generator, select a quarter fraction with 8 runs.
CLICK ON The Quarter Button in the Fraction Group
Then open the Alias Group Dialog again.
CLICK ON The Alias Groups Button
Here’s what we see:
Figure 20-3. Alias Groups (quarter fraction)
The Alias Groups in Figure 20-3 show quite an improvement. The main effects are all in separate groups. However, information about two-way interactions would be difficult to interpret. In some circumstances this would be adequate. If not, we could try different generators to try to isolate one or two two-way interactions, but instead we cancel this dialog and choose a larger fraction.
CLICK ON The Cancel Button
Returning to the Experiment Generator, select a half fraction with 16 runs.
CLICK ON The Half Button in the Fraction Group
Then open the Alias Group Dialog again.
CLICK ON The Alias Groups Button
Returning to the Alias Group Dialog, we see:
Figure 20-4. Alias Groups (half fraction)
This design is much better, but it requires us to do 16 runs. It isolates all the main factors, does not confound them with 2-way interactions, and it even isolates the 2-way interactions of the first few main effects. We will generate this experiment, so click the OK button.
CLICK ON The OK Button
It’s time to generate the PLUS Statements and insert them at the bottom of our Model.
CLICK ON The Insert Experiment Button
Since we asked GPSS World to generate a Run Procedure, next we see a Dialog that allows us to personalize it.
Figure 20-5. The Generated Run Procedure
You should make changes you need for your particular simulation, such as:
·
To specify a different nonmeasured warm-up period.·
To Specify the length of the measurement period.·
Conceivably you may want to change the manner in which the treatment levels are assigned to User Variables or the way the random number generators are seeded.In any case, you may want to edit the generated experiment itself in your Model Window. You can change the Run Procedure there, as well. Just click OK and all the new GPSS World Statements are placed at the bottom of your Model.
CLICK ON The OK Button
A sample of the generated code follows in the next two sections.
The Generated Experiment
*******************************************************
*
* ScreenEthernet
* Fractional Factorial Screening Experiment
*
*******************************************************
ScreenEthernet_Results MATRIX ,2,2,2,2,2
INITIAL ScreenEthernet_Results,UNSPECIFIED
ScreenEthernet_NextRunNumber EQU 0
EXPERIMENT ScreenEthernet() BEGIN
/* Run 1 */
Node_Count = 100;
Min_Msg = 256;
Max_Msg = 6072;
Fraction_Short_Msgs = 600;
Intermessage_Time = 1.0;
IF (StringCompare( DataType(
ScreenEthernet_Results[1,1,1,1,1]),
"UNSPECIFIED")’E’0)
THEN BEGIN
/* Set the Run Number Variable at the beginning. */
ScreenEthernet_NextRunNumber = 1;
/* Log the Run and Execute the Simulation */
ScreenEthernet_GetResult();
ScreenEthernet_Results[1,1,1,1,1] = (QT$Global_Delays/1000);
END;
/* Runs 2-15 are omitted for brevity. */
/* Run 16 */
Node_Count = 300;
Min_Msg = 512;
Max_Msg = 24288;
Fraction_Short_Msgs = 300;
Intermessage_Time = 1.0;
IF (StringCompare( DataType(
ScreenEthernet_Results[2,2,2,2,1]),
"UNSPECIFIED")’E’0)
THEN BEGIN
/* Log the Run and Execute the Simulation */
ScreenEthernet_GetResult();
ScreenEthernet_Results[2,2,2,2,1] = (QT$Global_Delays/1000);
END;
/* Aliased Effects in Fractional Factorial Experiment */
SE_Effects(ScreenEthernet_Results,"I=ABCDE");
END;
Running the Experiment
Now we have the big moment! It’s time to CONDUCT the experiment. CONDUCT is the GPSS World Command that is used to invoke an Experiment. The syntax is similar to that of a Procedure Call. But we have a better way. In the Experiment Generation dialog, we chose to have GPSS World load the F12 function key with the appropriate CONDUCT Command. (see Edit / Settings / Function Keys).
To start the execution of the experiment, we must do two things. First we must Translate the Model, thereby creating the Simulation Object.
CHOOSE
Command / Create SimulationThen we issue the CONDUCT Command.
CLICK ON The
[F11] Function KeyThe Experiment goes to work, reporting ongoing status and writing output to the Journal Window of the newly created Simulation Object. Our Screening Experiment will consist of 16 runs. Each yield will be reported in the Journal Window, and then the final results will be tabulated. It will include the effects of each alias group.
The Experiment will take some time on a fast personal computer. While it’s running, you’re free to take a break or do other things. This is one of the advantages of programmable PLUS Experiments. If you’re Model is debugged, the Experiment will run unattended.
The final results are shown in Figure 20-6.
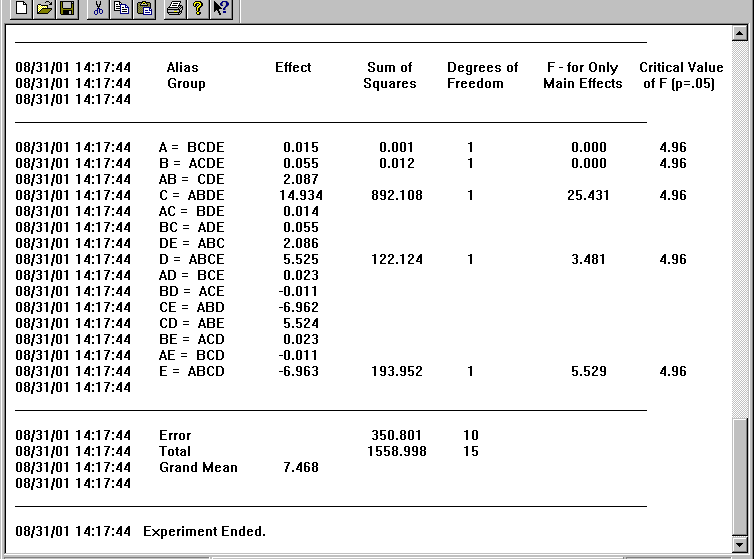
Figure 20-6. The Final Results of Screening Experiment
The results show that the C and E factors had significant effects and are certainly worthy of additional study. Both were aliased with only 4 way interactions, and are most likely the source of the effects measured. None of the other factors including 2 and 3 way interactions were found to be significant.
It should be apparent now what we have gained by using only a fractional factorial experiment. At one half the cost of a full factorial experiment we are able to screen out a large set of factors and interactions. We are now ready to design one or more User Experiments, and finally, an Optimizing Experiment using GPSS World’s other Automatic Experiment Generator. Both Experiment Generators are more fully described in Chapter 13 of the GPSS World Reference Manual.
Well, that’s all for this series of tutorial lessons. Go ahead and end the Session. We hope we have been able to give you a few glimpses of the true simulation power available to you through GPSS World. Much remains to be explored, however, and we suggest that you continue your studies by reading, understanding and running the examples in Chapter 2 of this manual. Also, check out the operating tips at the end of Chapter 13 of the GPSS World Reference Manual. They may save you some time and effort.